前言
本文是笔者所总结的有关 Vue 源码分析系列之一,本篇博文将从 Vue 实例的初始化过程为入口,概述源码执行的过程和相关逻辑;
本文为作者原创作品,转载请注明出处;
Demo
该 Demo 将以最小化的方式来使用 Vue,不采用复杂的脚手架;
- 首先从挂网的 Installation 下载最新的 vue.js,注意,需要下载开发版本的,
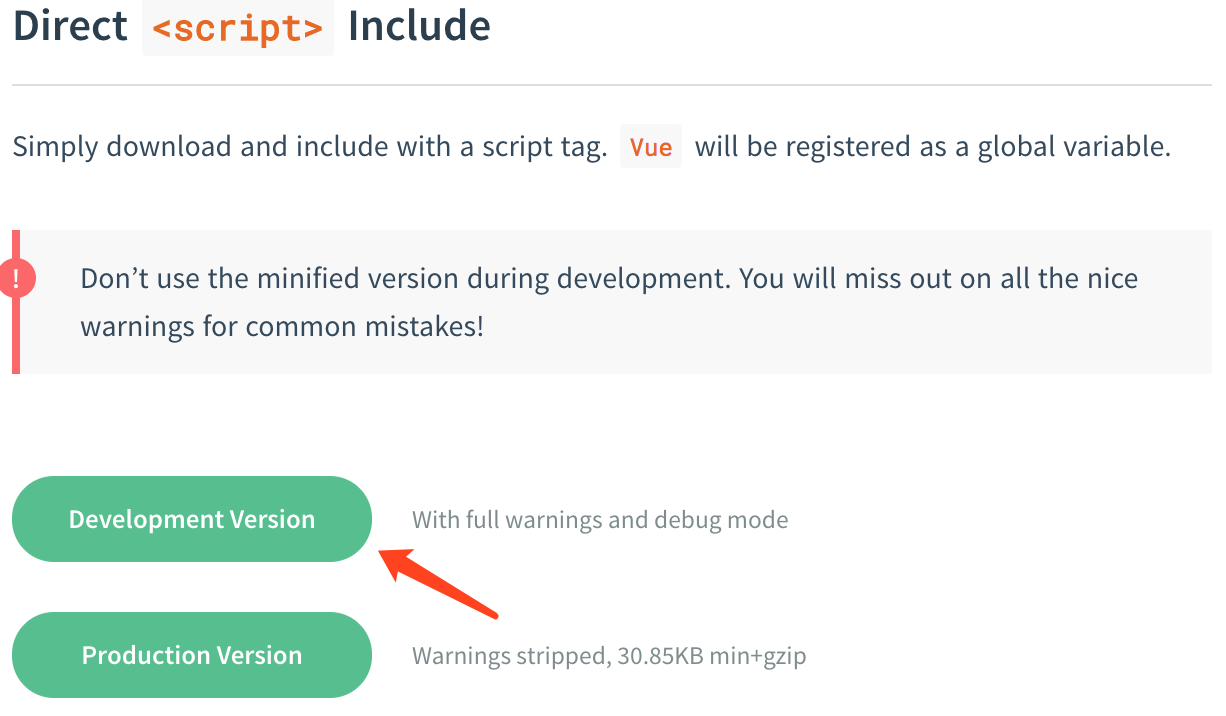
- 将下载好的 vue.js 导入本地工程,本地工程使用 IntelliJ IDEA 所创建的 Static Web Project

测试用例,如上图所示,reactive-in-depth.html
1
2
3
4
5
6
7
8
9
10
11
12
13
14<div id="example">{{ message }}</div>
<script>
var vm = new Vue({
el: '#example',
data: {
message: '123'
}
})
vm.message = 'new message' // change data
vm.$el.textContent === 'new message' // false
Vue.nextTick(function () {
vm.$el.textContent === 'new message' // true
})
</script>这是一个非常简单的 Vue 的用例,通过 Vue 实例中的参数 message 绑定 DOM 中的 message Text,实现 react;笔者通过这个例子的目的是,试图弄清楚 Vue 实例初始化过程中的大致步骤和过程;
流程分析
整体流程
当执行 Vue 的构造函数以后,
1 | var vm = new Vue({ |
其内部构造逻辑对应如下的流程图,
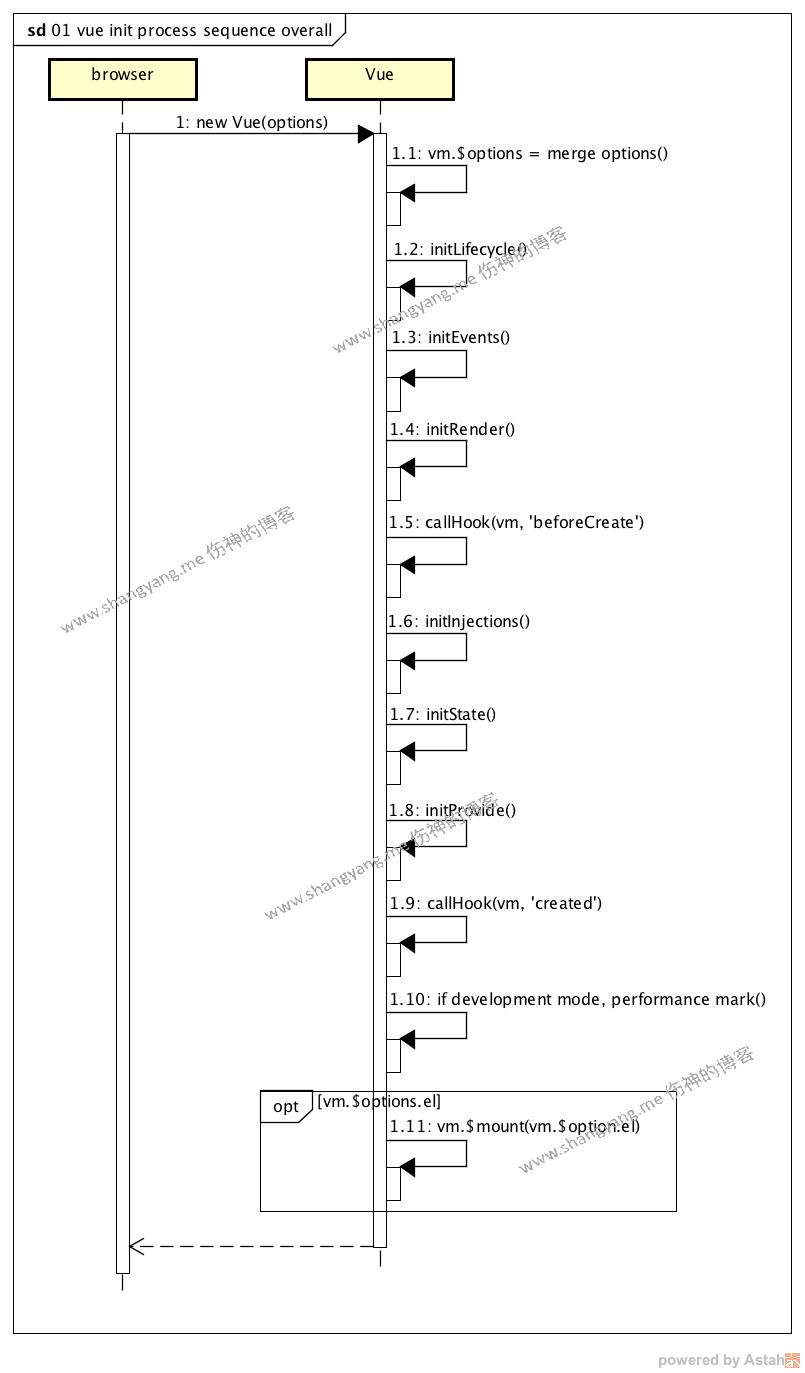
对应的核心步骤有
- merge options
- init Lifecyle
- init Events
- init Render
- init Injection
- init State
- init Provide
- mount option variable el
merge options
1 | vm.$options = mergeOptions( |
注意,这里将 merge 过后的 options 值赋值给了 vm.$options,也就是说,用户创建 vm 实例的时候所传入的配置参数现都存放在 vm.$options 中;
init Lifecycle
1 | function initLifecycle (vm) { |
- 代码第 5 - 11 行,构造 parent children 之间的关系,
- 代码第 13 - 14 行,初始化 vm.$root
- 代码第 19 - 24 行,初始化一系列的重要的实例变量,包括 watcher 等;
init Events
TODO
init Render
1 | function initRender (vm) { |
主要做了下面几件事情,
- resovle Slots
代码第 7 行,将 dom 节点映射成 Slot,就是将 dom 原始节点映射成内存(或者叫做虚拟)节点; - binds createElement function to vm
代码第 13 - 16 行 - define Reactive
代码第 23 - 30 行,注意 ‘$attrs’ 和 ‘$listeners’ 参数原本是不存在的,这里相当于通过 Object.defineProperty() 为 vm 实例定义了这两个参数,并对其进行相应 React 特性的扩展;
init Injection
TODO
init State
1 | function initState (vm) { |
如果没理解错,这个方法应该是整个初始化流程中最核心的方法了,
- 初始化了 vm 的 _watchers 属性
- init props
- init methods
- init data
上述代码第 7 行,这里会读取上述 demo 中的 options 中的 data 对象的 message 属性,并对其进行初始化操作,大致逻辑就是对 message 属性使用 Object.defineProperty() 方法对其进行扩展,并使用 defineReactive 方法对其进行 React 初始化动作,包含了 Dep 相关的逻辑;这部分内容笔者将会在下一篇博文中详细的阐述; - init computed
这部分对应设置了 compouted 对象的场景; - init watch
总结,init State 同样作为 Vue React 的核心初始化步骤,其主要的职责就是为 Vue 实例对象的 data, computed, methods 等属性通过 Object.defineProperty() 扩展出更多的有关 getter & setter 的特性,这样,Vue 实例可以监控这些属性的变化,一旦这些属性发生变化,便可以触发 Vue React;
init Provide
TODO
mount el
步骤 mount el 尤其的重要,其主要工作有,
- 对 el 所指定的参数进行解析得到对应的 DOM Element,
然后生成与该 DOM Element “相关的” Render 方法 ( 备注,这里的“相关”是指 Demo 中的 data.message ↔ div#example 中所定义的 message 之间的关系,既是定义 vm 实例中所使用到的 data.message 属性
1
2
3data: {
message: '123'
}与 div#example
1
<div id="example">{{ message }}</div>
中所定义的 message 之间的关系 );该 Render 方法尤其的重要,当 Vue 发生 React 的行为以后,便调用该 Render 方法对此 DOM Element 进行重新绘制;
初始化 vm 相关的 Watcher 对象,在初始化的过程中根据 data 中的 message 参数对该 DOM 节点进行初始绘制;
下面笔者试图从源码的层面简单的来剖析和梳理一下它的脉络,
1 | if (vm.$options.el) { |
可以看到,将 options 中的 el 属性作为参数调用 vm 的实例方法 $mount(),执行如下的代码,
1 | var mount = Vue.prototype.$mount; |
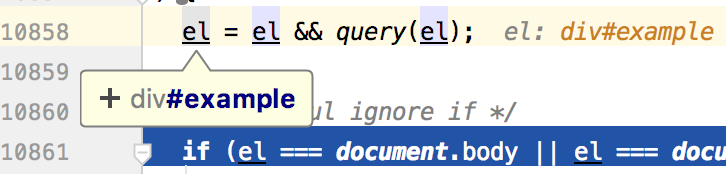
根据 el 的定义 '#example' 通过 document 查找到对应的元素,这里返回的是一个 div 元素,这里笔者为了描述方便,将其命名为 α 元素;相关逻辑参考上述代码第 6 行;
1
2
3
4
5
6
7
8
9
10
11
12
13
14function query (el) {
if (typeof el === 'string') {
var selected = document.querySelector(el);
if (!selected) {
"development" !== 'production' && warn(
'Cannot find element: ' + el
);
return document.createElement('div')
}
return selected
} else {
return el
}
}返回相应的 div element,
要注意的是,el 指定的绝对不能是 document.body 或者 document 相关的元素,否则提示警告并返回;代码 9 - 14 行;上述代码从第 16 行开始直到第 58 行结束,主要就是为了生成 α 元素的 render 方法,那它是怎么做到的呢?
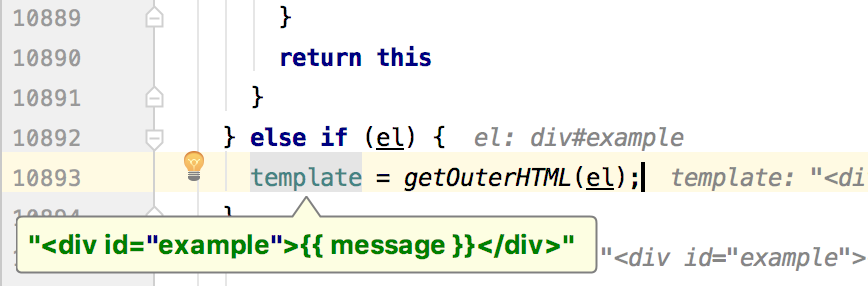
获取 String Template
代码 19 - 42 行,主要逻辑就是从 DOM 中获取得到 α 元素的 String Template,得到的就是一串字符串,如下图所示,
然后调用 compileToFunctions 方法,生成 render 方法,上述代码 49 - 54 行;下面我们来继续剖析一下 compileToFunctions 方法做了什么,它是如何根据 String Template 模板生成 render 方法的,开始分析以前,我们来看看方法的入口,
1
2
3
4
5
6
7
8
9
10
11
12
13
14
15
16
17
18
19
20
21
22
23
24
25
26
27
28
29
30
31
32
33
34
35
36
37
38
39
40
41
42
43
44
45
46
47
48
49
50
51
52
53
54
55
56
57
58
59
60
61
62
63
64
65
66
67
68
69
70
71
72
73
74
75
76
77
78
79
80
81
82
83
84
85function createCompileToFunctionFn (compile) {
var cache = Object.create(null);
return function compileToFunctions (
template,
options,
vm
) {
options = extend({}, options);
var warn$$1 = options.warn || warn;
delete options.warn;
/* istanbul ignore if */
{
// detect possible CSP restriction
try {
new Function('return 1');
} catch (e) {
if (e.toString().match(/unsafe-eval|CSP/)) {
warn$$1(
'It seems you are using the standalone build of Vue.js in an ' +
'environment with Content Security Policy that prohibits unsafe-eval. ' +
'The template compiler cannot work in this environment. Consider ' +
'relaxing the policy to allow unsafe-eval or pre-compiling your ' +
'templates into render functions.'
);
}
}
}
// check cache
var key = options.delimiters
? String(options.delimiters) + template
: template;
if (cache[key]) {
return cache[key]
}
// compile
var compiled = compile(template, options);
// check compilation errors/tips
{
if (compiled.errors && compiled.errors.length) {
warn$$1(
"Error compiling template:\n\n" + template + "\n\n" +
compiled.errors.map(function (e) { return ("- " + e); }).join('\n') + '\n',
vm
);
}
if (compiled.tips && compiled.tips.length) {
compiled.tips.forEach(function (msg) { return tip(msg, vm); });
}
}
// turn code into functions
var res = {};
var fnGenErrors = [];
res.render = createFunction(compiled.render, fnGenErrors);
res.staticRenderFns = compiled.staticRenderFns.map(function (code) {
return createFunction(code, fnGenErrors)
});
// check function generation errors.
// this should only happen if there is a bug in the compiler itself.
// mostly for codegen development use
/* istanbul ignore if */
{
if ((!compiled.errors || !compiled.errors.length) && fnGenErrors.length) {
warn$$1(
"Failed to generate render function:\n\n" +
fnGenErrors.map(function (ref) {
var err = ref.err;
var code = ref.code;
return ((err.toString()) + " in\n\n" + code + "\n");
}).join('\n'),
vm
);
}
}
return (cache[key] = res)
}
}调用的是 createCompileToFunctionFn 所返回的方法句柄 compileToFunctions,下面我们来详细分析一下上述代码的相关行为,
生成 render 方法的 String 模板
上述代码第 40 行,
1
var compiled = compile(template, options);
可以看到,该方法通过解析 div#message DIV 元素既 α 元素的 String 模板,生成了相应的 render 方法的 String 模板并赋值给 compiled 参数;
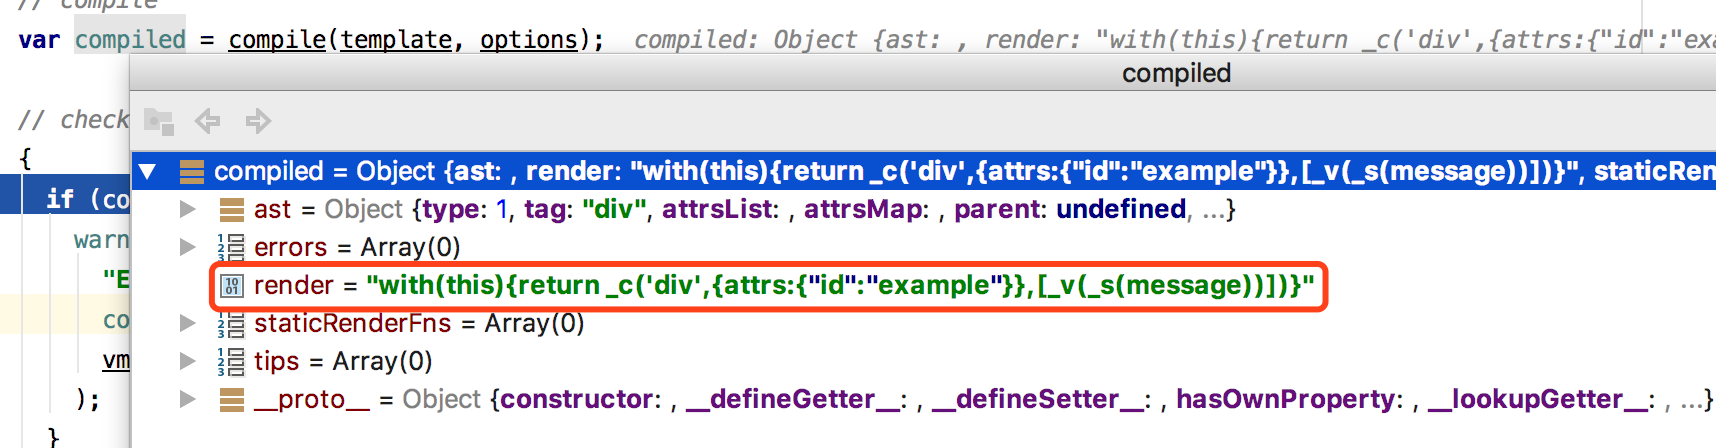
根据 String 模板生成 render 方法
上述代码第 59 行,
1
res.render = createFunction(compiled.render, fnGenErrors);
根据 render 的 String 模板生成相应的 javascript render 方法,
这里生成的这个 render 方法就非常非常的重要了,它描述了如何根据绑定的参数 message 来绘制这个 div 元素既 α 元素;还记得我们是如何绑定的吗?再看看这个 Demo,
1
2
3
4
5
6
7
8
9
10<div id="example">{{ message }}</div>
<script>
var vm = new Vue({
   el: '#example',
   data: {
       message: '123'
   }
})
...
</script>通过 el 绑定 #example DOM 节点,然后 render 方法通过参数 message 值的变化来进行重新绘制(这就是 React,根据所绑定的参数值的变化来实时更新所对应的 DOM 节点);
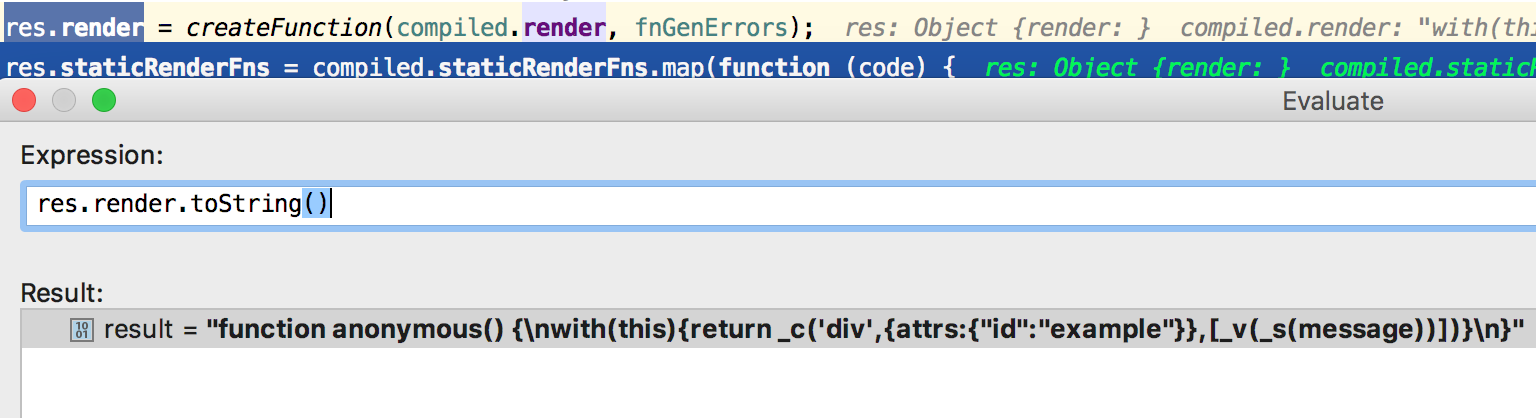
最后,要特别注意的是,这里将上述返回的 render 方法赋值给了 vm.$options 对象,见 Vue.prototype.$mount 代码的 57-58 行,
1
2options.render = render;
options.staticRenderFns = staticRenderFns;后续 vm._render 方法中用来生成 vnode 的 render 就是这里所创建的 render,来先睹为快,
1
2
3
4
5try {
vnode = render.call(vm._renderProxy, vm.$createElement);
} catch (e) {
...
}调用 render 方法生成 vnode;
代码第 67 行,调用 mount.call 方法创建 Watcher 对象并使用 render 方法对 el 元素(既 α 元素)进行首次绘制,
1
2
3
4
5
6
7
8// public mount method
Vue.prototype.$mount = function (
el,
hydrating
) {
el = el && inBrowser ? query(el) : undefined;
return mountComponent(this, el, hydrating)
};入口是另外一个 public 的 Vue.prototype.$mount 方法,调用 mountComponent 方法并返回,下面我们来看看这个方法,
1
2
3
4
5
6
7
8
9
10
11
12
13
14
15
16
17
18
19
20
21
22
23
24
25
26
27
28
29
30
31
32
33
34
35
36
37
38
39
40
41
42
43
44
45
46
47
48
49
50function mountComponent (
vm,
el,
hydrating
) {
vm.$el = el;
...
callHook(vm, 'beforeMount');
var updateComponent;
/* istanbul ignore if */
if ("development" !== 'production' && config.performance && mark) {
updateComponent = function () {
var name = vm._name;
var id = vm._uid;
var startTag = "vue-perf-start:" + id;
var endTag = "vue-perf-end:" + id;
mark(startTag);
var vnode = vm._render();
mark(endTag);
measure(("vue " + name + " render"), startTag, endTag);
mark(startTag);
vm._update(vnode, hydrating);
mark(endTag);
measure(("vue " + name + " patch"), startTag, endTag);
};
} else {
updateComponent = function () {
vm._update(vm._render(), hydrating);
};
}
// we set this to vm._watcher inside the watcher's constructor
// since the watcher's initial patch may call $forceUpdate (e.g. inside child
// component's mounted hook), which relies on vm._watcher being already defined
new Watcher(vm, updateComponent, noop, null, true /* isRenderWatcher */);
hydrating = false;
// manually mounted instance, call mounted on self
// mounted is called for render-created child components in its inserted hook
if (vm.$vnode == null) {
vm._isMounted = true;
callHook(vm, 'mounted');
}
return vm
}代码 12 - 35 行,定义了 updateComponent 方法,14 - 31 行是为开发模式注入额外的日志来进行 measure,其核心就在
1
2
3updateComponent = function () {
vm._update(vm._render(), hydrating);
};通过一个匿名方法封装了 vm._udpate 方法的逻辑,并将该匿名方法的引用赋值给了 updateComponent;下面来简单看看 vm._update 里面的逻辑,
1
2
3
4
5
6
7
8
9
10
11
12
13
14
15
16
17
18
19
20
21
22
23
24
25
26
27
28
29
30
31
32
33
34
35
36
37
38
39
40
41Vue.prototype._update = function (vnode, hydrating) {
var vm = this;
if (vm._isMounted) {
callHook(vm, 'beforeUpdate');
}
var prevEl = vm.$el;
var prevVnode = vm._vnode;
var prevActiveInstance = activeInstance;
activeInstance = vm;
vm._vnode = vnode;
// Vue.prototype.__patch__ is injected in entry points
// based on the rendering backend used.
if (!prevVnode) {
// initial render
vm.$el = vm.__patch__(
vm.$el, vnode, hydrating, false /* removeOnly */,
vm.$options._parentElm,
vm.$options._refElm
);
// no need for the ref nodes after initial patch
// this prevents keeping a detached DOM tree in memory (#5851)
vm.$options._parentElm = vm.$options._refElm = null;
} else {
// updates
vm.$el = vm.__patch__(prevVnode, vnode);
}
activeInstance = prevActiveInstance;
// update __vue__ reference
if (prevEl) {
prevEl.__vue__ = null;
}
if (vm.$el) {
vm.$el.__vue__ = vm;
}
// if parent is an HOC, update its $el as well
if (vm.$vnode && vm.$parent && vm.$vnode === vm.$parent._vnode) {
vm.$parent.$el = vm.$el;
}
// updated hook is called by the scheduler to ensure that children are
// updated in a parent's updated hook.
};首先,可见 vm._render() 方法返回的既是 vnode 节点,然后,上述代码 13 - 26 行,通过 vnode 作为参数调用 vm.__patch__ 方法对 DOM 进行绘制,备注,看官方英文文档的时候,经常会看到 patch 这个单词,从这里就可以看到,其意思就是像打补丁一样对有变换的元素进行局部的修补,已达到性能上的最优化;所以,可以看到 patch 最为核心的就是 vnode,下面,我们来看下 vm._render() 方法是如何构造 vnode 的,
1
2
3
4
5
6
7
8
9
10
11
12
13
14
15
16
17
18
19
20
21
22
23
24
25
26
27
28
29
30
31
32
33
34
35
36
37
38
39
40
41
42
43
44
45
46
47
48
49
50
51
52
53
54
55
56
57
58
59Vue.prototype._render = function () {
var vm = this;
var ref = vm.$options;
var render = ref.render;
var _parentVnode = ref._parentVnode;
// reset _rendered flag on slots for duplicate slot check
{
for (var key in vm.$slots) {
// $flow-disable-line
vm.$slots[key]._rendered = false;
}
}
if (_parentVnode) {
vm.$scopedSlots = _parentVnode.data.scopedSlots || emptyObject;
}
// set parent vnode. this allows render functions to have access
// to the data on the placeholder node.
vm.$vnode = _parentVnode;
// render self
var vnode;
try {
vnode = render.call(vm._renderProxy, vm.$createElement);
} catch (e) {
handleError(e, vm, "render");
// return error render result,
// or previous vnode to prevent render error causing blank component
/* istanbul ignore else */
{
if (vm.$options.renderError) {
try {
vnode = vm.$options.renderError.call(vm._renderProxy, vm.$createElement, e);
} catch (e) {
handleError(e, vm, "renderError");
vnode = vm._vnode;
}
} else {
vnode = vm._vnode;
}
}
}
// return empty vnode in case the render function errored out
if (!(vnode instanceof VNode)) {
if ("development" !== 'production' && Array.isArray(vnode)) {
warn(
'Multiple root nodes returned from render function. Render function ' +
'should return a single root node.',
vm
);
}
vnode = createEmptyVNode();
}
// set parent
vnode.parent = _parentVnode;
return vnode
};
}上述代码第 25 行,调用 vm.$option.render 方法,由前面分析 compileToFunctions 方法的代码可知,该 render 方法就是,
该方法执行完以后,得到 vnode 对象,其结构如下,
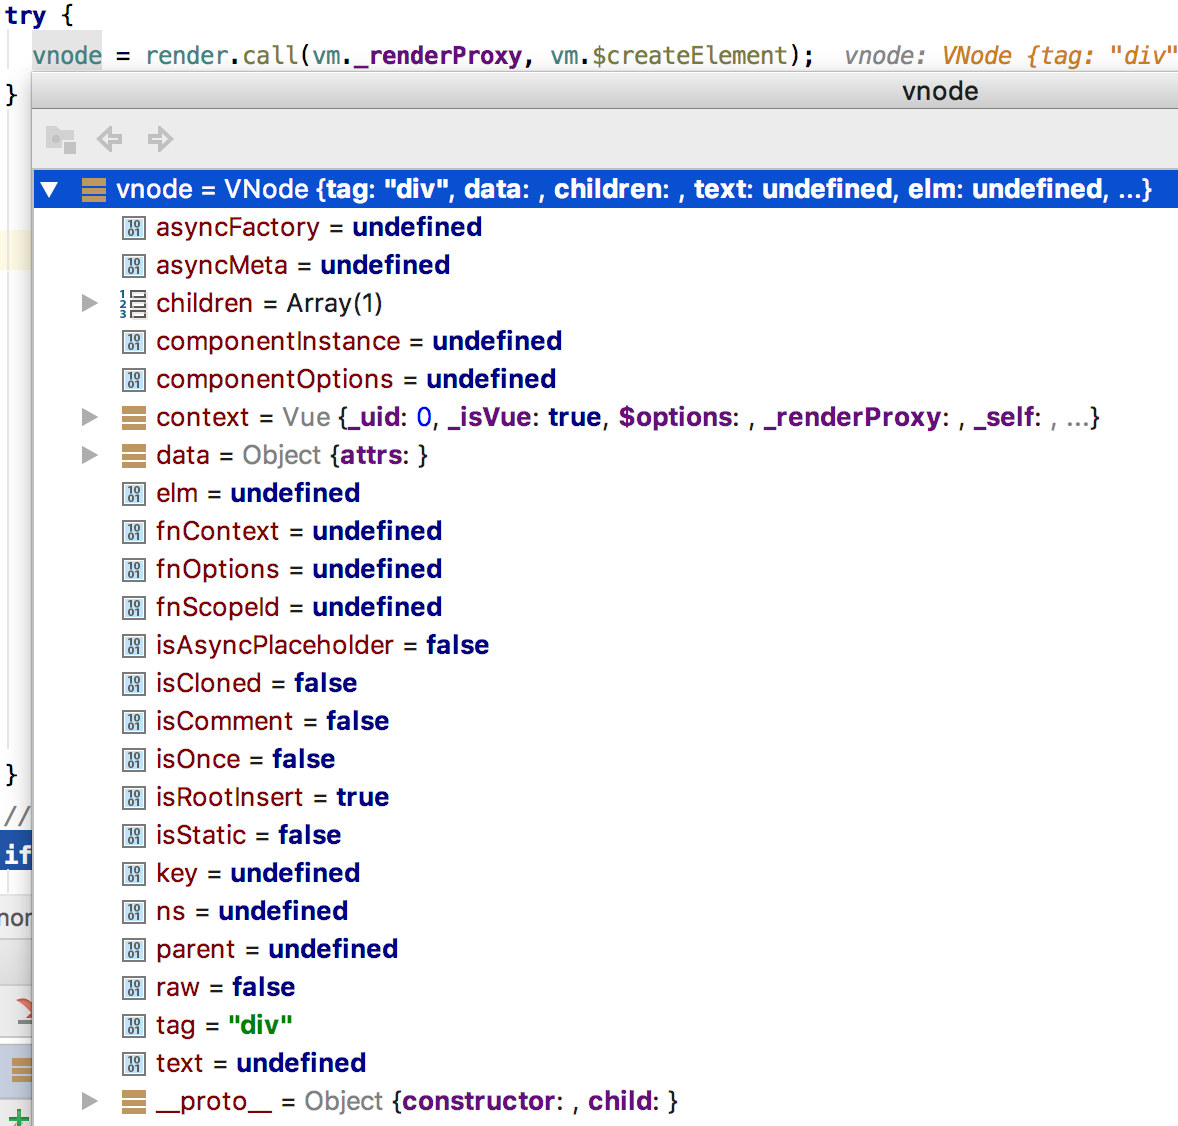
vnode 是 vue 的核心,与其所对应的 DOM node 就像两个相互纠缠的量子,相互映射,当其中的一个量子发生变化,另外一个量子也会马上发生相同的变化;最后,代码第 57 行,返回该 vnode;
所以,综上所述,updateComponent 方法根据 vnode 来绘制其所关联的 DOM 节点,也就是 Vue React 的核心所在;那么 updateComponent 方法又是在什么时候被触发的呢?看下面的分析,
代码第 40 行,通过 Watcher 的构造函数对其进行实例化,
1
new Watcher(vm, updateComponent, noop, null, true /* isRenderWatcher */);
updateComponent 是针对某个 vnode 的 update 句柄,因此这里所创建的 Watcher 同样是针对某个 vnode 的,而一个 vnode 对应一个 React 参数(data 对象中所设置的参数),所以,Watcher 实例与 vnode 是一对一的关系,当如果有多个 React 参数的情况下,一个 vm 实例中会创建多个 Watcher 实例,因此,vm 与 Watcher 之间是一对多的关系,而 Watcher 与 vnode 之间是一对一的关系,而一个 vnode 唯一对应一个 React 参数,所以 vnode 与 React 参数之间是一对一的关系;下面来分析一下 Watcher 的内部构造函数,
1
2
3
4
5
6
7
8
9
10
11
12
13
14
15
16
17
18
19
20
21
22
23
24
25
26
27
28
29
30
31
32
33
34
35
36
37
38
39
40
41
42
43
44
45
46
47
48
49var Watcher = function Watcher (
vm,
expOrFn,
cb,
options,
isRenderWatcher
) {
this.vm = vm;
if (isRenderWatcher) {
vm._watcher = this;
}
vm._watchers.push(this);
// options
if (options) {
this.deep = !!options.deep;
this.user = !!options.user;
this.lazy = !!options.lazy;
this.sync = !!options.sync;
} else {
this.deep = this.user = this.lazy = this.sync = false;
}
this.cb = cb;
this.id = ++uid$1; // uid for batching
this.active = true;
this.dirty = this.lazy; // for lazy watchers
this.deps = [];
this.newDeps = [];
this.depIds = new _Set();
this.newDepIds = new _Set();
this.expression = expOrFn.toString();
// parse expression for getter
if (typeof expOrFn === 'function') {
this.getter = expOrFn;
} else {
this.getter = parsePath(expOrFn);
if (!this.getter) {
this.getter = function () {};
"development" !== 'production' && warn(
"Failed watching path: \"" + expOrFn + "\" " +
'Watcher only accepts simple dot-delimited paths. ' +
'For full control, use a function instead.',
vm
);
}
}
this.value = this.lazy
? undefined
: this.get();
};首先,将当前的 Watcher 实例 push 到 vm._watchers 中,上述代码第 12 行;再次将 updateComponent 方法的引用赋值给了 this._getter,expOrFn 参数的值就是 updateComponent,对应上述代码 32 - 45 行;最后,代码第 48 行,执行 this.get() 方法,
1
2
3
4
5
6
7
8
9
10
11
12
13
14
15
16
17
18
19
20
21
22
23Watcher.prototype.get = function get () {
pushTarget(this);
var value;
var vm = this.vm;
try {
value = this.getter.call(vm, vm);
} catch (e) {
if (this.user) {
handleError(e, vm, ("getter for watcher \"" + (this.expression) + "\""));
} else {
throw e
}
} finally {
// "touch" every property so they are all tracked as
// dependencies for deep watching
if (this.deep) {
traverse(value);
}
popTarget();
this.cleanupDeps();
}
return value
};代码第 6 行,this.getter.call(vm, vm),由上述的分析可知,this.getter 的值就是 updateComponent 的方法引用,所以,这里实际上就是调用 updateComponent,有前面的分析可知,updateComponent 方法的作用就是根据 vnode 绘制相关的 DOM 节点;
最后,笔者使用下面这张流程图来总结上述的逻辑,
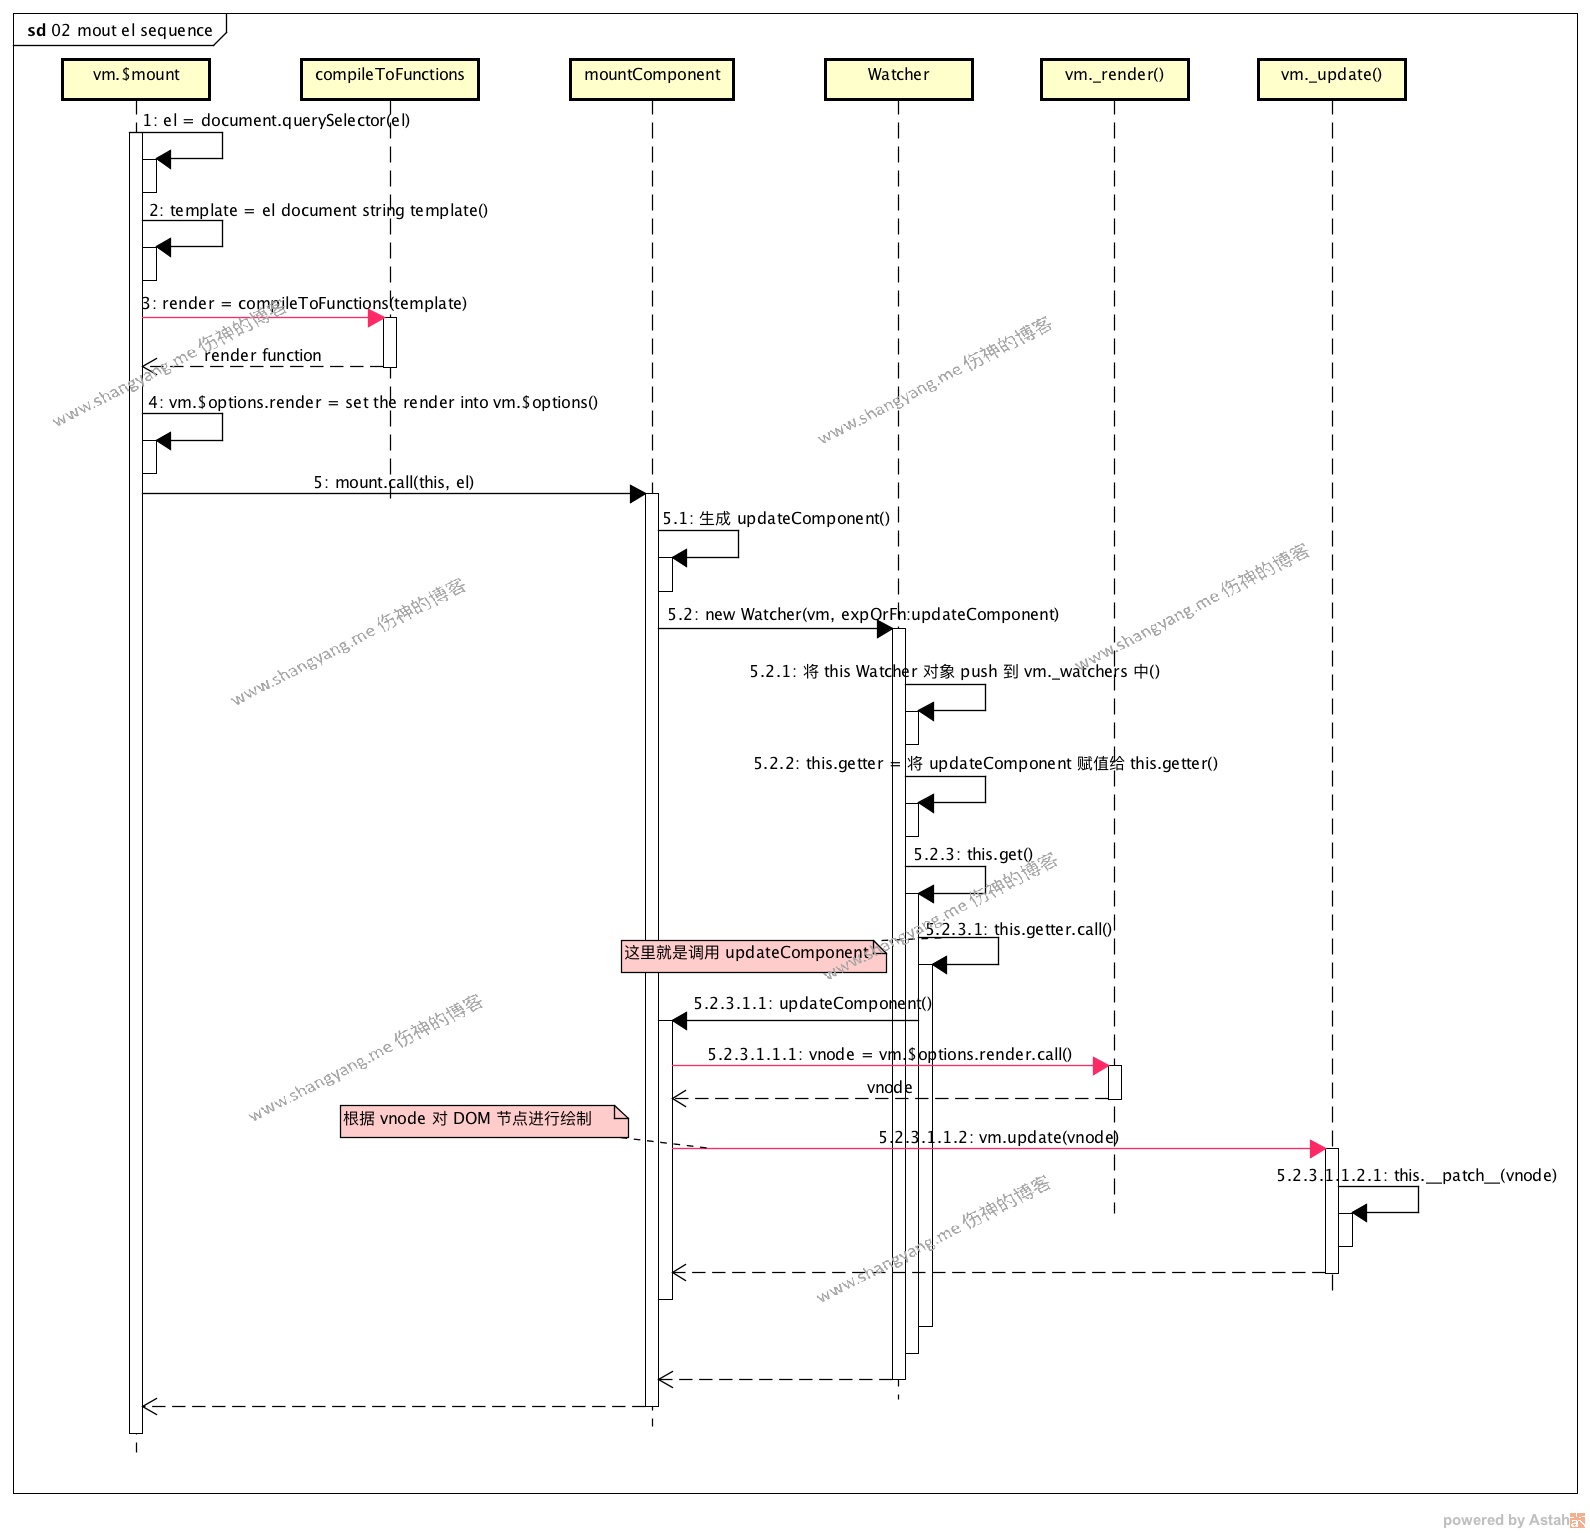
总体而言,通过创建 vnode 绑定 el 所指定的 DOM 元素,创建一个包含了 updateComponent 引用的 Watcher 对象,一旦 vm 实例中的 data 对象的值发生变化( 这里对应的就是 demo 例子中的 data.message 参数值 ),那么将会触发 Watcher 对象,Watcher 对象将会调用 updateComponent 方法对 DOM 节点进行,而 updateComponent 重新绘制 DOM 节点主要就是通过 vnode 和 Vue 实例 vm 的 __patch__ 方法来实现的( 该方法在 vm._update 中被调用 ),这里涉及到了 Vue 的 React 的相关概念,更多有关内容,笔者将会在下一篇博文中进行阐述;不过要知道的是,mount el 步骤作为 Vue React 的核心初始化步骤,为 Vue React 构建了如下的几大核心要素,
- render,主要用来生成 vnode 的,
- vnode,与 DOM 节点相对应的虚拟节点,配合 Vue 实例的 _update 方法来更新视图;
- updateComponent 方法引用,该方法将 render 和 Vue 实例的 _update 方法合并在了一起,这样,一旦调用 updateComponent 便会更具 vnode 来更新 DOM 节点;
- Watcher 实例,每个 Vue 实例对应一个或者多个 Watcher 实例,每个 Watcher 通过其 getter 属性维护了所对应的 updateComponent 方法引用,并且它能够监控 vue 实例 data 对象中属性值的变化,一旦发生变化,将会触发 Watcher 实例中的 updateComponent 方法对 DOM 节点进行重新绘制,至于如何根据属性值的变化而重新绘制 DOM 节点的逻辑笔者将会在该系列的下一篇博文中进行详细的介绍;
可以看到,上述的四个核心要素看似各自相互独立但又互相作用,像一根链条一样环环相扣在一起,在以 Vue React 为核心目的的情况下,其实谁也离不开谁;
Vue 实例的生命周期
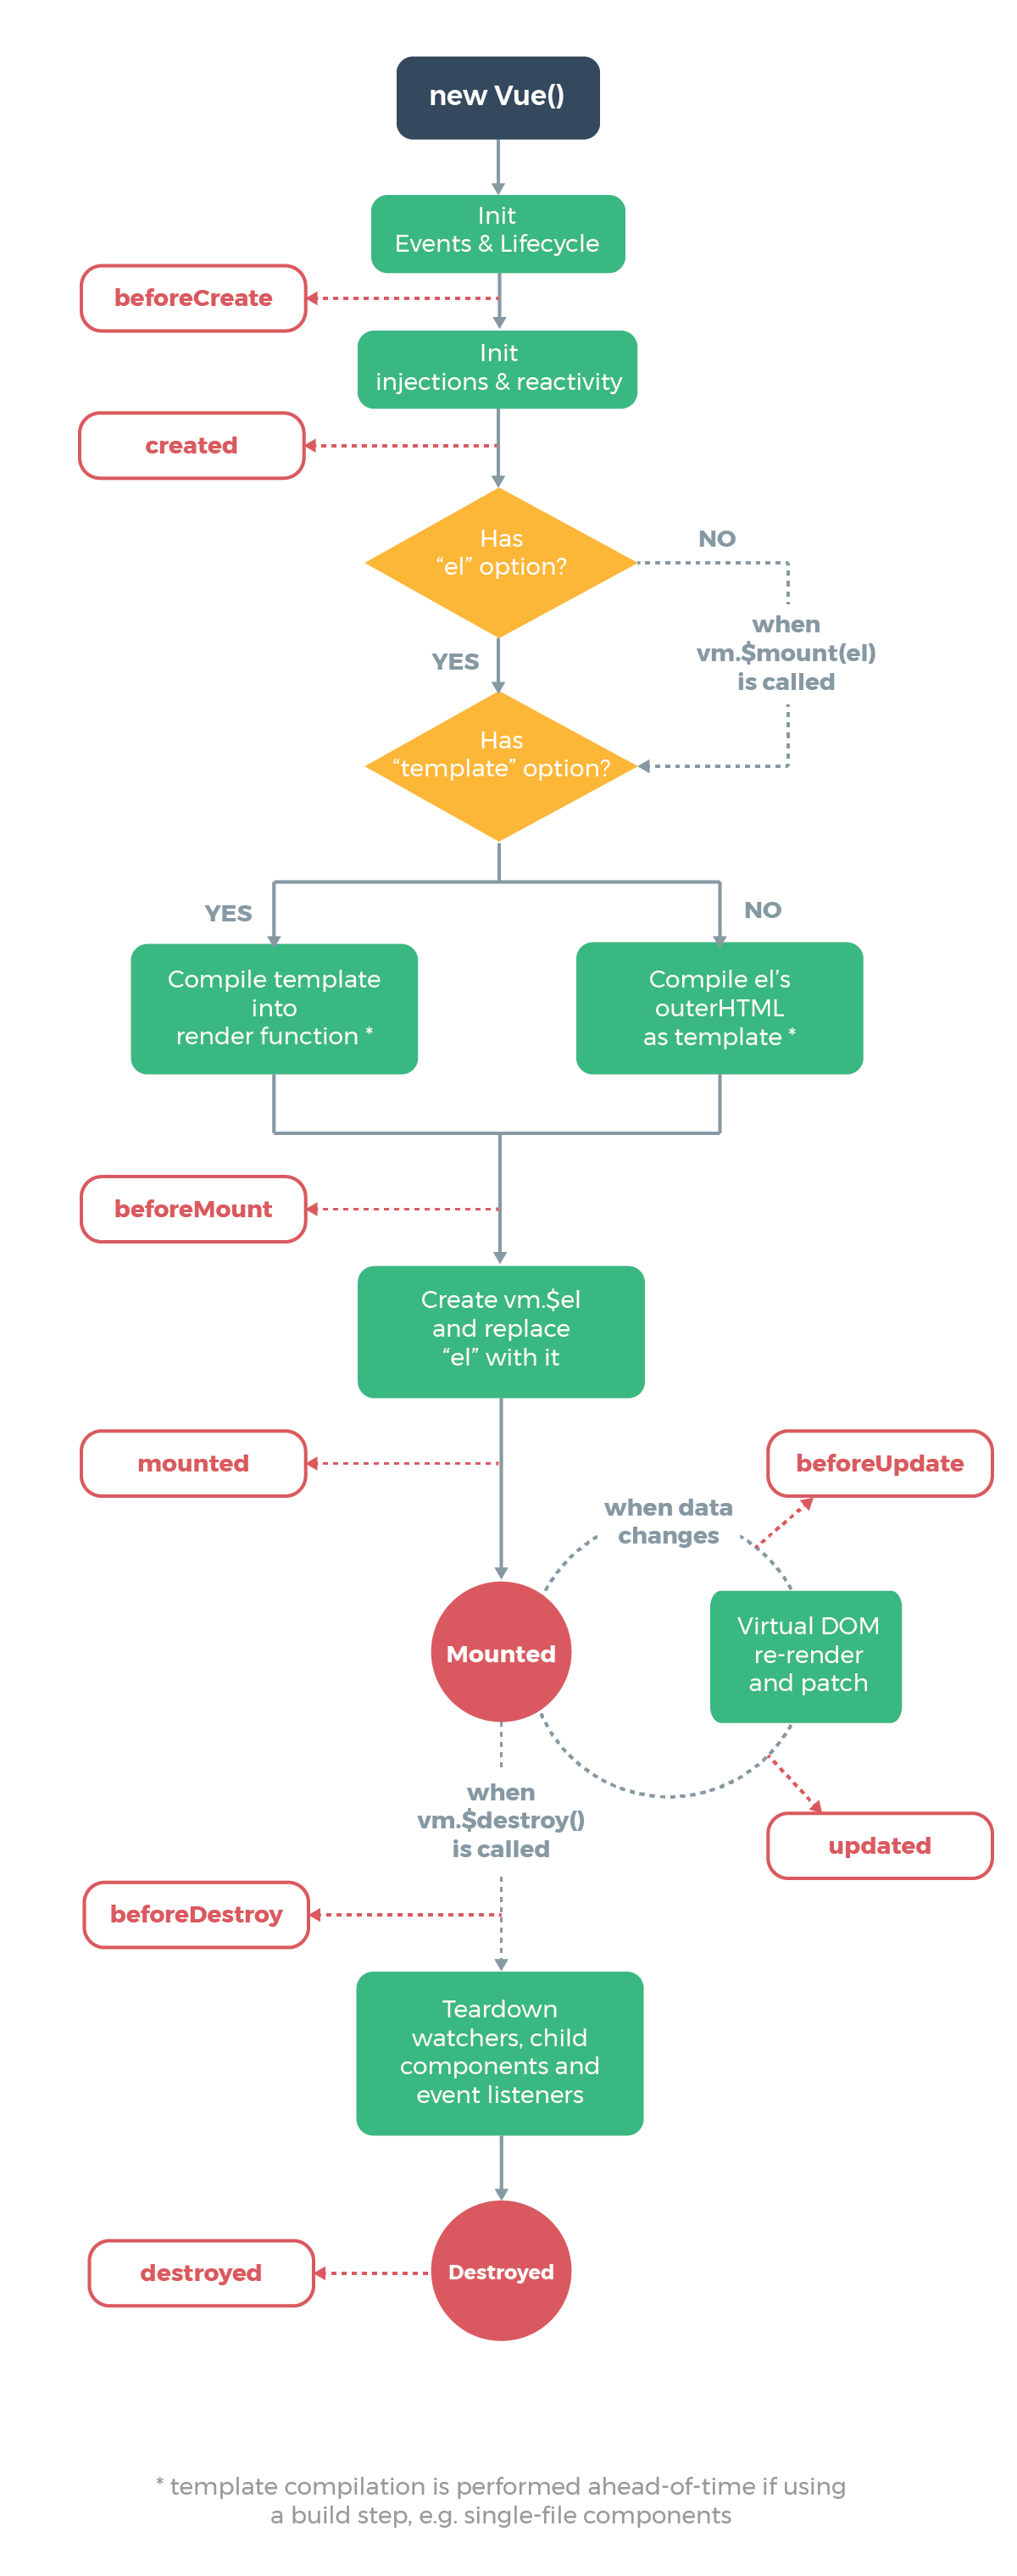
(上面这张图摘自官网 https://vuejs.org/v2/guide/instance.html)
当经过上述的源码分析以后,再回过头来查看这张 Vue 实例的生命周期,便了然于心了,从上面的这张流程图中也可以清晰的看到,最关键的步骤就是发生在调用 vm.$mount(el) 的过程中,注意两个状态,Mounted 和 Destroyed;
- Mounted
该状态既是表示 vnode 已经生成,并通过 updateComponent 方法的引用同时将 Vue 实例的 _update() 方法一起进行绑定,这样便完成了绑定动作,既是当前状态为 Mounted,也就是表示,如果有任何与之关联的属性值发生了变动,那么 Mounted 的 DOM 节点可以随时 React; - Destroyed
当调用 vm.$destroy() 以后,对该 Vue 实例进行销毁以后的状态;
References
https://vuejs.org/v2/guide/
https://cn.vuejs.org/v2/guide/components.html
nextTick 源码分析 https://github.com/answershuto/learnVue/blob/master/docs/Vue.js%E5%BC%82%E6%AD%A5%E6%9B%B4%E6%96%B0DOM%E7%AD%96%E7%95%A5%E5%8F%8AnextTick.MarkDown