前言
本文是笔者所总结的有关 Nodejs Passport 系列之一;本文将从源码分析的角度,来深入剖析 passport 的认证流程;
本文为作者原创作品,转载请注明出处;
综述
OAuth2orize 包模块扩展使得 Express 成为具备 OAuth 2 标准的 Authroization Server;本博文笔者仅对笔者目前所关注的 Resource Owner Password Credentials 的认证流程进行剖析,其它的方式可以触类旁通;
Resource Owner Password Credentials 标准流程概要
使用 Resource Owner Password Credentials 的方式向服务器发起请求要注意如下几点,
- 使用 “application/x-www-form-urlencoded” 的 URL 编码格式向服务器发起请求;
- Client id 和 Client Credentials 需要通过 Basic 的方式进行验证;
- grant_type=password
- username 和 password 同 grant_type 一同放在 Http Body 中 post 给服务器进行验证;
看一个请求的例子,
1 | POST /token HTTP/1.1 |
Demo
项目骨架
参考 OAuth2orize 所推荐的例子来作为源码分析的 Demo;项目工程结构如下,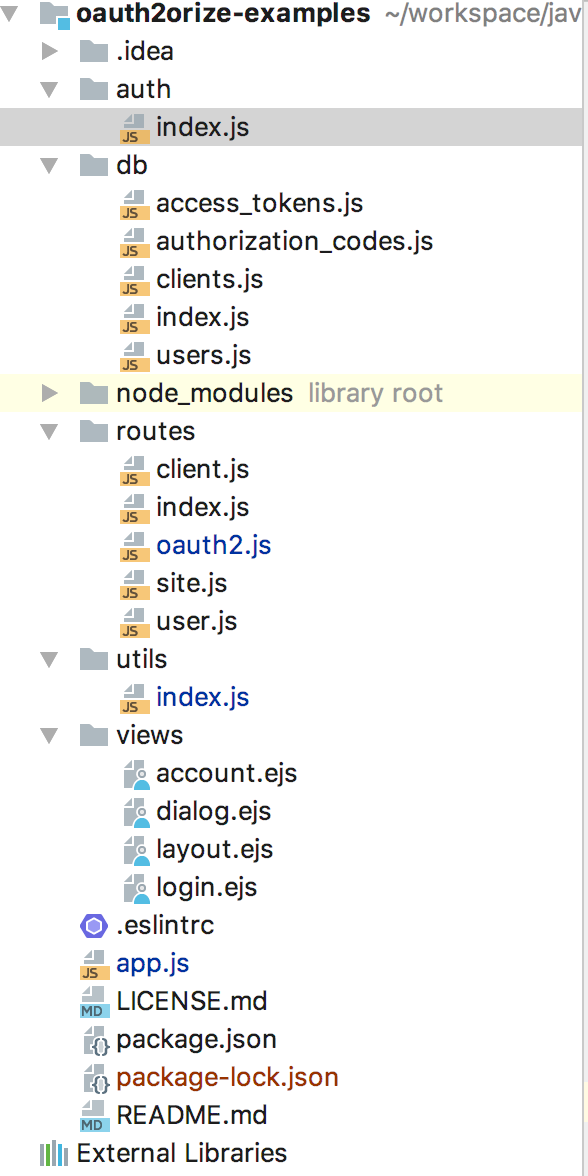
模块结构
项目的各个模块逻辑由下面这张图概括了,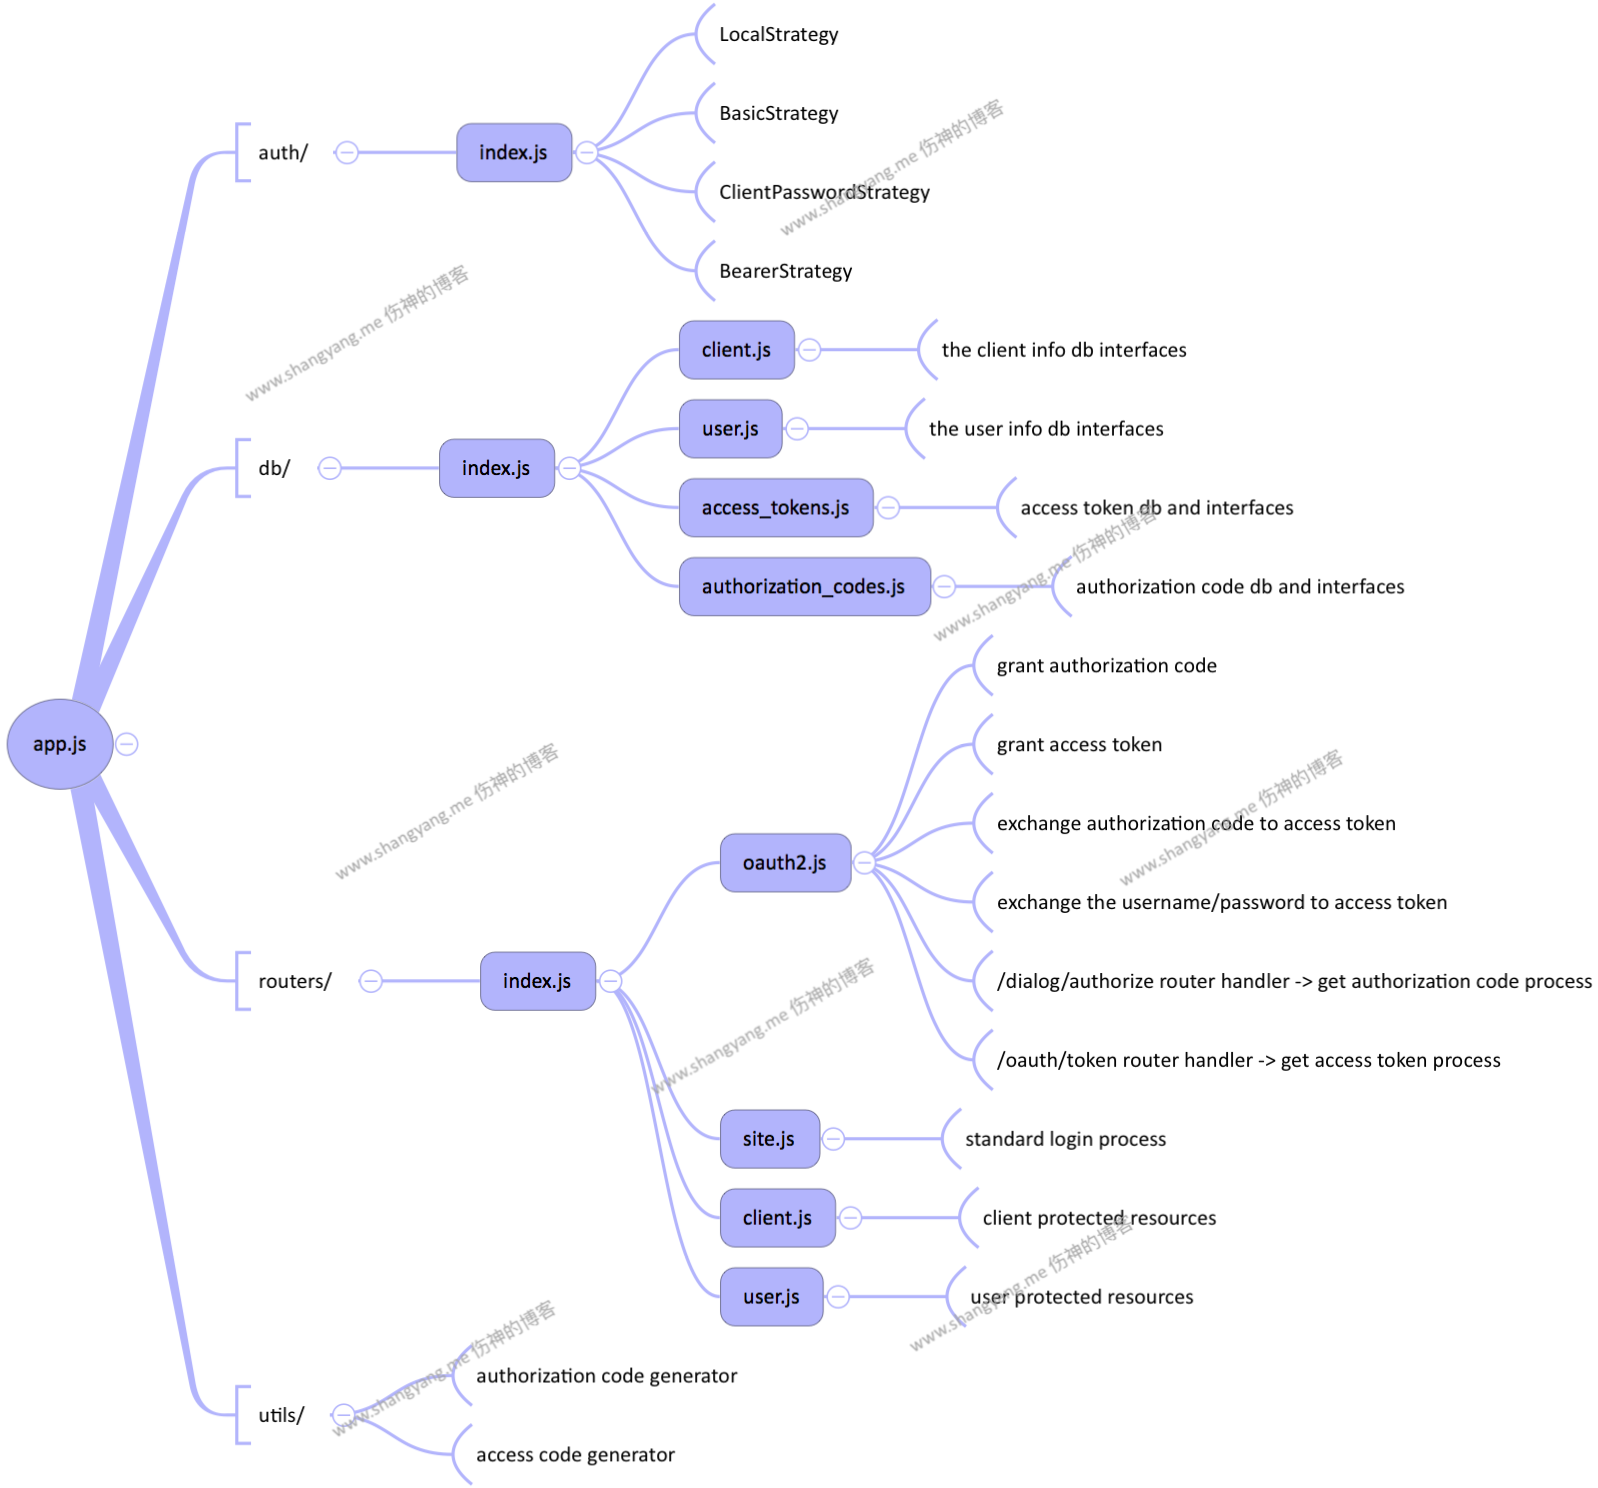
可以看到,主要有三大主模块,auth/、db/ 以及 routers/;auth/ 模块中定义了核心的 Strategies;routers/ 模块里面定义了与 oauth2 相关的 router 的 handlers;
oauth2 模块
auth/index.js 模块
1
2
3
4
5
6const passport = require('passport');
const LocalStrategy = require('passport-local').Strategy;
const BasicStrategy = require('passport-http').BasicStrategy;
const ClientPasswordStrategy = require('passport-oauth2-client-password').Strategy;
const BearerStrategy = require('passport-http-bearer').Strategy;
...可以看到,该模块中定义了各种验证的 Strategies 以及用户自定义的验证回调方法 $\alpha$,$\alpha$ 名字的由来参考上一博文;
- db/ 模块
定义了 user、client、各种 code 的存储和查找的模拟方法; routes/ 模块
里面定义了核心的 routers 的逻辑,先来看一个我们最为熟悉的一个,site.js 模块的实现,1
2
3
4
5
6
7...
module.exports.index = (request, response) => response.send('OAuth 2.0 Server');
module.exports.loginForm = (request, response) => response.render('login');
module.exports.login = passport.authenticate('local', { successReturnToOrRedirect: '/', failureRedirect: '/login' });
...上面这段代码就太熟悉不过了,得到 authenticate.js 模块的 authenticate 方法的句柄和闭包上下文,为之后 /login 请求的验证提供验证方法入口;不过,这现在不是笔者所关心的,笔者关心的是 OAuth 2.0 部分的内容;这部分参考 oauth2.js 模块,里面的实现内容主要分为三大块,
grant
grant authorization code,用来 exchange 得到 access code
1
2
3
4
5
6
7server.grant(oauth2orize.grant.code((client, redirectUri, user, ares, done) => {
const code = utils.getUid(16);
db.authorizationCodes.save(code, client.id, redirectUri, user.id, (error) => {
if (error) return done(error);
return done(null, code);
});
}));grant access token
1
2
3
4
5
6
7server.grant(oauth2orize.grant.token((client, user, ares, done) => {
const token = utils.getUid(256);
db.accessTokens.save(token, user.id, client.clientId, (error) => {
if (error) return done(error);
return done(null, token);
});
}));
exchange
由 authorization code 置换 access token,标准流程,
1
2
3
4
5
6
7
8
9
10
11
12
13server.exchange(oauth2orize.exchange.code((client, code, redirectUri, done) => {
db.authorizationCodes.find(code, (error, authCode) => {
if (error) return done(error);
if (client.id !== authCode.clientId) return done(null, false);
if (redirectUri !== authCode.redirectUri) return done(null, false);
const token = utils.getUid(256);
db.accessTokens.save(token, authCode.userId, authCode.clientId, (error) => {
if (error) return done(error);
return done(null, token);
});
});
}));也可以通过用户名密码以及 client 信息来置换,
1
2
3
4
5
6
7
8
9
10
11
12
13
14
15
16
17
18
19
20server.exchange(oauth2orize.exchange.password((client, username, password, scope, done) => {
// Validate the client
db.clients.findByClientId(client.clientId, (error, localClient) => {
if (error) return done(error);
if (!localClient) return done(null, false);
if (localClient.clientSecret !== client.clientSecret) return done(null, false);
// Validate the user
db.users.findByUsername(username, (error, user) => {
if (error) return done(error);
if (!user) return done(null, false);
if (password !== user.password) return done(null, false);
// Everything validated, return the token
const token = utils.getUid(256);
db.accessTokens.save(token, user.id, client.clientId, (error) => {
if (error) return done(error);
return done(null, token);
});
});
});
}));
router handlers
注册 Authroization Code 鉴权流程的 handler,
1
2
3
4
5
6
7
8
9
10
11module.exports.authorization = [
login.ensureLoggedIn(),
server.authorization((clientId, redirectUri, done) => {
...
}, (client, user, done) => {
...
}),
(request, response) => {
response.render('dialog', { transactionId: request.oauth2.transactionID, user: request.user, client: request.oauth2.client });
},
];注册使用 Resource Owner Password Credentials 鉴权流程的 handler,
1
2
3
4
5exports.token = [
passport.authenticate(['basic', 'oauth2-client-password'], { session: false }),
server.token(),
server.errorHandler(),
];
app oauth2 router
与 oauth2 验证流程相关的 app router 如下,
1 | app.get('/dialog/authorize', routes.oauth2.authorization); |
- /dialog/authorize 请求走的是 Authroization Code 鉴权流程
- /oauth/token 请求走的是 Resource Owner Password Credentials 鉴权流程
需要使用 access token 才能访问的资源,
1 | app.get('/api/userinfo', routes.user.info); |
看其中一个 handler 的实现,routes.user.info
1 | module.exports.info = [ |
可以看到,如果想要访问该资源,必须通过 ‘bearer’ 既 BearerStrategy 的验证;
Resource Owner Password Credentials 请求用例
前置条件
首先,Resource Owner Password Credentials 获取 access token 需要分别使用有效的 client credentials 和 user credentials,可使用如下的 credentials,
client credentials
db/clients.js1
2
3
4const clients = [
{ id: '1', name: 'Samplr', clientId: 'abc123', clientSecret: 'ssh-secret', isTrusted: false },
{ id: '2', name: 'Samplr2', clientId: 'xyz123', clientSecret: 'ssh-password', isTrusted: true },
];可以看到,有效的 client credentials 是 xyz123/ssh-password
user credentials
db/users.js1
2
3
4const users = [
{ id: '1', username: 'bob', password: 'secret', name: 'Bob Smith' },
{ id: '2', username: 'joe', password: 'password', name: 'Joe Davis' },
];可以看到有效的用户有两个,bob 和 joe 都是可以的;
得到 access token
然后,使用 Postman 构建一个 http://localhost:3000/oauth/token 的模拟请求,该请求将会触发 /oauth/token 的 handler,如下所述,1
2
3
4
5exports.token = [
passport.authenticate(['basic', 'oauth2-client-password'], { session: false }),
server.token(),
server.errorHandler(),
];
- 构建 client credentials 参数,此部分要求使用 Basic Auth 的方式进行验证,进行如下配置,
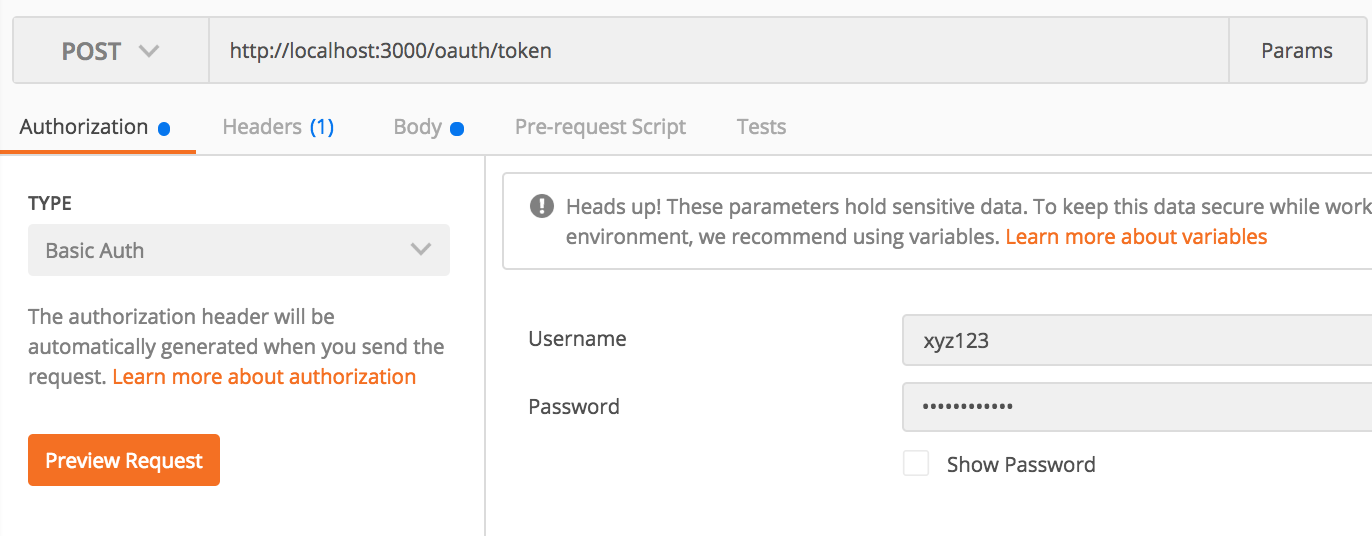
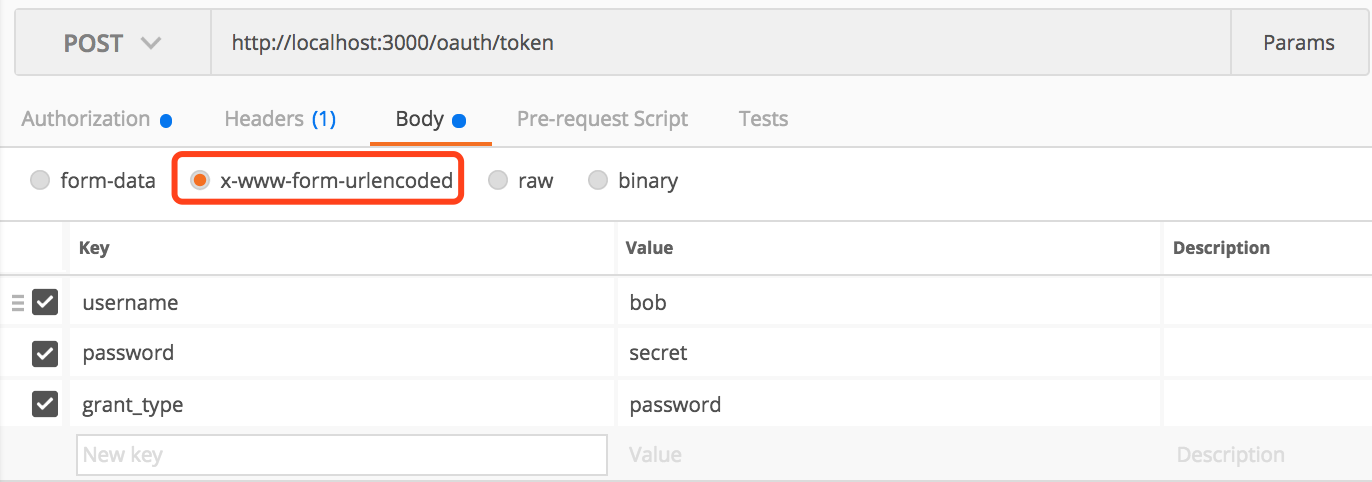
设置以后,Postman 在发送请求的时候,会默认的在 Http Header 中添加字段 Authorization: basic xxx 发送给服务器端进行验证; - 构建 user credentials 和 grant type 参数,此部分尤其要注意的是,必须选择 x-www-form-urlencoded 编码格式,否则验证会失败,
- 测试,点击 send 以后,发送之前记得开启服务器;

这样,我们便获取了由服务器所返回的 token_type 为 Bearer 类型的 access_token;使用该 token,我们便可以获取相应的私有资源了;
使用 access token 获取被保护资源
最后,我们使用上述的 access_token 来模拟访问 user 的被保护资源,用户的被保护资源在 routes/user.js 模块中定义如下,
1 | module.exports.info = [ |
可见,如果要能够访问用户的被保护资源,那么必须通过 Bearer Strategy 的验证;所以,我们使用刚才我们所获得的 access_token 同样使用 Postman 来构建 bearer 类型的请求,这里我们以访问 user 的被保护资源 /api/userinfo 为例来进行相关的配置,选择 Bearer Token,将 access token 输入 token 即可,
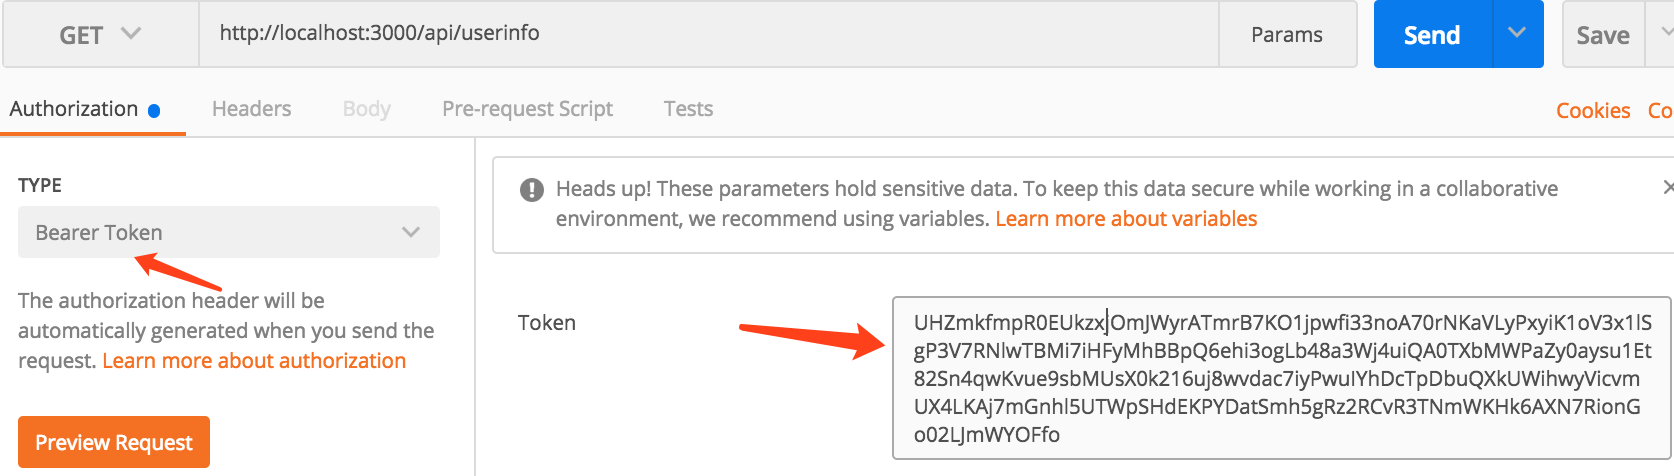
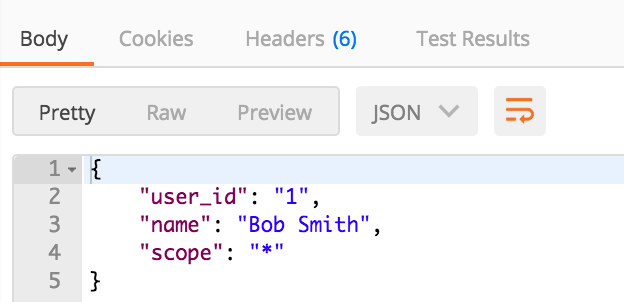
点击 send,即可获取用户的被保护资源的信息,
源码分析
笔者这里仅以 Resource Owner Password Credentials 为例,来分析 oauth2orize 底层的验证执行逻辑,
配置流程源码分析
oauth2orize 初始加载流程
oauth2orize 模块分析
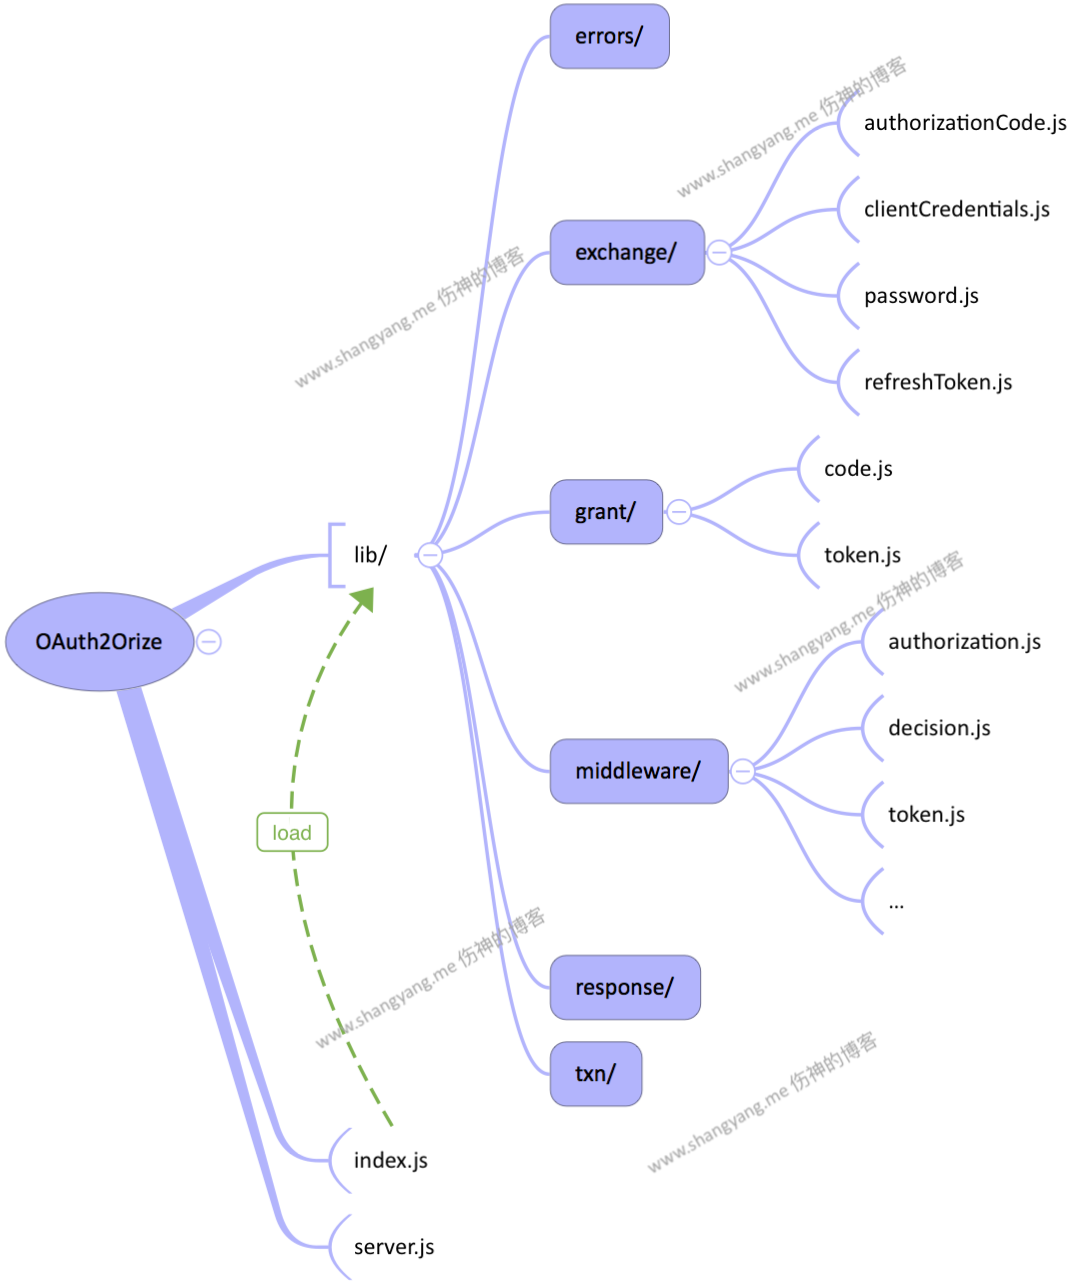
- exchange/
该 package 中分别对应了根据四种不同的 grant_type 请求 token 的模块,- authorization.js 模块对应 grant_type $\to$ authorization_code
- clientCredentials.js 模块对应 grant_type $\to$ client_credentials
- password.js 模块对应 grant_type $\to$ password;该模块是笔者本篇博文着重介绍的场景;
- refreshToken.js 模块对应 grant_type $\to$ refresh_token
- grant/
该 package 中包含了生成 authorization_code 和 access_token 的重要逻辑, - middleware/
该 package 中包含了 oauth2orize 作为 middleware 的各种 handlers;
oauth2orize 初始化流程
oauth2orize 的初始化流程主要发生在 oauth2.js 模块中,其加载的流程图如下,
归纳起来,oauth2orize 的初始化流程主要分为如下几个流程,
加载 grant/ 和 exchange/ 包的模块并通过 module.exports.grant.* 和 module.exports.exchange.* 的方式将核心的对象给暴露出去;不过,要注意的是,其加载的过程是通过扫描文件进行的,对应步骤 1.1
加载 grant/ 的模块并 exports 相关对象,
1
2
3
4
5
6
7
8
9
10
11
12
13exports.grant = {};
fs.readdirSync(__dirname + '/grant').forEach(function(filename) {
if (/\.js$/.test(filename)) {
var name = path.basename(filename, '.js');
var load = function () { return require('./grant/' + name); };
exports.grant.__defineGetter__(name, load);
}
});
// alias grants
exports.grant.authorizationCode = exports.grant.code;
exports.grant.implicit = exports.grant.token;可以看到,通过 fs.readdirSync 方法遍历所有的 .js 文件并进行加载,对应上述代码第 6 行,并直接使用 .js 的文件名作为 exports.grant 对象的属性进行 exports 出去,对应上述代码第 7 行;
加载 exchange/ 的模块并 exports 相关对象,
1
2
3
4
5
6
7
8
9
10
11
12exports.exchange = {};
fs.readdirSync(__dirname + '/exchange').forEach(function(filename) {
if (/\.js$/.test(filename)) {
var name = path.basename(filename, '.js');
var load = function () { return require('./exchange/' + name); };
exports.exchange.__defineGetter__(name, load);
}
});
// alias exchanges
exports.exchange.code = exports.exchange.authorizationCode;加载逻辑与 grant/ 包模块一模一样,不再赘述;只是,要特别注意的是,笔者所关心的一个被 exports 出来的一个方法对象,exports.exchange.password 对应流程中的步骤 1.1.4.4,这里简单的来分析一下 password.js 模块,
1
2
3
4
5
6
7
8
9
10
11
12
13
14
15
16
17
18
19
20
21
22
23
24
25
26module.exports = function(options, issue) {
if (typeof options == 'function') {
issue = options;
options = undefined;
}
options = options || {};
if (!issue) { throw new TypeError('oauth2orize.password exchange requires an issue callback'); }
var userProperty = options.userProperty || 'user';
// For maximum flexibility, multiple scope spearators can optionally be
// allowed. This allows the server to accept clients that separate scope
// with either space or comma (' ', ','). This violates the specification,
// but achieves compatibility with existing client libraries that are already
// deployed.
var separators = options.scopeSeparator || ' ';
if (!Array.isArray(separators)) {
separators = [ separators ];
}
return function password(req, res, next) {
if (!req.body) { return next(new Error('OAuth2orize requires body parsing. Did you forget app.use(express.bodyParser())?')); }
...
}
}可以看到,passport.js 模块 exports 出来的是一个匿名方法,匿名方法中定义了一个新的带闭包的 password() 方法,该方法就是 Resource Owner Password Credentials 鉴权流程的核心中的核心了,该部分内容笔者将会在执行流程源码分析的部分详细的进行介绍;
总结
加载并 exports grant/ 和 exchange/ 包下面的各个模块,并通过 exports.grant 和 exports.exchange 对象的方式将这些模块暴露出去,这样,第三方模块就可以非常方便的引用 grant/ 和 exchange/ 包下面的各个模块了;心得,如果某个包下面的模块较多的话,可以参考使用这种方式将各个模块 exports 出去;
server.grant 流程,对应步骤 5、6、7;看其中的一个例子,grant authorization code
1
2
3
4
5
6
7
8
9
10
11
12
13
14// Grant authorization codes. The callback takes the `client` requesting
// authorization, the `redirectUri` (which is used as a verifier in the
// subsequent exchange), the authenticated `user` granting access, and
// their response, which contains approved scope, duration, etc. as parsed by
// the application. The application issues a code, which is bound to these
// values, and will be exchanged for an access token.
server.grant(oauth2orize.grant.code((client, redirectUri, user, ares, done) => {
  const code = utils.getUid(16);
  db.authorizationCodes.save(code, client.id, redirectUri, user.id, (error) => {
    if (error) return done(error);
    return done(null, code);
  });
}));oauth2orize.grant.code $\to$ oauth2orize/lib/grant/code.js 模块 exports 的 code 方法的句柄,这里的 grant 流程对应就是 Authorization Code 鉴权流程,这里设置了用户自定义的回调方法,该回调方法作为接口实现了 authorization code 的生成和保存的方式;
server.exchange 流程,对应步骤 8、9、10,看 password 的初始化流程
1
2
3
4
5
6
7
8
9
10
11
12
13
14
15
16
17
18
19
20
21
22
23
24
25// Exchange user id and password for access tokens. The callback accepts the
// `client`, which is exchanging the user's name and password from the
// authorization request for verification. If these values are validated, the
// application issues an access token on behalf of the user who authorized the code.
server.exchange(oauth2orize.exchange.password((client, username, password, scope, done) => {
// Validate the client
db.clients.findByClientId(client.clientId, (error, localClient) => {
if (error) return done(error);
if (!localClient) return done(null, false);
if (localClient.clientSecret !== client.clientSecret) return done(null, false);
// Validate the user
db.users.findByUsername(username, (error, user) => {
if (error) return done(error);
if (!user) return done(null, false);
if (password !== user.password) return done(null, false);
// Everything validated, return the token
const token = utils.getUid(256);
db.accessTokens.save(token, user.id, client.clientId, (error) => {
if (error) return done(error);
return done(null, token);
});
});
});
}));做了两件事情,
1. 调用 oauth2orize.exchange.password 方法句柄并设置用户回调方法,
这里我们就来详细的分析一下 oauth2orize.exchange.password 方法句柄是如何注册用户的回调方法的,
oauth2orize/lib/exhange/password.js
1
2
3
4
5
6
7
8
9
10
11
12
13
14
15
16
17
18
19
20
21
22
23
24
25
26
27module.exports = function(options, issue) {
if (typeof options == 'function') {
issue = options;
options = undefined;
}
options = options || {};
if (!issue) { throw new TypeError('oauth2orize.password exchange requires an issue callback'); }
var userProperty = options.userProperty || 'user';
// For maximum flexibility, multiple scope spearators can optionally be
// allowed. This allows the server to accept clients that separate scope
// with either space or comma (' ', ','). This violates the specification,
// but achieves compatibility with existing client libraries that are already
// deployed.
var separators = options.scopeSeparator || ' ';
if (!Array.isArray(separators)) {
separators = [ separators ];
}
return function password(req, res, next) {
...
执行 grant_type=password 的标准 oauth2 流程,并通过 issue 回调用户自定义方法,
...
}
}用户自定义的回调方法通过参数 issue 传入,然后作为内部方法 password 的闭包,最后返回该 password(req, res, next) 方法句柄;所以要注意的是闭包中的参数 issue 保存的是用户自定义的回调方法;后续在执行过程中,将会通过该参数 issue 来回调用户的方法;
2. 注册 password(req, res, next) 方法句柄到 server._exchanges,
oauth2orize/lib/server.js
1
2
3
4
5
6
7
8
9
10
11Server.prototype.exchange = function(type, fn) {
if (typeof type == 'function') {
fn = type;
type = fn.name;
}
if (type === '*') { type = null; }
debug('register exchanger %s %s', type || '*', fn.name || 'anonymous');
this._exchanges.push({ type: type, handle: fn });
return this;
};注意上述代码第 9 行,将 password(req, res, next) 方法句柄( handler )以它的方法名既 password 进行了注册;在“执行流程源码分析”章节的获取 access token 小节中可以看到,是如何通过 this._exchanges 根据 password 关键字获取相应的的方法句柄并得到 access token 的;
总结,
看多了 Node.js 的相关源码,发现最常用的模块化的使用方式是,调用某个匿名的初始化方法 $\alpha$,而 $\alpha$ 中又定义另外一个方法 $\beta$,$\alpha$ 执行结束以后,便可以返回一个带 $\alpha$ 闭包的新的方法句柄 $\beta$;心得,这个有什么好处呢?那就是,可以通过这种方式,直接将用户自定义的配置、方法也好参数也好,统统都可以直接放到这个闭包中,想想,其它语言的配置过程为什么这么复杂,特别是 Java 的 Spring,你看看,得写多么复杂的配置文件或者 @Configuration 代码,写好了还没有完,还必须得辅以特别复杂的解析流程,完了?No,还没完,解析完了以后,还得想办法小心的将这些解析完的信息好好保存,通常是放在 Java 的静态代码块或者是某个全局的缓存对象中,这部分的详细分析可以参考笔者的另一篇博文 《Spring Core Container 源码分析七:注册 Bean Definitions》里面详细的描述了 Spring Container 是如何加载 Bean 的配置文件和过程的,复杂得让你想骂娘,而通过 javascript 的闭包的方式来构建相应的配置,就显得简单得不能再简单了,用户的配置直接通过一个回调方法来配置,而存储这些配置就直接通过方法的闭包,完了,没有更多的东西了;
生成 Router Middleware,下面来关注一下如何获得 access token 的 /oauth/token POST 请求的 router,
1
2
3
4
5exports.token = [
passport.authenticate(['basic', 'oauth2-client-password'], { session: false }),
server.token(),
server.errorHandler(),
];- 使用 Basic Strategy 和 Client Password Strategy 作为获取 token 的前置验证条件;
server.token()
该方法将会返回 middleware/tokens.js 的含 options 闭包的 token(req, res, next) 方法的句柄,相关代码如下,1
2
3
4
5
6
7
8
9
10
11
12
13
14module.exports = function token(server, options) {
options = options || {};
if (!server) { throw new TypeError('oauth2orize.token middleware requires a server argument'); }
return function token(req, res, next) {
var type = req.body.grant_type;
server._exchange(type, req, res, function(err) {
if (err) { return next(err); }
return next(new TokenError('Unsupported grant type: ' + type, 'unsupported_grant_type'));
});
};
};注意,代码第 9 行,调用 server._exchange 方法,这里将会调用 #3 中通过 server.exchange() 方法所注入的 exchanges,比如 password,这部分涉及到了调用过程,具体分析参考调用流程分析;
- 参考 /oauth/token 请求初始化流程,客户端发起 /oauth/token POST 请求后对应的方法句柄;
/oauth/token 请求初始化流程
1 | app.post('/oauth/token', routes.oauth2.token); |
routes.oauth2.token $\to$ routes/oauth2.js
1 | exports.token = [ |
可以看到 /oauth/token 的 post 请求被映射到了 routes/oauth2.js 所定义的 token middleware 上;此部分的详细分析参考 oauth2orize 初始化流程中的 #4;由此可知,当客户端通过 /oauth/token POST 请求请求 access token 调用的既是 server.token() 所初始化所得到的调用方法的句柄,由 oauth2orize 初始化流程分析可知,调用的句柄是 oauth2orize/lib/middleware/token.js 中的方法句柄 token(req, res, next),
1 | module.exports = function token(server, options) { |
方法句柄 token(req, res, next) 既是获取 access token 的入口方法;
BearerStrategy 加载流程
BearerStrategy 是 access token 的标准验证方式,当客户端通过 access token 来获取用户的被保护的信息的时候,服务器端需要使用到 Bearer Strategy 对其进行验证,本章节将重点描述 Bearer Strategy 是如何被加载并初始化的;
用户自定义回调方法
通过 auth/index.js 模块加载,首先来看一下用户自定义的回调函数逻辑,
1 | passport.use(new BearerStrategy( |
用户自定义的匿名回调方法,可以看到,它是从 db.accessTokens 模块中去查找,db/access_token.js 的代码如下,
1
2
3
4
5
6
7
8
9
10
11
12
13
14
15
16
17
18const tokens = {};
module.exports.find = (key, done) => {
if (tokens[key]) return done(null, tokens[key]);
return done(new Error('Token Not Found'));
};
module.exports.findByUserIdAndClientId = (userId, clientId, done) => {
for (const token in tokens) {
if (tokens[token].userId === userId && tokens[token].clientId === clientId) return done(null, token);
}
return done(new Error('Token Not Found'));
};
module.exports.save = (token, userId, clientId, done) => {
tokens[token] = { userId, clientId };
done();
};可简单,直接从 tokens 缓存中去查找,然后通过 done 回调函数处理后续逻辑,
如果从 db.accessTokens 找到了相应的 token,便会回调 6 - 25 行之间的代码,
如果是与 user 相关的 token,则通过 done 回调方法加载用户的信息;
1
done(null, user, { scope: '*' });
注意,这里同时返回了第三方应用可访问资源的 scope;
- 如果是与 client 相关的 token,过程与 user 的大同小异;
BearerStrategy 模块
1 | const BearerStrategy = require('passport-http-bearer').Strategy; |
可知,BearerStrategy 加载的是 passport-http-bearer 模块,
首先,先来看一下它的构造函数,
1 | function Strategy(options, verify) { |
构造函数中,将用户自定义的回调函数通过 verify 参数赋值给了实例变量 this._verify,并且将该实例命名为 ‘bearer’,这样后续在通过 authenticate 方法进行验证的时候,便可以直接通过 ‘bearer’ 名字找到该 BearerStrategy 来进行验证;
其次,来看一下 BearerStrategy 实例的验证方法,
1 | /** |
上述代码整体上包含两部分的执行逻辑,
- 代码 11 - 35 行,依次试图从 headers、body 和 query 中去解析并获得 token,注意,这里的逻辑好玩的是,如果从 headers 中已经解析并得到了 access token,结果 body 中还有 access token 参数,那么就直接抛出 400 错误,请求无效,从 query 中解析的方式同理;
- 代码 39 - 55 行,这里通过 this._verify 回调用户自定义的验证方法,用来验证 access_token 以及执行其它相关逻辑,这部分逻辑与 Local Strategy 的执行逻辑类同,不再赘述;
执行流程源码分析
获取 access token
回顾一下相关的配置代码如下,
1 | app.post('/oauth/token', routes.oauth2.token); |
routes.oauth2.token $\to$ routes/oauth2.js
1 | exports.token = [ |
当客户端通过 /oauth/token POST 请求试图获取 access token 的流程图如下,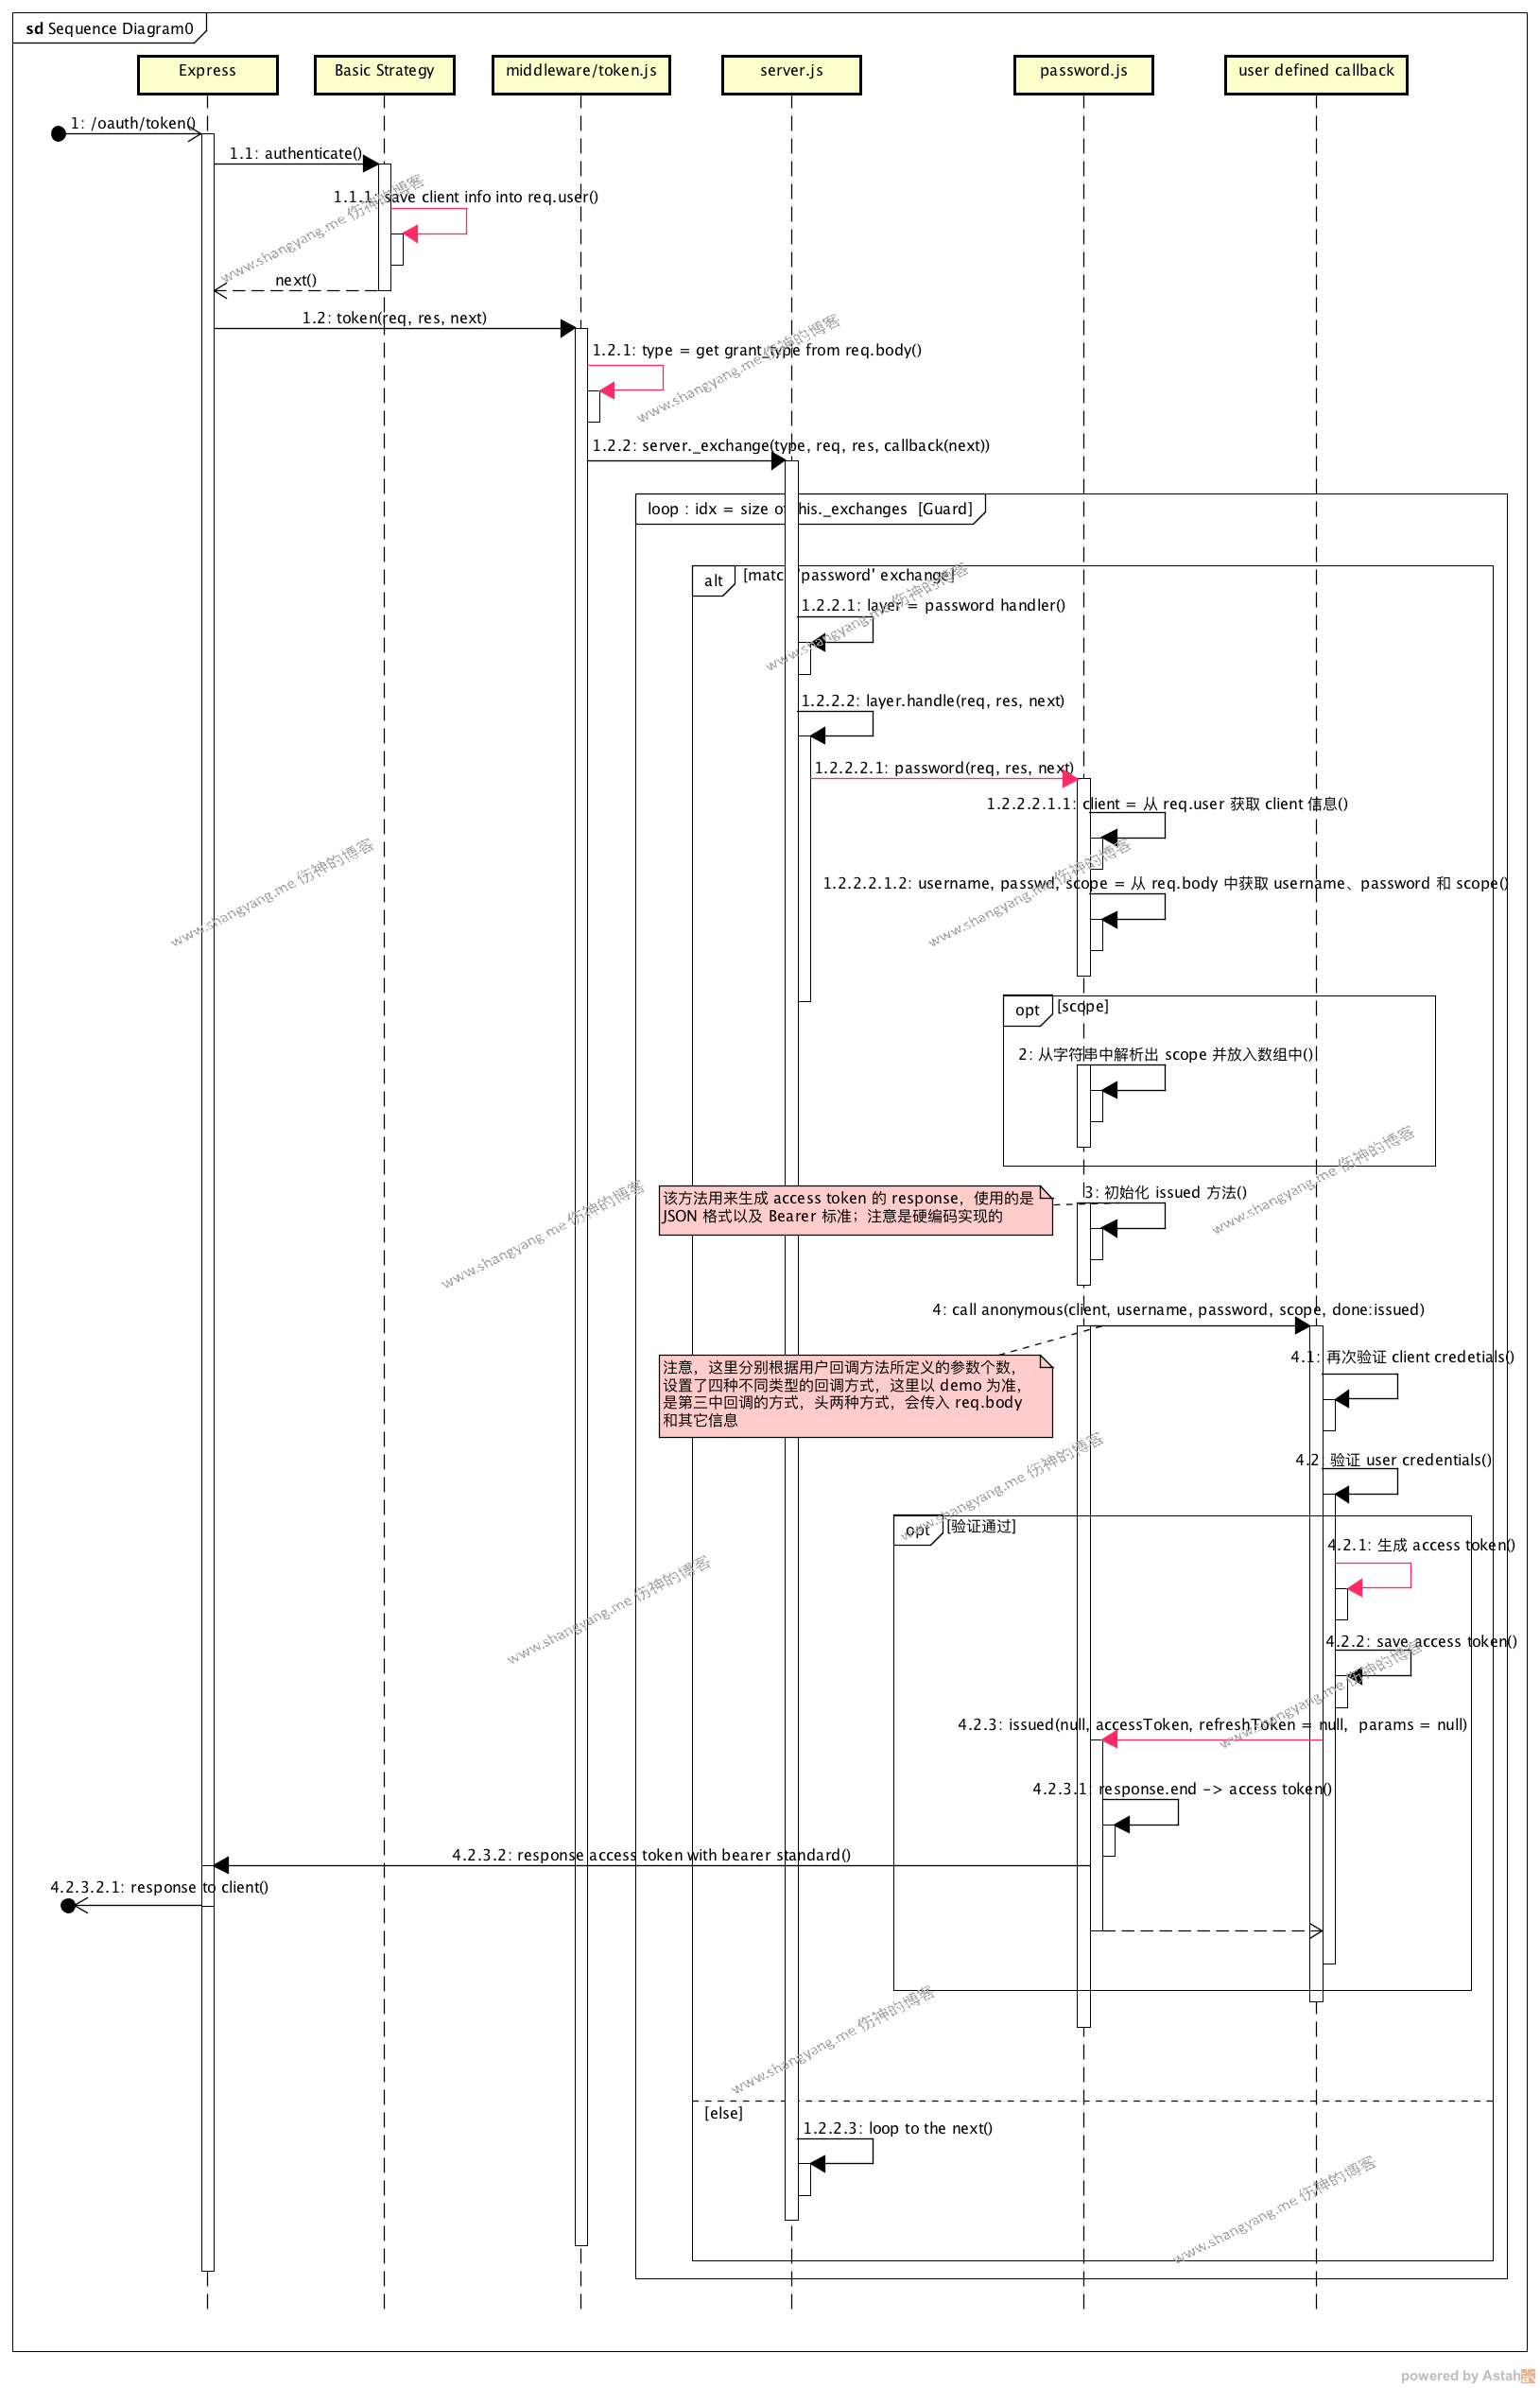
上述流程主要分为两个部分,
第一个部分:使用 Basic Strategy 验证 client credentials,
主要逻辑就是通过从 Http Header 中的 Authorization 中获得 Base 64 编码的 Client Credentials 进行验证;这是要注意的是,这里验证通过以后,通过回调函数 done() 是将 client 信息注入 request 中而不是 user,
auth/index.js1
2
3
4
5
6
7
8
9
10
11
12function verifyClient(clientId, clientSecret, done) {
db.clients.findByClientId(clientId, (error, client) => {
if (error) return done(error);
if (!client) return done(null, false);
if (client.clientSecret !== clientSecret) return done(null, false);
return done(null, client);
});
}
passport.use(new BasicStrategy(verifyClient));
passport.use(new ClientPasswordStrategy(verifyClient));
这里要注意的是,一旦通过 Basic Strategy 验证成功以后,便会将 client 用户的身份信息保存在 req.user 对象中;
第二个部分:通过 password 模块验证 user credentials 并颁发 access token
由 /oauth/token 请求初始化流程的分析可知,这一步实际上调用的是 oauth2orize/lib/middleware/token.js$token(req, res, next),所以如果要调试的话,断点需要打在这个方法上面;整个流程大致如下,
- 通过 grant_type 的类型从 server._exchanges 找到对应的方法句柄,demo 中的例子使用的是 password 的句柄;对应流程图中的 loop 逻辑以及步骤 1.2.2.1;
调用 password 方法句柄,
- 解析 client、user 以及 scope 参数,
对应步骤 1.2.2.2.1,调用过程中要注意 scope 实际上是可以通过 req.body 进行参数传递的,也就是说,客户端的 Form 表单中可以添加一个 scope 字段表示它所请求的 scope 范围,不过从后续的分析可知,客户端所请求的 scope 是否能够被接受,是用户通过自定义的回调方法来决定的; 回调用户自定义的回调方法,
1
2
3
4
5
6
7
8
9
10
11
12
13
14
15
16
17
18
19
20server.exchange(oauth2orize.exchange.password((client, username, password, scope, done) => {
// Validate the client
db.clients.findByClientId(client.clientId, (error, localClient) => {
if (error) return done(error);
if (!localClient) return done(null, false);
if (localClient.clientSecret !== client.clientSecret) return done(null, false);
// Validate the user
db.users.findByUsername(username, (error, user) => {
if (error) return done(error);
if (!user) return done(null, false);
if (password !== user.password) return done(null, false);
// Everything validated, return the token
const token = utils.getUid(256);
db.accessTokens.save(token, user.id, client.clientId, (error) => {
if (error) return done(error);
return done(null, token);
});
});
});
}));首先,再次验证了 Client Credentials(其实笔者觉得这里没有必要了,因为 Client Credentials 已经通过 Basic Strategy 验证过了),然后验证 User Credetials,若通过,则调用 util.js 模块生成 access token,并通过回调方法 done 将 access token 反馈给 password 方法对象;备注,done 回调的是 password 中的 issued 方法;
- 解析 client、user 以及 scope 参数,
- 回调 issued 方法,生成 response,结束
1
2
3
4
5
6
7
8
9
10
11
12
13
14
15
16
17
18
19
20function issued(err, accessToken, refreshToken, params) {
if (err) { return next(err); }
if (!accessToken) { return next(new TokenError('Invalid resource owner credentials', 'invalid_grant')); }
if (refreshToken && typeof refreshToken == 'object') {
params = refreshToken;
refreshToken = null;
}
var tok = {};
tok.access_token = accessToken;
if (refreshToken) { tok.refresh_token = refreshToken; }
if (params) { utils.merge(tok, params); }
tok.token_type = tok.token_type || 'Bearer';
var json = JSON.stringify(tok);
res.setHeader('Content-Type', 'application/json');
res.setHeader('Cache-Control', 'no-store');
res.setHeader('Pragma', 'no-cache');
res.end(json);
}
通过 access token 访问被保护资源
本章节以获取资源 /app/userinfo 为例演示如何通过 access token 获取用户的被保护资源,
先来看相关的配置流程
router 的相关配置
1
app.get('/api/userinfo', routes.user.info);
router.user.info $\to$ routes/user.js
1
2
3
4
5
6
7
8
9
10module.exports.info = [
passport.authenticate('bearer', { session: false }),
(request, response) => {
// request.authInfo is set using the `info` argument supplied by
// `BearerStrategy`. It is typically used to indicate scope of the token,
// and used in access control checks. For illustrative purposes, this
// example simply returns the scope in the response.
response.json({ user_id: request.user.id, name: request.user.name, scope: request.authInfo.scope });
}
];可以看到,直接使用 Bearer Strategy 来进行验证,若通过,则相关资源;备注,相关的 oauth 的信息是保存在 request.authInfo 对象中的;
Bearer Strategy 的配置参考 BearerStrategy 加载流程,这里要注意用户的回调方法,回顾一下,
1
2
3
4
5
6
7
8
9
10
11
12
13
14
15
16
17
18
19
20
21
22
23
24
25
26
27passport.use(new BearerStrategy(
(accessToken, done) => {
db.accessTokens.find(accessToken, (error, token) => {
if (error) return done(error);
if (!token) return done(null, false);
if (token.userId) {
db.users.findById(token.userId, (error, user) => {
if (error) return done(error);
if (!user) return done(null, false);
// To keep this example simple, restricted scopes are not implemented,
// and this is just for illustrative purposes.
done(null, user, { scope: '*' });
});
} else {
// The request came from a client only since userId is null,
// therefore the client is passed back instead of a user.
db.clients.findByClientId(token.clientId, (error, client) => {
if (error) return done(error);
if (!client) return done(null, false);
// To keep this example simple, restricted scopes are not implemented,
// and this is just for illustrative purposes.
done(null, client, { scope: '*' });
});
}
});
}
));用户的回调方法是被注册在 BearerStrategy 中的实例私有属性 _verify 中的,
passport-http-bearer/lib/strategy.js
1
2
3
4
5
6
7
8
9
10
11
12
13
14
15
16function Strategy(options, verify) {
if (typeof options == 'function') {
verify = options;
options = {};
}
if (!verify) { throw new TypeError('HTTPBearerStrategy requires a verify callback'); }
passport.Strategy.call(this);
this.name = 'bearer';
this._verify = verify;
this._realm = options.realm || 'Users';
if (options.scope) {
this._scope = (Array.isArray(options.scope)) ? options.scope : [ options.scope ];
}
this._passReqToCallback = options.passReqToCallback;
}
再来分析具体的执行流程,
当客户端发起对资源的请求的时候,会调用 BearerStrategy 的 authenticate 方法,
passport-http-bearer/lib/strategy.js
1 | Strategy.prototype.authenticate = function(req) { |
上述代码的核心逻辑主要包含三个部分,
- 解析 access_token,对应上述代码 4 - 28 行
可以看到,access_token 可以从三个地方获取,req.header、req.body 或 req.query 中,且是按照次序依次尝试的,不过注意这里的一个逻辑,access_token 不同同时出现在两个或者以上的地方,否则将会抛出 400 的错误; 回调用户自定的匿名方法,代码 44 - 48 行,
1
2
3
4
5
6
7
8
9
10
11
12
13
14
15
16
17
18
19
20
21
22
23
24
25(accessToken, done) => {
db.accessTokens.find(accessToken, (error, token) => {
if (error) return done(error);
if (!token) return done(null, false);
if (token.userId) {
db.users.findById(token.userId, (error, user) => {
if (error) return done(error);
if (!user) return done(null, false);
// To keep this example simple, restricted scopes are not implemented,
// and this is just for illustrative purposes.
done(null, user, { scope: '*' });
});
} else {
// The request came from a client only since userId is null,
// therefore the client is passed back instead of a user.
db.clients.findByClientId(token.clientId, (error, client) => {
if (error) return done(error);
if (!client) return done(null, false);
// To keep this example simple, restricted scopes are not implemented,
// and this is just for illustrative purposes.
done(null, client, { scope: '*' });
});
}
});
}通过 db.accessTokens.find 方法查找 access token 是否存在且有效,并且通过一个匿名回调方法处理成功或者失败的逻辑,可见如果成功,若该 token 是属于 user 对象的,从用户数据库中加载 user 对象,并通过回调方法 done() 将 user 和 scope 设置到 req 对象中,这样,当前请求的后续 handler 便可以从 req 中获取到通过 OAuth 认证的用户信息以及相应的 Scope,这样后续的 handlers 便可以通过 Scope 来设置该请求可以访问资源的权限了;
附录
待研究的问题
access token 失效的问题
access token 的失效时间如何设置,两种方案,
- access token 的失效时间是个绝对值,也就是说,不管用户是否再次访问,access token 都会在规定的时间失效;
- access token 的失效时间是个相对值,也就是说,当用户再次登录以后,access token 的失效时间将会再次计算并延长;
采用 #2 的问题是,如果用户长期登录且登录的间隔时间较短,那么 access token 将会一直有效,但在某些场景下,并不期望这种情况发生,比如某些安全防护的场景;
为了某种原因,笔者更倾向于 #1 的方式,但是会遇到这样的一种情况,如果某个用户在写一篇长博文,写之前是登录成功的,但是当他提交的时候,access token 正好在规定的时间内失效了,那么用户的提交也就丢失了;这种情况可以对某些特殊的请求设置某种特殊的规则,比如,先通过请求,然后再判断 access token 的时效性,这样可以避免这种情况的发生;但是,为了解决这种特殊的情况,却打破了 access token 的默认的验证流程,存在设计上的漏洞;还是比较倾向于,不处理这种小概率事件;