前言
本文是对 Spring Security Core 4.0.4 Release 进行源码分析的系列文章之一;
本文为作者的原创作品,转载需注明出处;
简介
笔者一直对 Spring Security 的认证跳转逻辑比较感兴趣,准备撰写一篇文章来专门进行深入的分析,包括其源码执行相关的逻辑;认证跳转主要有这样的一个核心的应用场景,直接访问未被授权的链接,将会被拦截,并跳转至登录界面,登录成功以后,再跳转回之前未被认证的页面;将此场景弄懂以后,其它的场景自然也就迎刃而解了;
继续以 DemoApplication 为例,
1 |
|
从上述配置中我们可以读出,访问 /web/report/** 链接是需要 Manager 权限的;否则将会被拦截跳转至登录界面身份验证,认证成功以后,将会再次跳转回之前未被认证的链接 /web/report/** 中;
源码分析
流程
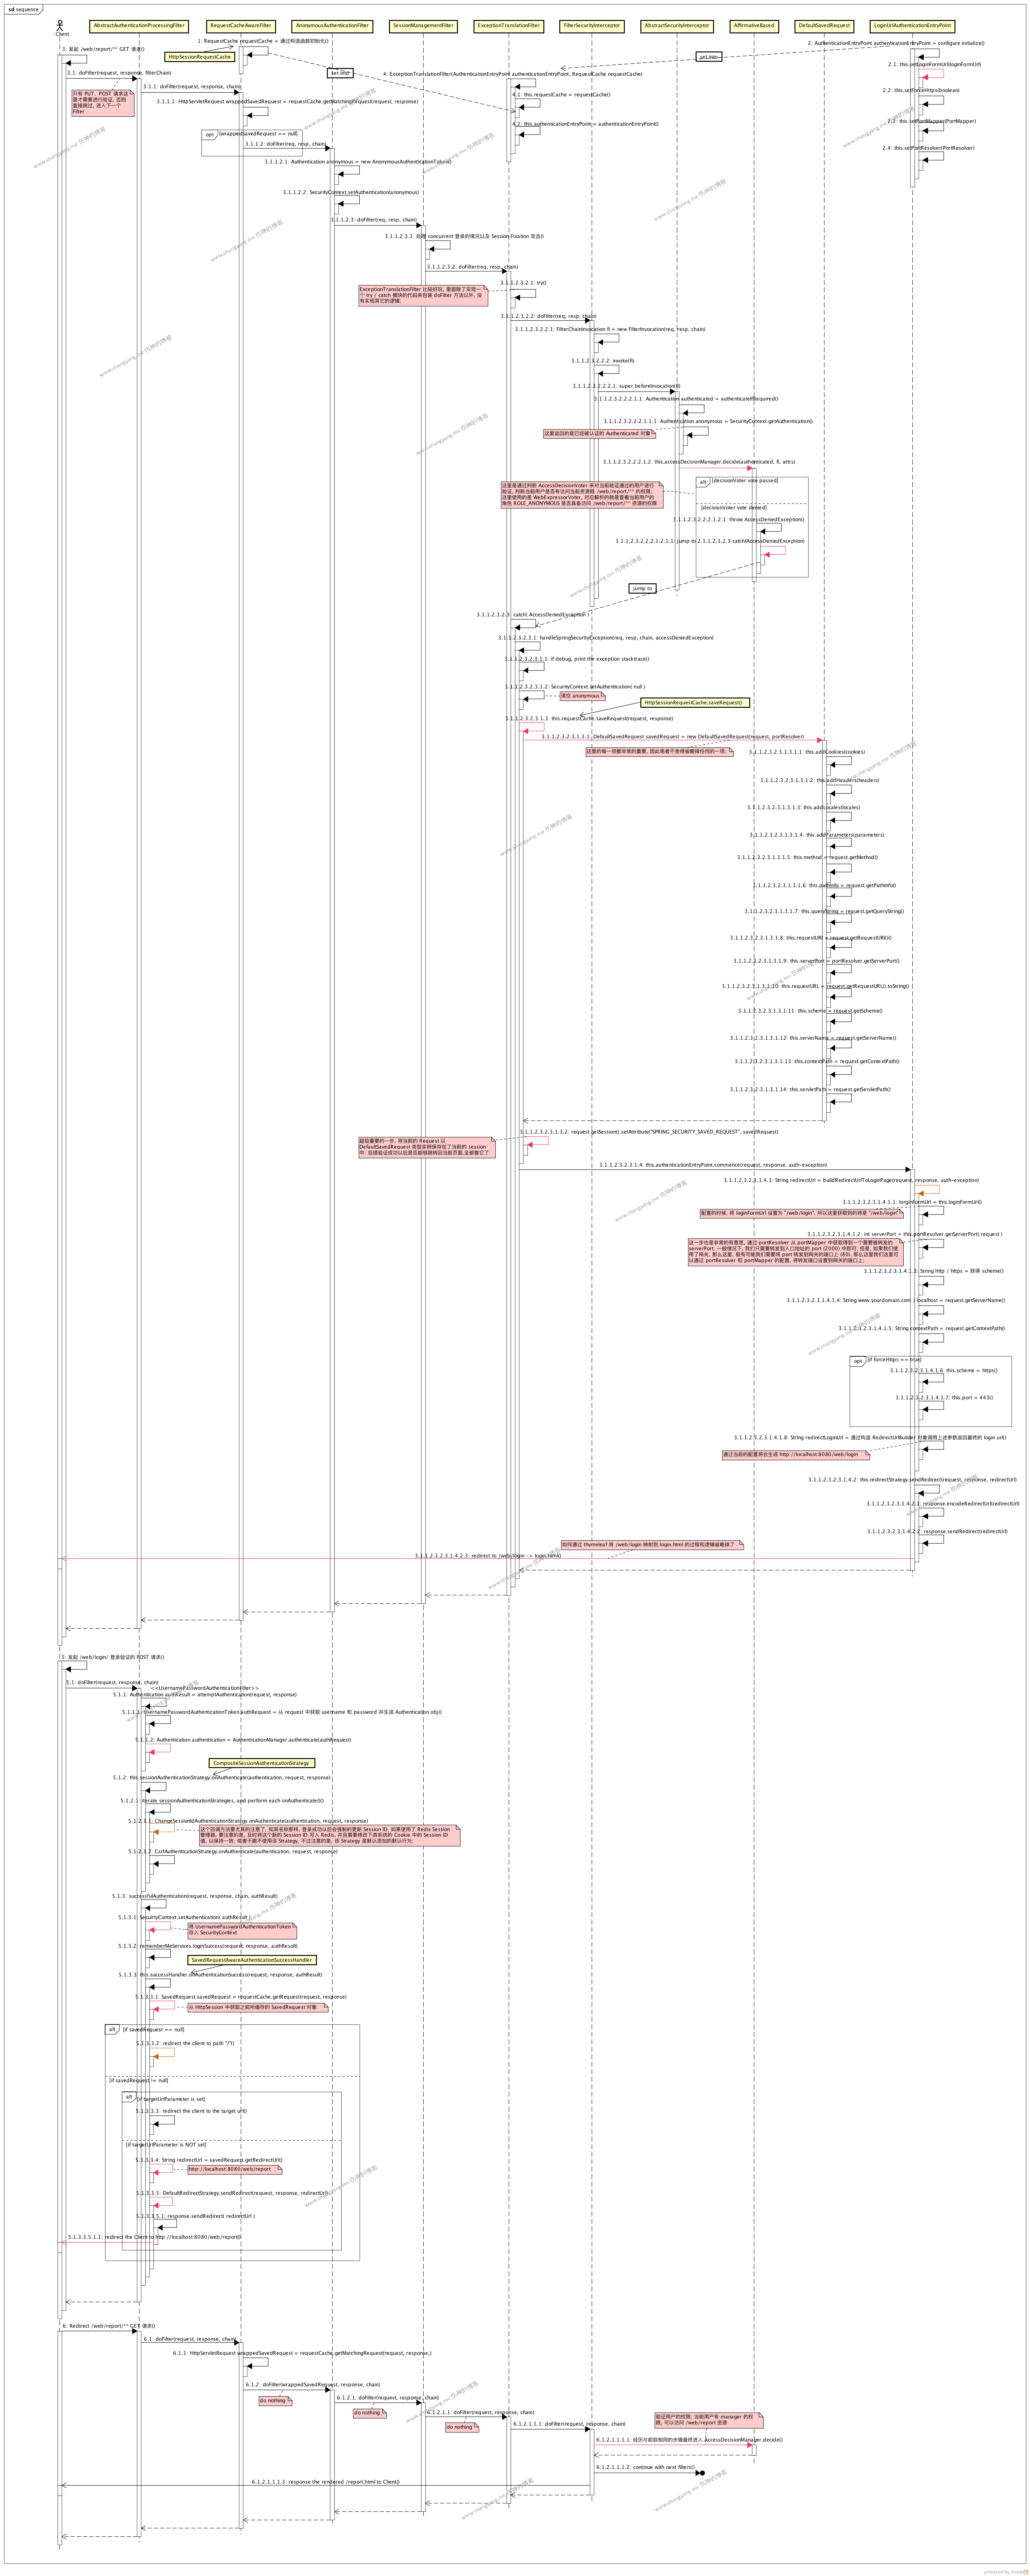
同样,笔者将千言万语汇聚到如下的这样一张流程图中,

上述流程中,归纳起来有三个重要的步骤,分别总结如下,
三个重要的步骤
访问受保护资源
这一步是客户端发起对被保护资源 /web/report/** 的 GET 请求,此步骤对应的是流程图中的_ Step 3 以及其相关的所有子步骤;_
相关步骤详细描述如下,
首先,因为是 GET 请求,AbstractAuthenticationProcessingFilter( 既 UsernamePasswordAuthenticationFilter )不会对其做任何的验证请求;
然后,因为没有传入任何的验证信息,AnonymousAuthenticationFilter 会为当前的请求创建一个 Anonymous 账户,生成 Anonymous Authentication 对象并将其加入 SecurityContext 中;
然后,ExceptionTranslationFilter 在 doFilter() 方法上包裹了一层异常捕获处理的模块,专门用来捕获 AccessDeniedException 异常,并做相应的转发处理;这一步比较的关键,后续的认证失败跳转到登录链接全靠它了;
然后,进入 FilterSecurityInterceptor,这一步便是验证当前的账户既 Authentication 是否有权限访问 /web/report/** 资源,通过 AccessDecisionManager.decide() 方法来验证用户是否有访问 /web/report/** 资源的权限,参考步骤 3.1.1.2.3.2.2.2.1.2,显然未登录的 Anonymous 账户不具备这样的权限,因此不能访问,将会抛出 AccessDeniedException;
然后,该异常 AccessDeniedException 将会被 ExceptionTranslationFilter 的 catch 异常的模块所捕获,见步骤 3.1.1.2.3.2.3,该处理流程中,两个步骤非常关键,
把当前的 Request 对象封装成为 DefaultSavedRequest
见步骤 3.1.1.2.3.2.3.1.3.1,过程中会保存当前的 cookies,headers,locales,请求参数,请求方法 method,scheme,访问路径等等与当前请求相关的所有属性内容,这一步为什么重要,是因为后续登录认证后跳转回当前链接 /web/report/** 就全靠它了 DefaultSavedRequest,最后,将 DefaultSavedRequest 对象以 “SPRING_SECURITY_SAVED_REQUEST” 为键保存在 HttpSession 中,供后续的请求访问;Redirect client to login page
见步骤 3.1.1.2.3.2.3.1.4生成 login URL
该步骤中根据用户所设定的规则生成登录访问的地址,具体详情参考相关的子步骤;该步骤将会生成登录地址,注意,如果是强制使用了 https 那么在生成该访问地址的时候,会将 scheme 改成 https;最后所生成的登录地址为 http://localhost:8080/web/loginRedirect Client to login URL
见步骤 3.1.1.2.3.2.3.1.4.2,可见该步骤很简单,直接通过 response.sendRedirect() 方法使得客户端 Client 跳转到 login path 之上;
总结,
对于学习者来说,弄清楚里面的来龙去脉固然重要,但是最为重要的是,能够用一两句话来对复杂的事物进行总结,这样,这个知识才能够被固化并长时间的驻留在你的大脑中;所以,笔者试着用一两句话来总结该步骤;当 Client 访问被保护资源的时候,Spring Security 默认使用 Anonymous 账户进行登录,最后,通过判断 Anonymous 账户不具备对被保护资源的访问权限,抛出 AccessDenied 异常并构造出登录连接,redirect Client to login page(登录地址),即完成了该步骤的整个操作;
登录认证跳转
此步骤对应的是 Step 5 以及其相关的所有子步骤;对应的也就是上一个重要步骤访问受保护资源之后的跳转步骤,将 Client redirect 到登录地址 /web/login 之上;
相关步骤详细描述如下,
首先,用户在 login page 输入 Manager 的账户信息,点击登录;
注意,在构造 login 页面中的 <form> 的 action 属性的值的时候,需要使用 /web/login 地址;然后,进入 AbstractAuthenticationProcessingFilter( 既 UsernamePasswordAuthenticationFilter )中,因为是 POST 请求,所以会执行如下的三个核心的步骤,
步骤 5.1.1 验证用户身份
此步骤中,从 request 中获取到 username 和 password 的相关信息,然后通过 AuthenticationManager 来对用户的身份进行验证,如果验证通过,返回 Authentication 对象;
步骤 5.1.2 Session Authentication Strategies onAuthenticate
比步骤中尤其要注意 ChangeSessionIdAuthenticationStrategy,当用户登录成功以后,Spring Security 会默认的修改该 Session ID 的值;如果是一个集群,并且使用到了 Session 管理器,那么一定要确保 Session 管理器的 Session ID 和 Cookie 中的 Session ID 同时被更新,否则会导致集群中的 Session 不一致;
步骤 5.1.3 验证成功后处理
首先将验证通过的用户信息 Authentication 保存到 SecurityContext 中;然后,重点来了,通过从 Http Session( 既是 RequestCache ) 中获取用户之前第一次访问被保护资源时候所存储的 SavedRequest,并根据该对象构建出用户认证成功以后需要跳转的地址,既是还原第一次访问资源时候的地址 http://localhost:8080/web/report ,(备注,如果强制使用了 https,那么这里对应的 Scheme 将会是 https 协议 );最后将 Client redirect 到被保护资源 http://localhost:8080/web/report 中;
总结,
让我感到比较意外的是,这里在 UsernamePasswordAuthenticationFilter 中认证成功以后既跳转;后来想想,如果是我来设计的话,我也会这样做,因为当前所访问的是 http://localhost:8080/web/login 资源,且目的是对用户进行登录认证(仅仅是对用户名、密码进行验证),自然需要跳转回被保护资源 http://localhost:8080/web/report 对当前 manager 用户账户 Authentication 做进一步的权限验证;
再次访问受保护资源
继登录认证跳转之后,再次对 http://localhost:8080/web/report 资源进行访问,该逻辑从步骤 6 开始,其余步骤基本上于第一次访问受保护资源的步骤一致,有几个地方的变化如下,
RequestCacheAwareFilter 处理逻辑
这一步的时候要关注的是,它会使用 SavedRequest 替换当前的 Request 对象进行后续的 Filters 的操作;目的很明显,保持当前的 Request 对象与第一次[访问受保护资源]时候所使用到的 Request 对象一致;FilterSecurityInterceptor 处理逻辑
这里,通过 AccessDecisionManager 的 decide 方法验证当前的用户 manager 具备对 http://localhost:8080/web/report 资源的访问权限;于是,验证通过,并且继续进入后续的 Filters 操作最终将 report.html 经过 Spring MVC 渲染以后,返回给 Client
源码分析
根据流程分析中,笔者就自己认为比较重要和感兴趣的部分源码进行分析,
AbstractAuthenticationProcessingFilter
笔者在流程图的步骤 3.1 给了注释,当调用 AbstractAuthenticationProcessingFilter 对用户进行认证操作的时候,如果当前的请求是 GET 请求,将不会进行后续的认证操作,笔者将相关核心代码摘录如下,
AbstractAuthenticationProcessingFilter.java
1 | public void doFilter(ServletRequest req, ServletResponse res, FilterChain chain) |
从 ① 中可以知道,如果当前的访问不是 POST / PUT 请求将直接跳过余下的步骤,并直接进入下一个 Filter 执行;如果是 POST / PUT 请求,将执行后续的操作,2.1 认证; 2.2 通过认证以后,使用 Session Authentication Strategies 进行后续处理;2.3 处理成功以后的跳转逻辑;
RequestCacheAwareFilter
该对象的实现异常的简单,但是却异常的重要,该对象通过获取得到 SavedRequest,当认证跳转后,依然使用的是用户第一次访问时候的 Request 对象,就像线程被中断保护一样,当线程再次启动的时候,需要重现该线程的保护现场,既相关的所有数据;
1 | public class RequestCacheAwareFilter extends GenericFilterBean { |
ExceptionTranslationFilter
看一下其 doFilter 方法,
1 | public void doFilter(ServletRequest req, ServletResponse res, FilterChain chain) |
可以看到,该 ExceptionTranslationFilter.doFilter() 方法除了添加了一个 try … catch … 的程序模块以外,并没有实现其它的逻辑,目的是当,当后续的 AccessDecisionManager 在判断当前用户若不具备相应的访问权限以后,将会抛出 AccessDeniedException,这里将会拦截处理,并实现相应的跳转逻辑,这里的跳转逻辑会将 Client 重定向到 login path 中,既是 /web/login;该步骤是在 handleSpringSecurityException 方法中进行处理的,处理的过程中,尤其要注意其如何使用 DefaultSavedRequest 对当前的请求 Request 记性现场保护的操作,该步骤参考 3.1.1.2.3.2.3.1.3.1;
这里笔者所学到的东西既是,添加一个 Filter,通过该 Filter 来拦截某些异常,并进行自定义的处理;
FilterSecurityInterceptor
通过调用其父类 AbstractSecurityInterceptor#beforeInvocation() 方法对当前用户进行权限验证,判断该用户是否拥有访问当前资源( /web/report/** )资源的权限;过程中通过 AffirmBased 来判断该用户是否对被保护资源 /web/report/** 具有访问的权限;如果没有,将会抛出 AccessDeniedException 的错误;
LoginUrlAuthenticationEntryPoint
正如流程图中 3.1.1.2.3.2.3.1.4 this.authenticationEntryPoint.commence() 所描述的那样,会根据 LoginUrlAuthenticationEntryPoint 实例中的配置来生成相关的 login 的链接来使得 Client 跳转到登录页面中,这里尤其要注意几个逻辑,1、PortResolver,可以通过 PortMapper 对象通过映射的方式取得用户自定义跳转端口对象,这个在使用 ZUUL 网关的时候,需要使得跳转链接使用网关端口的时候将会非常有用;2、如果是强制使用的 https,那么这里的跳转链接将会强制使用 https;相关核心代码逻辑在方法 buildRedirectUrlToLoginPage() 中;
1 | protected String buildRedirectUrlToLoginPage(HttpServletRequest request, |
PortResolver
通过 PortMapper 提供的映射来生成跳转的链接的端口,这个在使用 ZUUL 网关的时候,需要使得跳转链接使用网关端口的时候将会非常有用;
PortMapper
定义映射关系,比如,可以将 2000 映射到 8000,比如,在 Spring Clound 集群中,通过 ZUUL 转发到后台的某个服务使用的是 2000 端口,经过该服务进行用户身份认证以后,执行跳转,默认会跳转到 2000 端口上,这样,就跳过了网关,就会导致访问错误,所以这个时候,需要通过 PortMapper 将端口 2000 映射到 8000 上,这样跳转的时候,会跳转到 8000 端口上,既是网关 ZUUL 上;