前言
本文是笔者所总结的有关 Vue 源码分析系列之一,本篇博文将从源码分析的角度剖析 Vue Component;
本文为作者原创作品,转载请注明出处;
Demo
笔者选取了官文上最为典型的一个有关 Vue Component 的例子,
1 | <div id="example-2"> |
这个例子的特殊之处在于,同一个 Vue Component 被三个不同的 Vue Instances 渲染,这三个 Instances 对应的也就是,
1 | <div id="example-2"> |
执行的效果如图所示,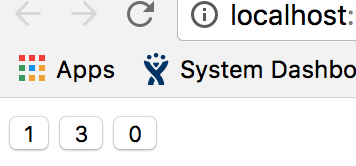
三个按钮,当点击任何一个按钮其对应的数字递增;
概念设计
本章节以 Demo 为例,探讨 Vue Component 的概念设计,如图所示,
如图,为了便于理解,我将解析 Root Element 的 Vue Instance 命名为 Root Vue Instance,而将解析 Component 相关的 Vue Instance 命名为 Component Vue Instance,当 root element 既 div#example-2 在被解析并被实例化的时候,检测到其包含三个 Component 子元素的存在,(备注,该 Component 元素指的就是
1 | <simple-counter></simple-counter> |
),然后分别针对这三个不同的 Component 创建出三个不同的 Component Vue Instance,不过要特别注意的是,这三个不同的 Component Vue Instance 共享的是同一个全局的 Vue Component 对象,因此,这也就是为什么官网上描述,在定义 Vue Component 的时候 data 必须是 function 的原因,归根结底,因为 Vue Component 是一个全局对象,所以,如果 data 不是由一个 function 构造返回的对象而直接是一个对象的话,那么这个对象必定是全局的,就会出现官网 Demo 上的这种情况,三个按钮中的其中一个按钮的状态发生变化,其它按钮也会同时发生变化;
源码分析
该源码分析章节的分析内容参考 Demo 中的示例进行,从 Demo 中,不难发现,整个流程分为两个部分,一是初始化 Vue Component,另外一个部分是初始化 Vue Instance;
Component 的初始化和注册流程
该部分的逻辑主要对应 Demo 中的代码 7 - 12 行,如下,
1 | Vue.component('simple-counter', { |
初始化流程如下所述,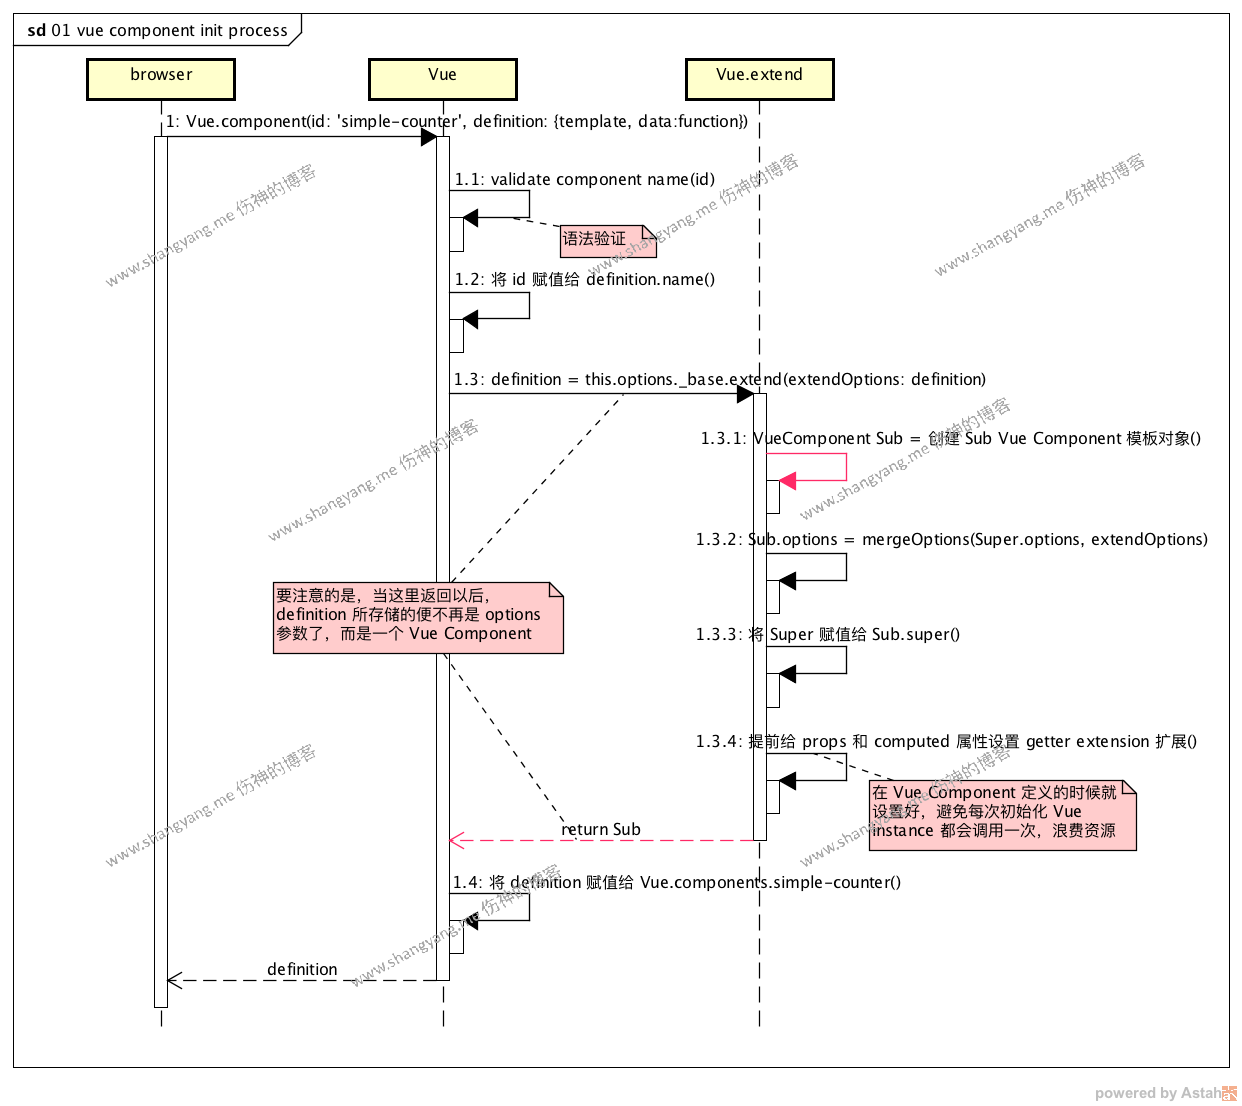
先来看一下它的入口方法,该入口方法基本上涵盖了上述的整个流程逻辑,
1 | ASSET_TYPES.forEach(function (type) { |
针对流程图中的核心流程我们依次来分析,
步骤 1,调用 Vue.component 方法开始初始化,需要注意的是它的调用方式,
1
2
3
4
5
6
7
8ASSET_TYPES.forEach(function (type) {
Vue[type] = function (
id,
definition
) {
...
}
});Vue.component 方法是通过 Vue[type] 的形式进行进行定义的,type 的值是 ‘component’,因此调用的就是 Vue.component 方法;注意调用方法所对应的参数,id → ‘simple-counter’,definition → 对应如下的 options,
1
2
3
4
5
6{
template: '<button v-on:click="counter += 1">{{ counter }}</button>',
data: function () {
return { counter: 0 }
}
}步骤 1.3,对应入口方法第 15 行,该步骤中,最为核心的就是创建一个以 ‘simple-counter’ 为关键字的 Sub Vue Component 全局对象,注意这里的返回,直接将该 Sub Vue Component 对象赋值给 definition,也就是说,当它返回以后便会覆盖掉原来的 definition;另外还要注意的是,步骤 1.3.1,这里构造的是一个 Sub Vue Component 的模板对象,将来会根据这个 Sub Vue Component 对象来构建相应的 Sub Component Vue Instance;
步骤 1.4,将 Sub Vue Component 赋值给全局对象 Vue.components,怎么赋值的呢?参看入口方法代码第 20 行,
1
this.options[type + 's'][id] = definition;
相当于赋值给了全局对象 Vue 的属性 options.components.simple-counter,连起来也就是 Vue.options.components.simple-counter
至此,Vue Component 的初始化和注册流程就分析完毕,可见,其内部的逻辑还是相对简单明了的,就是以关键字 ‘simple-counter’ 作为关键字在全局对象 Vue.options.components 注册上一个全局的 component 对象 simple-counter,注意,这个 component 对象是全局的,也就是在 options 中由 data 所定义的 reactive 属性也是全局的,在 Vue 中将其称之为 Vue Component;
Vue Instance 初始化流程
Vue Instance 的初始化流程包含两个部分,一部分是通过元素 div#example-2 初始化 Root Vue Instance,对应如下代码,
1 | new Vue({ |
另外一部分是在初始化元素 div#example-2 的时候,在对它进行渲染的时候,会根据 div#example-2 中的子元素的定义,如下所述,
1 | <simple-counter></simple-counter> |
从全局对象 Vue 中找到其对应的 Vue Component 也就是 simple-counter Vue Component 对象,并通过该 Vue Component 对象中的 template 和 options 分别创建三个 simple-counter 相关的 Component Vue Instnace;
备注,为了概念上的清晰,笔者定义了如下的术语,
- Root Vue Instance
对应是由解析 HTML 元素节点所生成的 Vue Instance; - Component Vue Instance
对应是由解析 Vue Component 中所指定的元素节点的 Vue Instance;
Root Vue Instance 初始化流程
Vue Instance 的初始化流程在笔者的另一篇博文中 Vue 源码分析系列之二:深入 Vue React 响应式编程的小节初始化流程中有过分析,不过对应 Vue Component 的解析流程有所不同的是,在其渲染既是 patch 的过程中,判断 VNODE 节点是否是 Vue Component 类型的节点,如果是 Vue Component 的节点,那么再会根据其相应的全局 Vue Component 对象中的定义来初始化并创建 Component Vue Instnace;相关流程如下所述,为了尽量描绘清楚前后的来龙去脉,笔者尽量涵盖了相关的初始化流程中的节点,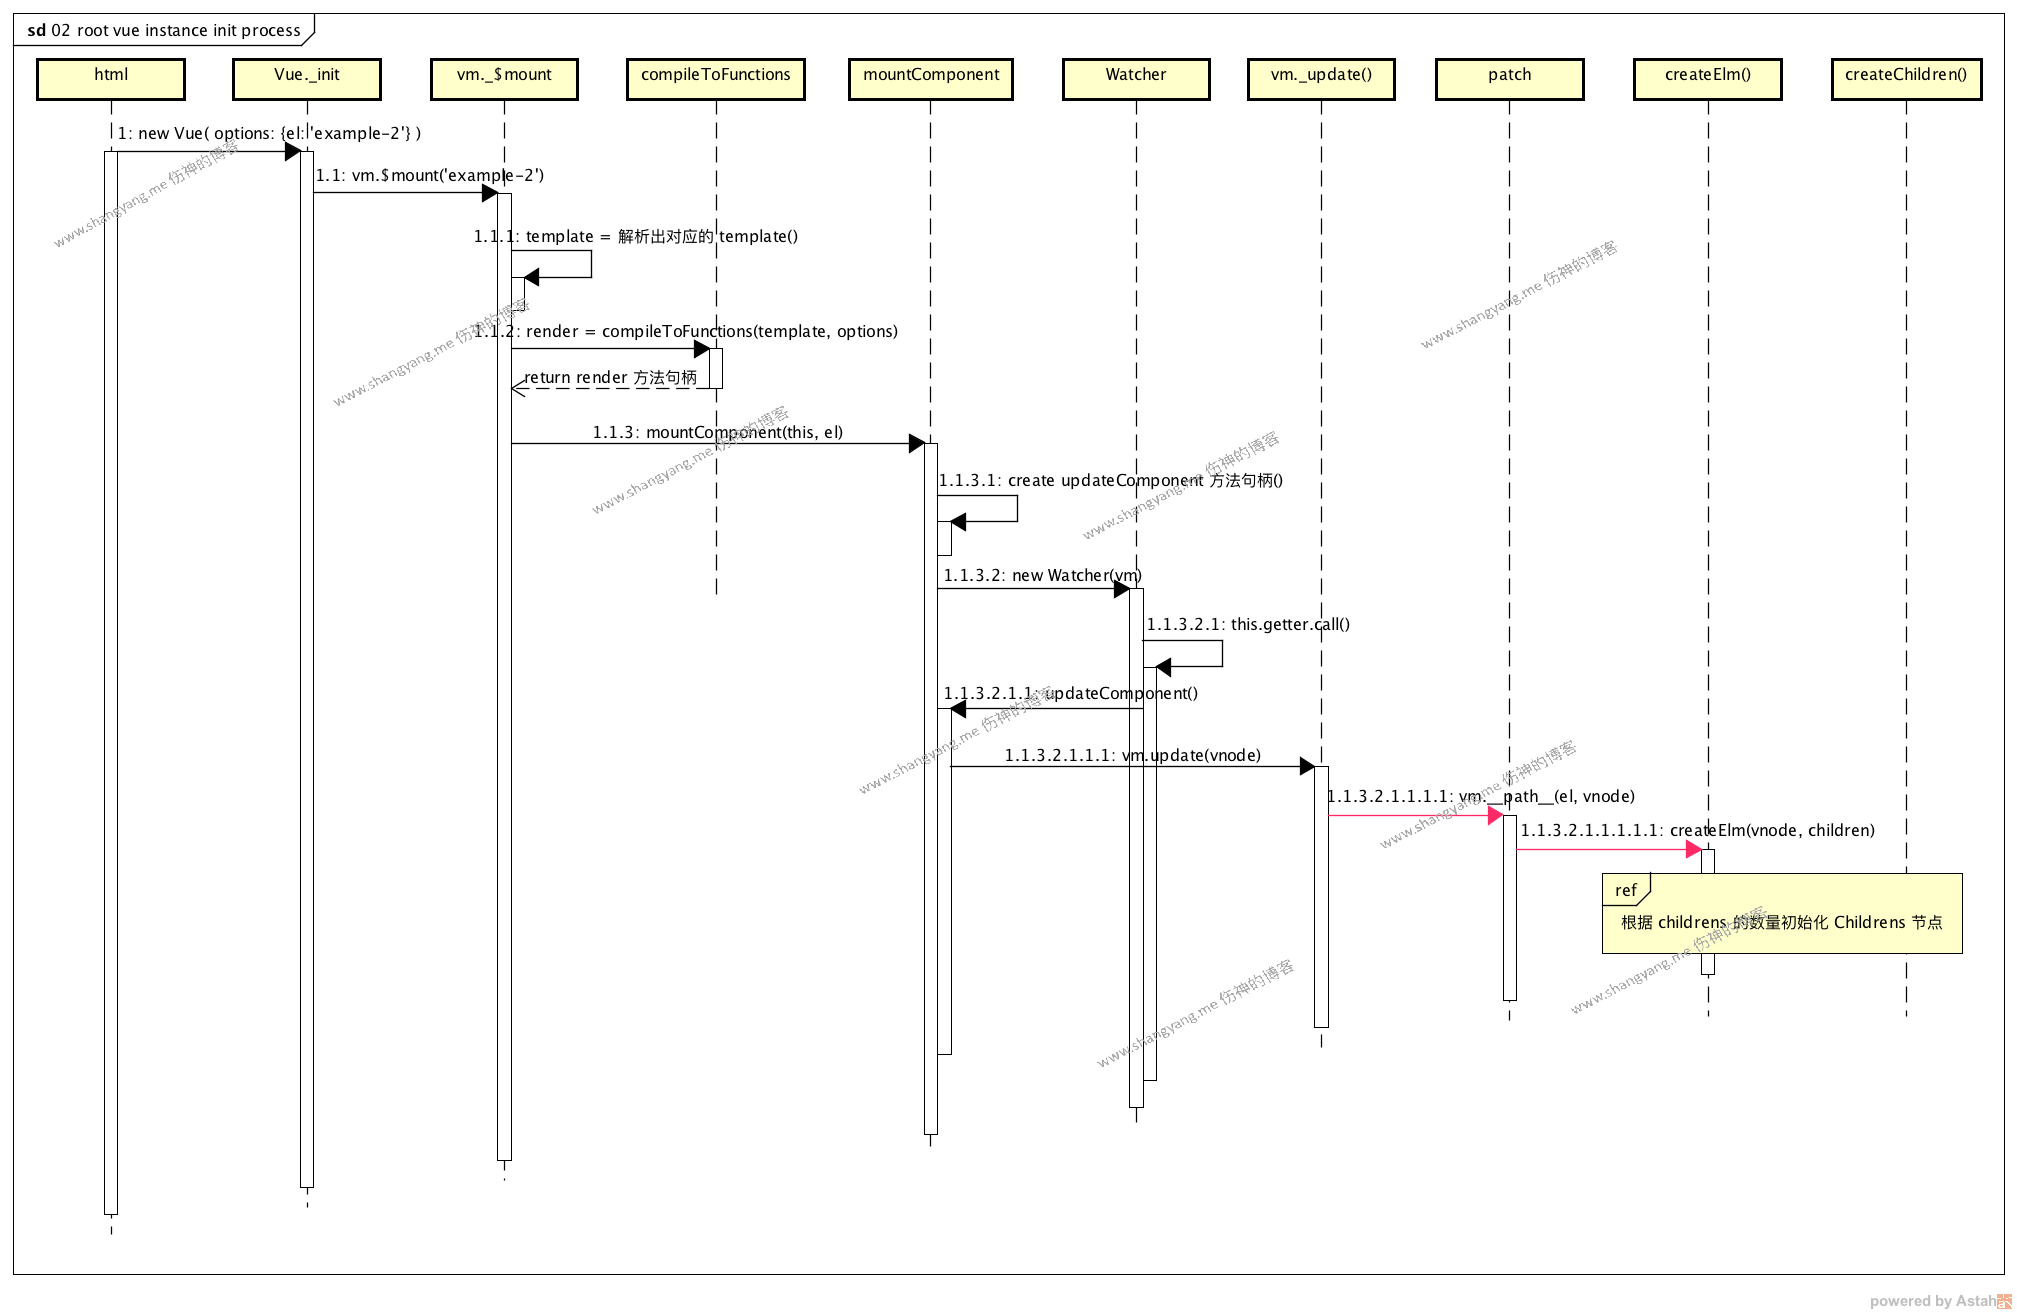
步骤 1.1.2,对应所生成的 render 方法截图如下,
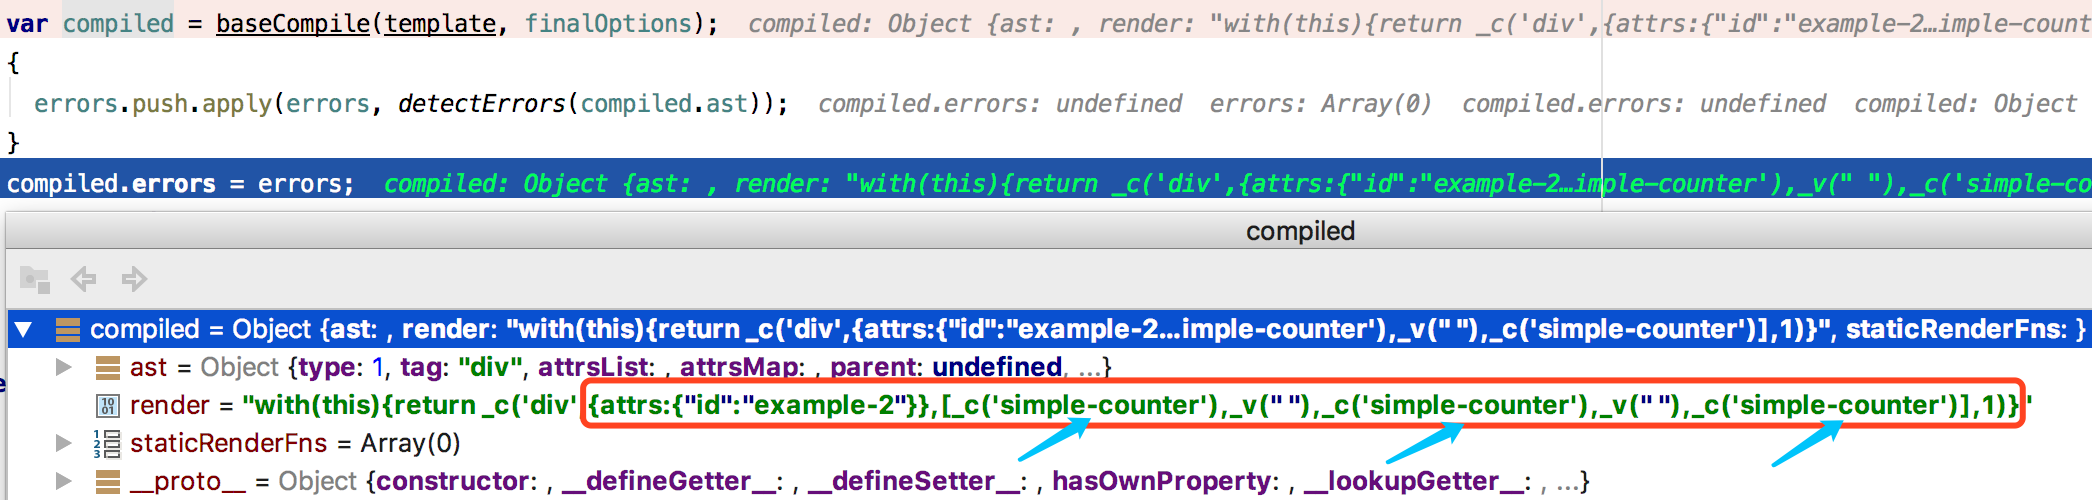
备注,该表达式就是 VNODE,如果是 _c 表示的是另一个 Component,可以理解为另一个 VNODE 节点,如果是 _s 表示的是 simple text,比如,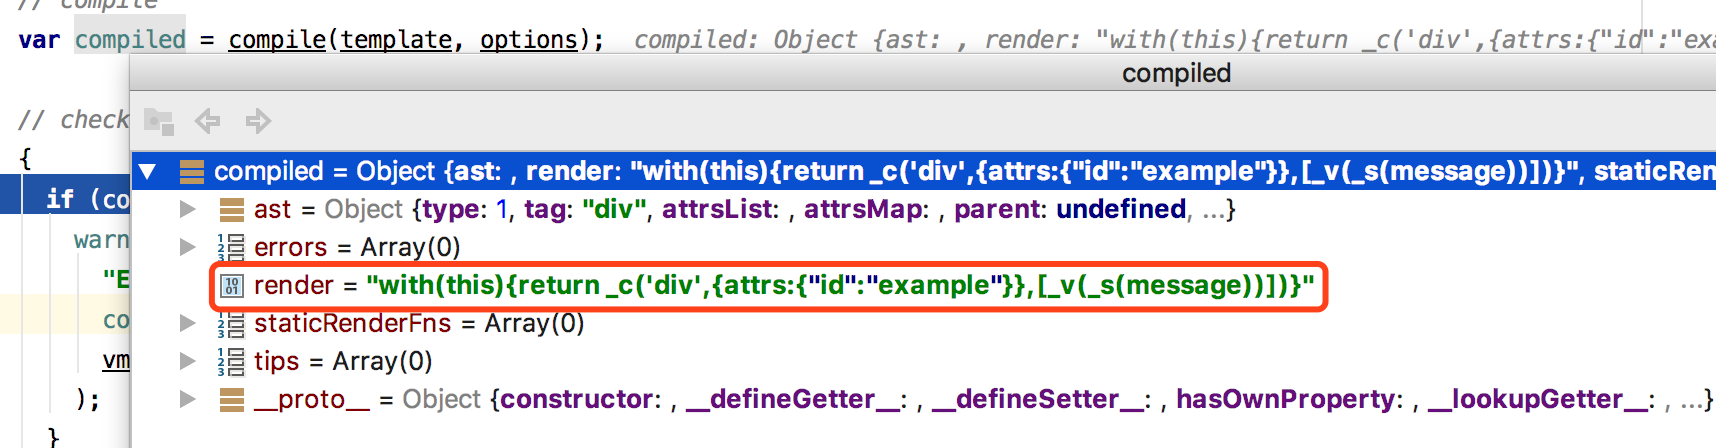
其关键流程就发生在步骤 vm.__path__(el, vnode) 中,通过上述所成成的 vnode 节点调用 createElm() 方法中的 createChildren() 方法,该方法内部循环遍历 Vue Component 相关的虚拟子节点 (对应的也就是表达式 _c(‘simple-counter’))并开始创建 Component Vue Instance,相关 createChildren() 的调试截图如下,
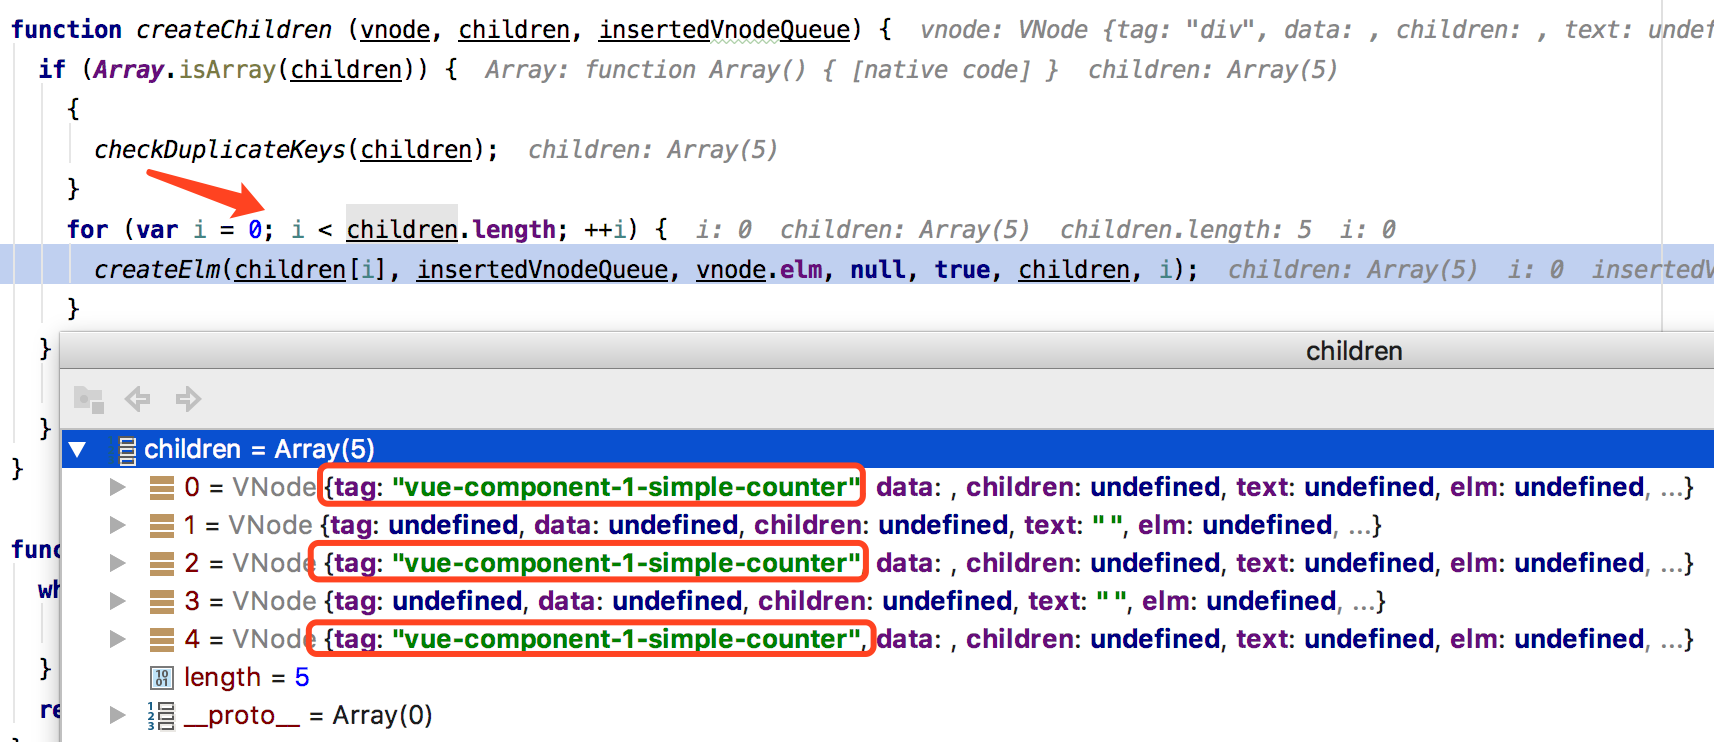
可见,循环遍历 Root Elm 下所有的 VNODE 分别进行构建,可以看到,包含三个与 simple-counter 相关的 VNODE 节点;然后便进入 Component Vue Instance 初始化流程,相关分析参考下一小节;
Component Vue Instance 初始化流程
继续 Root Vue Instance 初始化流程,接下来将会创建与之关联的 Vue Components 相对应的 Component Vue Instances,下面是对应初始化 Component Vue Instnace 的流程图,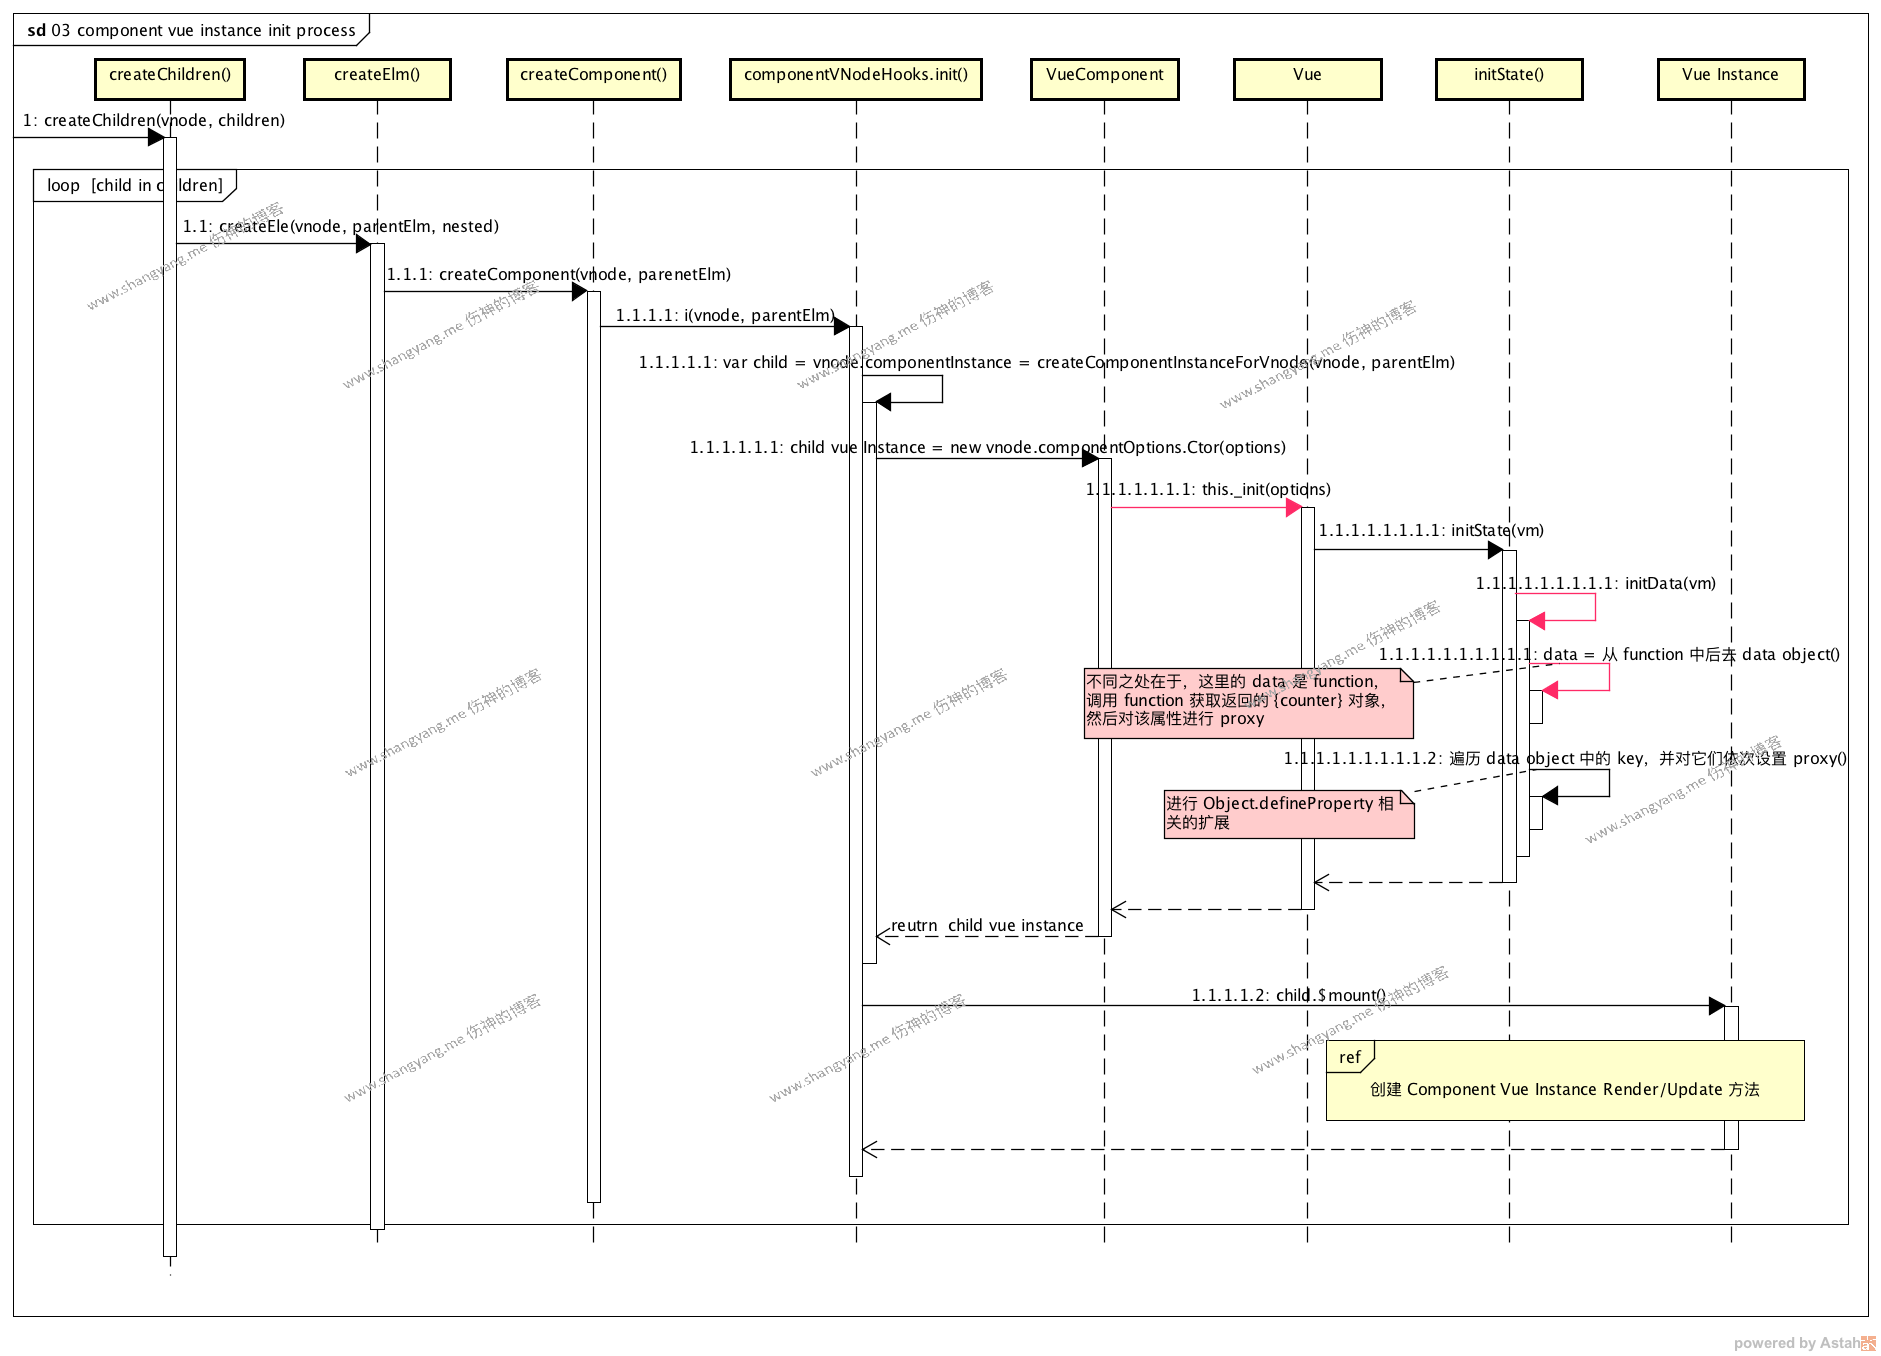
步骤 1.1 -> 步骤 1.1.1.1.1.1,该过程就是为初始化 Component Vue Instance 做准备,大致过程就是,使用当前的 vnode 既 ‘simple-counter’ 所对应的 Vue Component 模板对象,该对象的创建过程参考 Component 的初始化和注册流程,注意这是一个全局对象,这里有三个相同的 ‘simple-counter’ component 元素需要渲染,因此,循环中包含了三个待渲染的 ‘simple-counter’ Vue Component 模板对象且这三个对象是相同的;如下图所示,
还要注意的一点就是,该系列步骤中包含了根据关键字 ‘simple-counter’ 去匹配并找到对应的 Vue Component 模板对象的,次模板对象是构造 Vue Instance 的核心;从步骤 1.1.1.1.1.1 开始,根据 VueComponent 模板对象来构造出 Component Vue Instance,步骤 1.1.1.1.1.1.1 this._init 开始调用 Vue._init 方法构造 Vue Instance 对象;过程中,首先要关注的是,如何对 data 属性 counter 进行 setter 和 getter 的扩展的,依然是调用初始化流程中的 initData() 方法进行的,只是这次不同的是,调用的是 data 对象所定义的方法,通过方法返回的对象来进行的,具体过程参考代码如下,
1
2
3
4
5
6
7
8
9
10
11
12
13
14
15
16
17
18
19function initData (vm) {
var data = vm.$options.data;
data = vm._data = typeof data === 'function'
? getData(data, vm)
: data || {};
......
// proxy data on instance
var keys = Object.keys(data);
var props = vm.$options.props;
var methods = vm.$options.methods;
var i = keys.length;
while (i--) {
...
proxy(vm, "_data", key);
...
}
// observe data
observe(data, true /* asRootData */);
}代码 3 - 6 行,判断 data 是否是 function,如果是,则调用 getData(data, vm) 方法,该方法内部其实就是 call 该 function,然后获取其返回的结果,并将该结果赋值给 data,但为什么这里必须是 function 呢?原因参考 data 为什么必须是 function 小节内容;再来看看 data 属性的 function 定义;
1
2
3data: function () {
return { counter: 0 }
}可以看到,很简单,它就是直接返回一个包含了 counter 属性的匿名对象;再来看代码 8 - 16 行,依次遍历返回对象中的 key,其中包含 counter 属性,然后对它们进行 proxy 调用,
1
2
3
4
5
6
7
8
9
10// 把属性 message 转换成 this._data.message 的方式,注意是一个方法的句柄;getter and setter
function proxy (target, sourceKey, key) {
sharedPropertyDefinition.get = function proxyGetter () {
return this[sourceKey][key]
};
sharedPropertyDefinition.set = function proxySetter (val) {
this[sourceKey][key] = val;
};
Object.defineProperty(target, key, sharedPropertyDefinition);
}不难发现,这里对 counter 属性与当前的 vm 实例通过 Object.defineProperty 进行了绑定并对 counter 属性进行了 getter 和 setter 扩展;也就是说,当实现了相应的扩展以后便可以使得,当 counter 的值发生了变化,那么便可以触发 setter 回调,然后调用 render 方法对该 Compoennt Vue Instance 所对应的 DOM 节点进行绘制,进而实现与其相关的 Vue React 特性;
后续的流程就是与该 child 实例既是 Component Vue Instance 相关的 $mount 逻辑了,该逻辑过程大致就是,获得 child 相关的 template 模板,生成与其相关的 Render 方法以及对应的 VNODE 对象,创建对应的 updateComponent 句柄既 Vue React 重新绘制 DOM 节点的入口方法,并通过初始化 Watcher 实例来对 child 进行初始化绘制,备注,这里的初始化绘制依然是通过 Vue React 的方式来实现的;要注意的地方有,该 template 不再是从原生的 HTML DOM Tree 中去获取的,而是直接从 Vue Component 的定义中获取的,
1
template: '<button v-on:click="counter += 1">{{ counter }}</button>',
另外,render 方法对应如下,

对应的内容如下,1
2
3render: with(this){
return _c('button', {on:{"click":function($event){counter += 1}}},[_v(_s(counter))])
};可以看到 render 方法将 template 翻译成了 Vue 的专属方法,一个 button,添加事件 click,并且将 click=”counter += 1” 转换成了相应的 function 既 function($event){counter += 1};之后,在 Vue React 渲染的时候,会通过该 render 方法生成相应的 VNode,然后根据 VNode 中的定义,通过 __patch__ 方法对 DOM 节点进行绘制;相关流程方面的细节笔者已经在 Vue 源码分析系列之二:深入 Vue React 响应式编程一文中的 更新渲染流程小节中有过详尽的描述,这里不再赘述;
依次创建剩余的两个 Component Vue Instance;
特殊情况和限制
data 为什么必须是 function
根据官网上的描述,由 Vue Component 所定义的 data 必须是 function 且 function 所返回的对象必须是局部对象;其实根本原因笔者在前面已经描述过了,就是因为三个 Component Vue Instance 的初始化过程中使用了同一个 Vue Component 全局对象,因此其所引用到的 data 属性同样是一个全局的对象,所以,如果 data 使用的是一个全局的方式来定义的,像这样,
1 | Vue.component('simple-counter', { |
(当然,这种方式在 Vue 编译的时候会报错)或者像这样,
1 | var data = { counter: 0 } |
以上述 Demo 为例,当一个按钮的值发生了改变,通过 Vue React 的方式,其余的两个按钮的值会同时发生变化,这是我们不期望的;因此,我们必须使用 function 的方式并返回一个局部对象的引用给每一个 Component Vue Instance,像这样,
1 | Vue.component('simple-counter', { |
这样,就不会出现上述的问题了,因为每一个 Component Vue Instance 在初始化的过程中都会通过调用该匿名方法返回一个私有的局部匿名对象;那么 javascript 是如何做到的呢?参考下面这张图,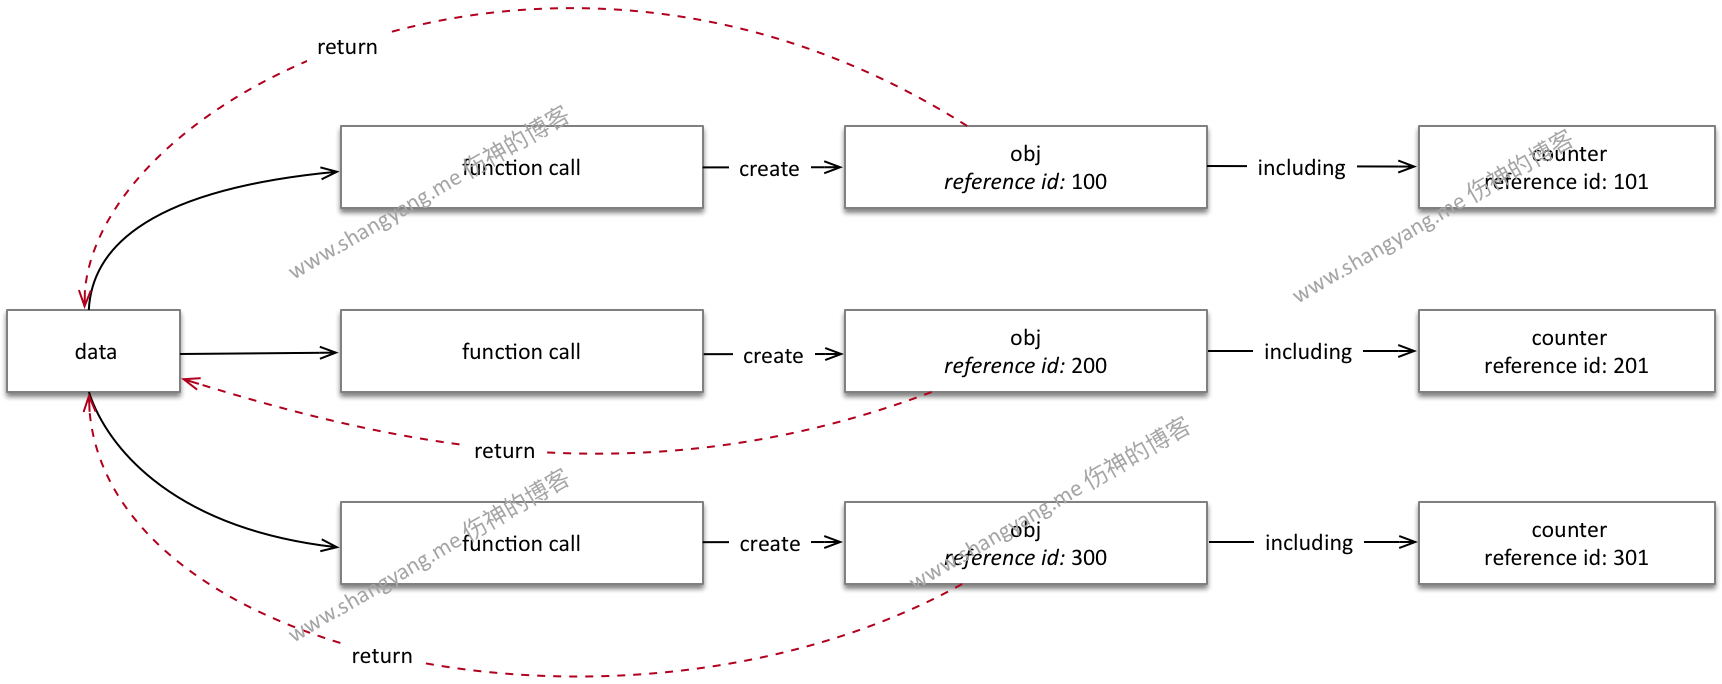
当 function 每一次被调用的时候,在方法内部都会初始化一个不同的匿名对象和 counter 属性;