前言
本文是笔者所总结的有关 Nodejs Passport 系列之一;本文将从源码分析的角度,来深入剖析 passport 的初始化流程;
本文为作者原创作品,转载请注明出处;
备注,该系列的源码分析是基于 passport 版本 1.15.6
demo
笔者将使用这个 demo 来对 Local Strategy 的源码进行剖析;
构建项目骨架
- 首先构建 express 项目骨架,这部分内容参考 Nodejs Express 系列之二:Express 骨架 Skeleton 中小节“如何使用 Express Application Generator” 构建项目骨架;
导入 passport 模块
1
$ npm install passport
导入 Local Strategy 模块
1
$ npm install passport-local
导入 express-session 模块
1
$ npm install express-session
将工程导入你所熟悉的开发工具中,这里笔者使用的是 IntellJ IDEA;
- 构建完成以后,我们得到的 package.json 文件的内容信息如下,
1
2
3
4
5
6
7
8
9
10
11
12
13
14
15
16
17
18
19
20
{
"name": "passport-local-demo",
"version": "0.0.0",
"private": true,
"scripts": {
"start": "node ./bin/www"
},
"dependencies": {
"body-parser": "~1.18.2",
"cookie-parser": "~1.4.3",
"debug": "~2.6.9",
"ejs": "~2.5.7",
"express": "~4.15.5",
"express-session": "^1.15.6",
"morgan": "~1.9.0",
"passport": "^0.4.0",
"passport-local": "^1.0.0",
"serve-favicon": "~2.4.5"
}
}
测试代码
与 passport 初始化流程相关的代码如下,
1 | /** 1. 初始化 passport **/ |
主要分为两个流程,
- 初始化 passport
- 初始化 Local Strategy 相关
后续的源码分析将会分为了两个阶段进行深入的剖析;
测试代码下载
设计分析
组件图
passport 的初始化流程比较的复杂,如果没有对它的核心模块有一个整体上的认知,是很难摸清它的底层交互逻辑的,基于此,笔者绘制了该核心组件图,将各个核心组件的内在逻辑以及相互之间的关联关系梳理出来;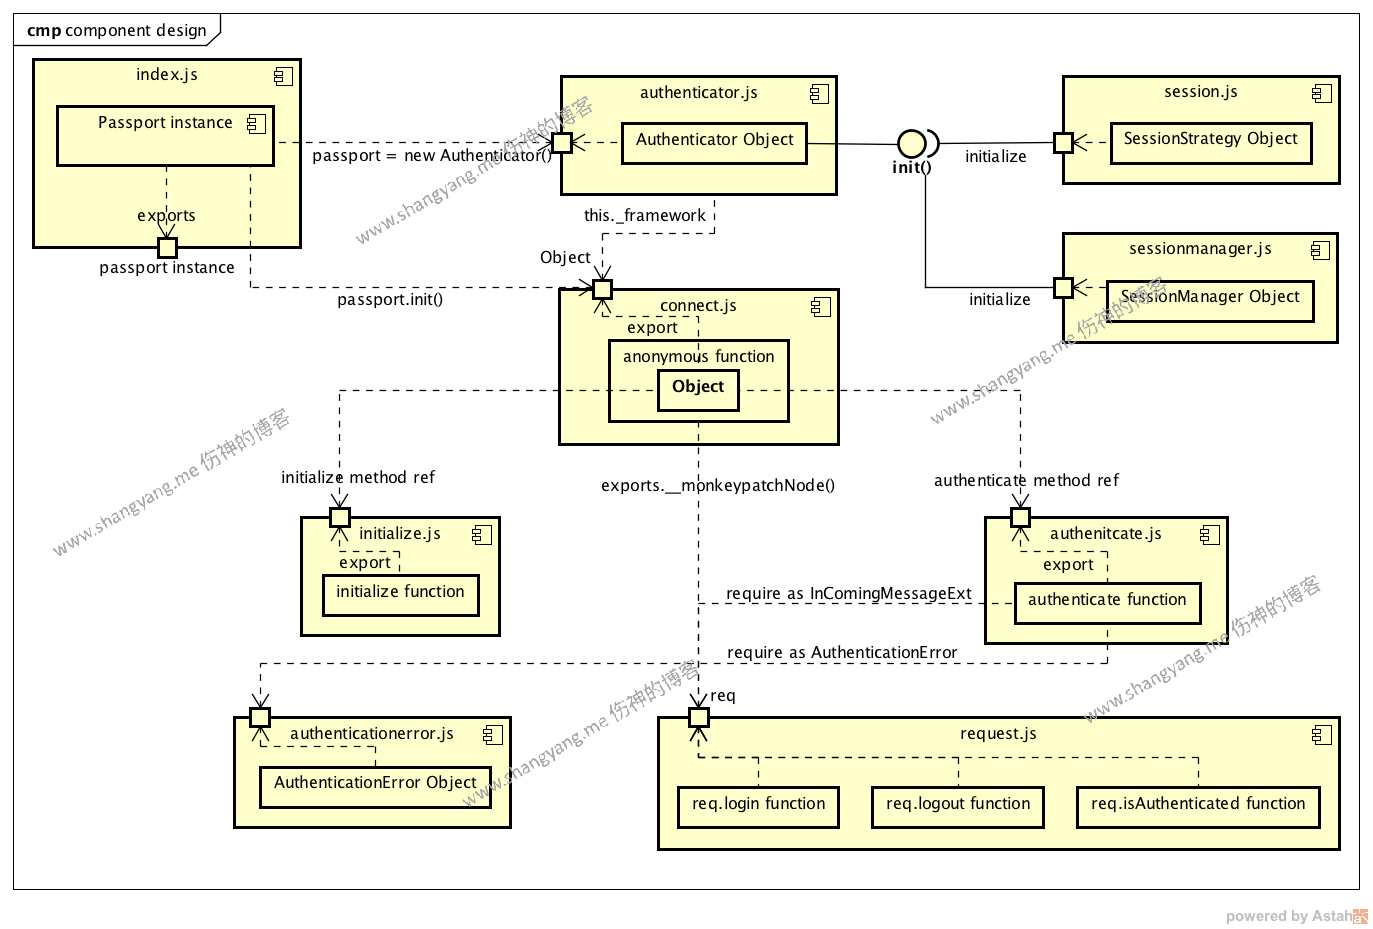
passport 总共有 9 大核心模块,其它的扩展都是基于这 9 大核心模块构建起来的;其基本逻辑是,
- 在加载 index.js 模块的时候,便会初始化 authenticator.js 模块所 exports 的 Authenticator 对象,并作为 index.js 模块的 exports;对应上述测试代码的第 2 行;
- 在初始化 Authenticator 对象的时候,会通过 this.init() 方法分别初始化
- connect 模块
- Session Strategy 模块
- Session Manager 模块
- 在 #2 初始化 connect 模块的时候,会初始化
- initialize 模块,该模块主要负责对 passport 对象做进一步的初始化动作;
- authenticate 模块,这个模块非常的重要,某个请求的 router 就是通过该方法对用户身份进行验证的;
- 然后是 request.js 模块,该模块定义了 request 相关的方法,login、logout 和 isAuthenticated,isAuthenticated 属性注明了该用户是否已经认证通过了;
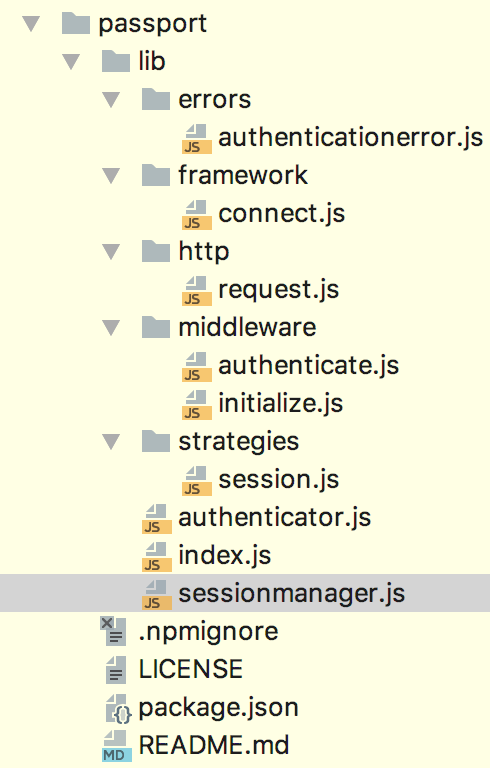
- 最后来看看 passport 在 ./node_modules 中的包结构,
类图
笔者后来发现,组件图不能很好的反映出各个模块之间的关系,还是需要类图,于是补充如下的类图(2018-07-26),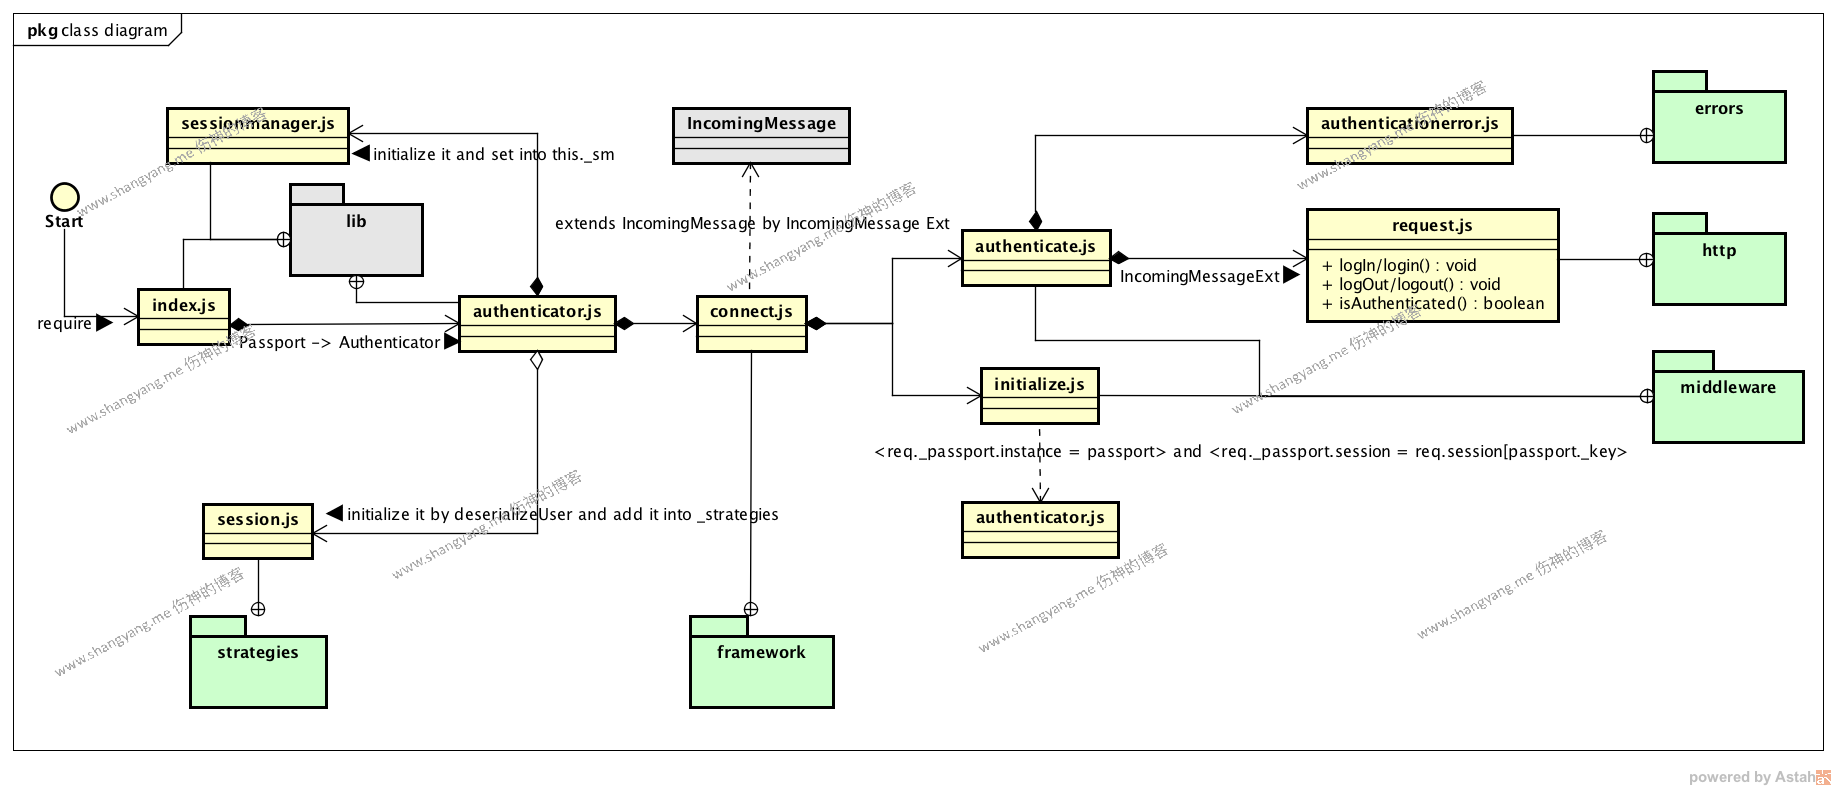
连接器 connect.js
在 framework 包中,从类图中,便可以一目了然的知道,为什么它取名为 connect 了,注意,它作为连接器,连接了三方面的内容,扩展了 Express http req 属性,该属性在 Express 中对应的对象为 IncomingMessage,通过如下的方法进行扩展,
1
2
3
4
5
6
7
8
9
10
11
exports.__monkeypatchNode = function() {
var http = require('http');
var IncomingMessageExt = require('../http/request');
http.IncomingMessage.prototype.login =
http.IncomingMessage.prototype.logIn = IncomingMessageExt.logIn;
http.IncomingMessage.prototype.logout =
http.IncomingMessage.prototype.logOut = IncomingMessageExt.logOut;
http.IncomingMessage.prototype.isAuthenticated = IncomingMessageExt.isAuthenticated;
http.IncomingMessage.prototype.isUnauthenticated = IncomingMessageExt.isUnauthenticated;
};http.IncomingMessage 对应的就是 req,而 IncomingMessageExt 就是由 passport 模块 request.js 中所导出 req 对象,并且用该对象的 logIn,logOut,isAuthenticated 来覆盖原本 http.IncomingMessage 的对应方法; 也就使得,在 Express 的后续使用过程中,req 对象的 logIn,logOut 和 isAuthenticated 使用的都是 passport 所扩展出来的相应方法;注意,该方法在两个地方会被调用
- 在 require 流程中初始化 Passport,既是初始化 Authenticator 的过程当中;
authenticate.js#authenticate() 方法中被调用的,
1
2
3
4
5
6
return function authenticate(req, res, next) {
if (http.IncomingMessage.prototype.logIn
&& http.IncomingMessage.prototype.logIn !== IncomingMessageExt.logIn) {
require('../framework/connect').__monkeypatchNode();
}
...通过上述的 if 判断,确保该扩展是会对当前的 http req 对象执行一次覆盖扩展;
- 连接两个 middleware,分别是 authenticate.js 模块和 initialize.js 模块;
- 作为被连接点被顶层的 authenticator.js 模块所引用,并作为 authenticator 的不可或缺的一个组件;
中间件 Middleware
authenticate.js
该模块的重要性不言而喻了,它提供了公共的抽象模板方法 authenticate() 来供其它所扩展出来 Authenticate Strategy 所调用,比如 Session Strategy、Local Strategy、 Basic Strategy 等等;该部分内容将会在下一博文中进行专门阐述;注意,该对象会引用 http 包中的 request.js 模块,该模块扩展了 logIn、logOut 和 isAuthenticated 等方法,正如有关连接器的第一点所描述的那样,这些扩展方法将会被注入到 http.IncomingMessage 既 req 对象中;
- initialize.js
提供对每次请求的初始化动作,该动作主要发生在如何初始化某些对象到 req 和 session 中;类图中,笔者将这种初始化动作用一个表达式总结了,两方面内容,1) 将 passport 对象赋值给 req._passport.instance 对象;2) 将 session 中对应键 passport._key 的值赋值给 req._passport.session;尤其要注意第二点,也就是说,在 passport 框架中,req._passport.session 引用的正是 session 中的值,因此,该值会随着 Session 的失效而失效;相关方法,也是该模块中的唯一一个方法,如下1
2
3
4
5
6
7
8
9
10
11
12
13
14module.exports = function initialize(passport) {
return function initialize(req, res, next) {
req._passport = {};
req._passport.instance = passport;
if (req.session && req.session[passport._key]) {
// load data from existing session
req._passport.session = req.session[passport._key];
}
next();
};
};
Passport 对象,既模块 authenticator.js 中所定义的 Authenticator 对象;
当使用语句 const passport = require(‘passport’) 所 export 出来的正是 authenticator.js 模块中所定义的 Authenticator 对象;从我的感受来讲,它更像是充当的一个适配器的角色,来适配用户自定义的功能组件;为什么这么说呢?看下面的代码,1
2
3
4
5
6
7
8
9
10
11
12
13
14
15
16
17passport.use(new LocalStrategy(
(username, password, done) => {
User.findByUsername(username, (error, user) => {
if (error) return done(error);
if (!user) return done(null, false);
if (user.password !== password) return done(null, false);
return done(null, user);
});
}
));
passport.serializeUser((user, done) => done(null, user.id));
// 这里实际上就是接口了,你可以自定义如何查找 user 的方式;要注意,官方文档上说明的是,这种情况是使用 session 才有的序列化方式
passport.deserializeUser((id, done) => {
db.users.findById(id, (error, user) => done(error, user));
});通过 passport 对象也就是 Authenticator,扩展了用户自定义的验证策略,以及序列化和反序列化的动作;这里笔者稍微提及一下有关序列化和反序列化的操作,passport 的设计中为了尽最大限度的减少内存的占用,往往只需要将认证成功以后的 user id 保存在 session 中,这部分逻辑是由 serializeUser 扩展方法所提供的,如下,
1
passport.serializeUser((user, done) => done(null, user.id));
通过 done 方法的参数 user.id 传递给 session manager,然后将认证成功以后的用户的 user.id 保存到 session 中,当然,这里也可以不传递 user.id,你可以传递 user.username 或者 user.email 等等,甚至于你可以直接传递一个 user 对象给 session manager,但通常我们不推荐这么做;而后,当应用需要获取得到用户信息的时候该怎么办呢?是的,就是调用用户自定义扩展的 deserializeUser 来实现的,
1
2
3passport.deserializeUser((id, done) => {
db.users.findById(id, (error, user) => done(error, user));
});Strategy
passport 默认提供了 Session Strategy 框架,用于实现基于 Session 的用户认证功能;
源码分析之初始化流程分析
概述
Authenticator 的初始化流程主要对应以下的三行代码,
1 | const passport = require('passport'); |
- 其中 require(‘passport’) 的核心功能就是加载并初始化 passport 框架的各个核心模块;
- app.use(passport.initialize())
通过 passport.initialize() 初始化方法返回 initialize.js 模块中所 exported 的 initialize 方法引用,这里将该应用通过 app.use 注入 Express,使得以后每次请求到来的时候,都会调用该 initialize 方法;而 initialize.js#initialize 方法的关键部分在于以下两点,
1) 将 Authenticator 实例赋值给了 req._passport.instance
2) 将 Session 有关 passport 的缓存值全部赋值给了 req._passport.session
这部分的详细分析参考 Authenticator initialize 初始化流程 - app.use(passport.session())
这部分的代码的含义,容易被它的命名所干扰,实际上这里是注入 Session Strategy 进行验证的方法引用,以便以后每次请求到来以后,都会首先使用 Session Strategy 进行校验,校验的大致过程为,判断当前的 session 中是否有个 passport user,如果有,则证明之前已经验证过了,则通过 deserializeUser 接口从数据源中试图去加载用户,主要是判断该用户是否真实存在;这部分内容将会在小节中详细分析;
Sequence Diagram
相关流程图如下,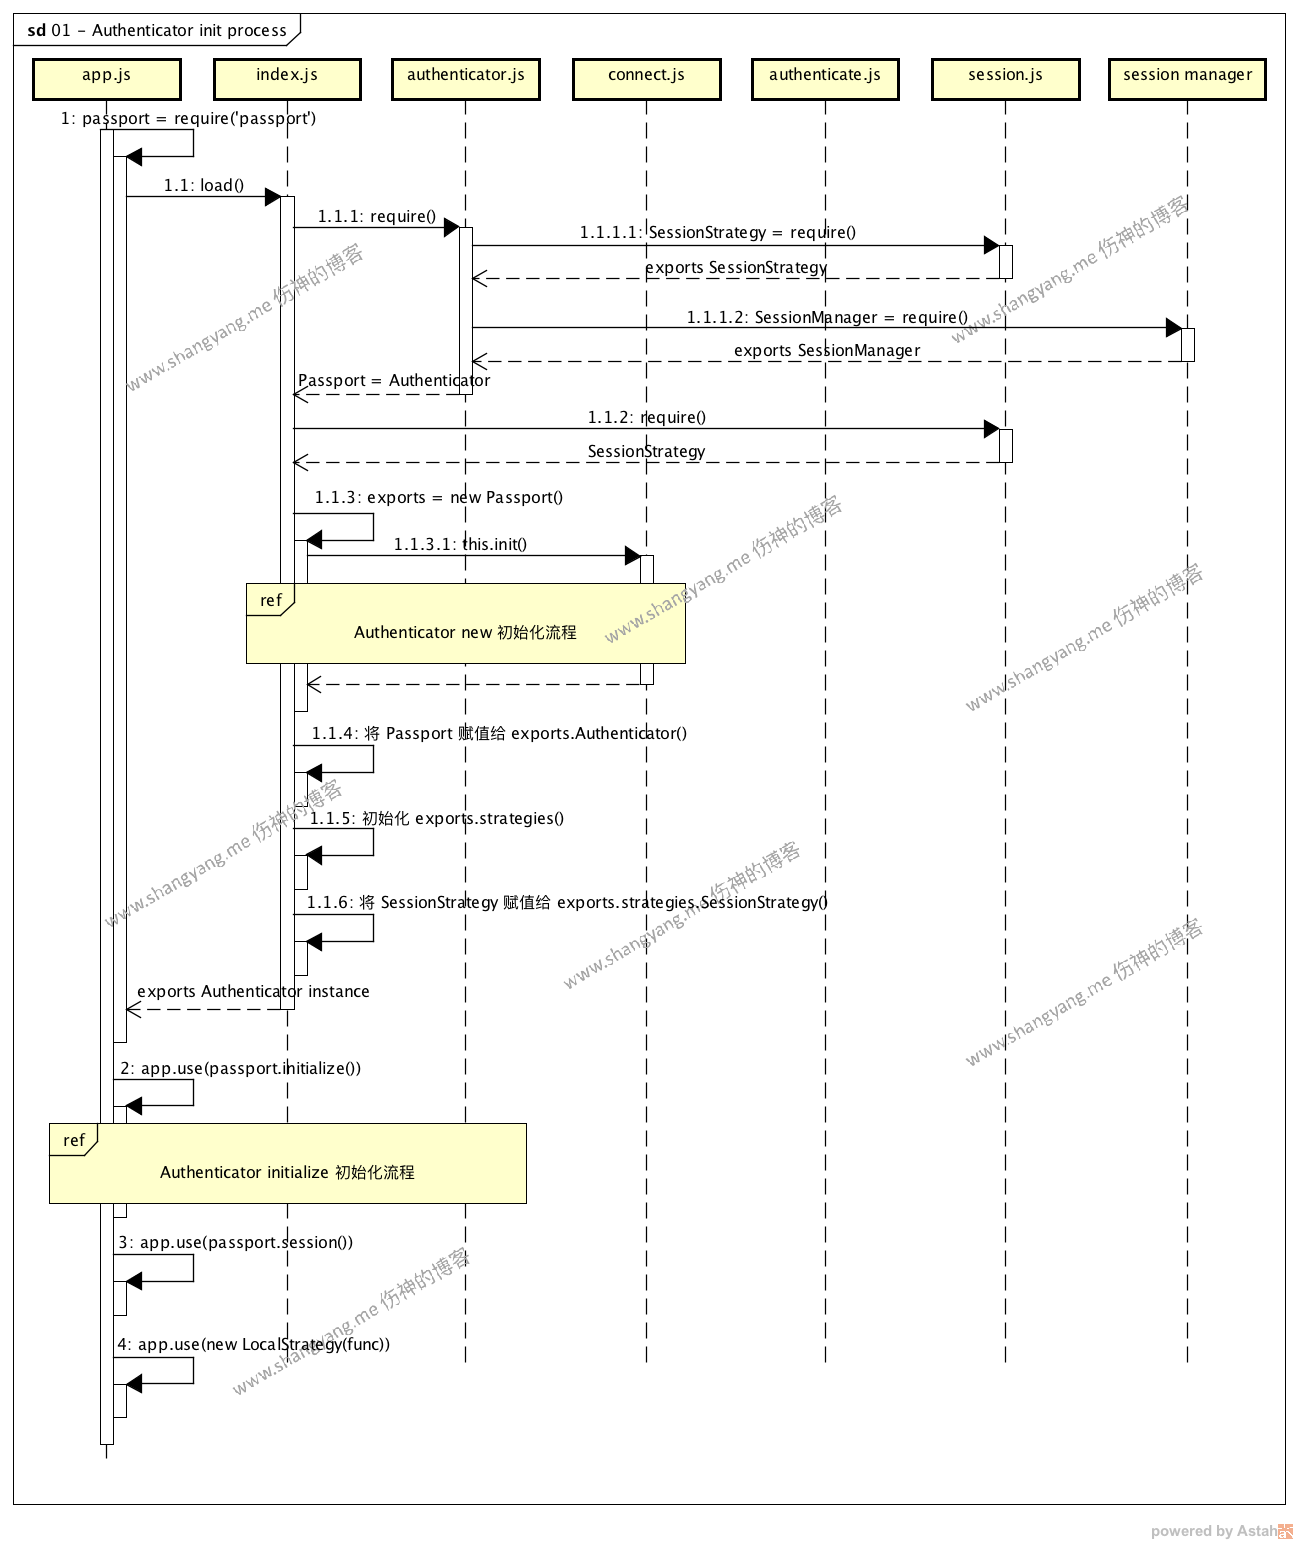
初始化流程非常直接,总共分为四大步骤,
- require 流程
此部分对应主流程的第 1 步和相关子步骤中;核心目的就是用来加载 passport 各个核心子模块的; - 注册 initialize 流程
此部分对应主流程的第 2 步和相关子步骤中;核心目的就是为 Express 注入 initialize.js 模块的 initialize 方法句柄,使得每次请求都必须通过该方法进行初始化操作; - 注册 Session Strategy 认证流程
此部分对应主流程的第 3 步和相关子步骤中;核心目的就是为 Express 注入 Session Strategy 的方法句柄,使得每次请求都必须通过该方法进行 Session 验证操作; - 注册其它 Strategy 认证流程
此部分对应主流程的第 4 步和相关子步骤中;该步骤笔者主要是以 Local Strategy 的注册流程作为例子讲述;
要注意的地方有,
- 当通过 1.1.1.1 加载 session 模块的时候,返回的是 SessionStrategy 模板对象,并赋值到 index 模块的 exports.strategies.SessionStrategy 对象中,随着 exports 的返回而返回;
- 步骤 1.1.3,new Passport() 这里的 Passport 是 Authenticator 对象;
- 通过 require(‘passport’) 返回的是一个 Authenticator 实例并赋值给 passport;对应上述代码第 1 行,
1
const passport = require('passport');
下面,笔者将就这三个核心步骤分别进行描述,
require 流程
该流程其它地方都没什么好多说的,唯一就是实例化 Authenticator 的流程,所以,本小节,笔者主要就实例化 Authenticator 的流程做详细的描述,
实例化 Authenticator ( new Authenticator )流程
该流程是由 Step 1.1.3 new Passport() 步骤所触发,注意,这里的 Passport 引用的是 Authenticator;先来看下 Authenticator 对象的代码,
1 | function Authenticator() { |
可以看到,在通过关键字 new 初始化 Authenticator 的时候,创建了很多关键的属性,包括 _strategies、_serializers、_deserializers 以及 _framework 等,但最为关键的是,其调用 init() 方法的流程,先来看看 init() 方法里面做了什么,
1 | Authenticator.prototype.init = function() { |
相关流程图如下所述,
在读这个流程图的时候,首先要映在脑海的是,这里所初始化所得到的 Authenticator 实例其实就是 app.js 模块中的 passport 实例;
整个 init 过程分为三个子流程,
init framework
对应的是如下代码的逻辑,1
this.framework(require('./framework/connect')());
首先,来分析一下 require 的逻辑,加载 connect 模块,对应执行如下代码,
1
2
3
4
5
6
7
8
9
10exports = module.exports = function() {
// HTTP extensions.
exports.__monkeypatchNode();
return {
initialize: initialize,
authenticate: authenticate
};
};exports.__monkeypatchNode();
1
2
3
4
5
6
7
8
9
10
11exports.__monkeypatchNode = function() {
var http = require('http');
var IncomingMessageExt = require('../http/request');
http.IncomingMessage.prototype.login =
http.IncomingMessage.prototype.logIn = IncomingMessageExt.logIn;
http.IncomingMessage.prototype.logout =
http.IncomingMessage.prototype.logOut = IncomingMessageExt.logOut;
http.IncomingMessage.prototype.isAuthenticated = IncomingMessageExt.isAuthenticated;
http.IncomingMessage.prototype.isUnauthenticated = IncomingMessageExt.isUnauthenticated;
};该方法非常的关键,扩展了 http.IncomingMessage 属性,也就是 Express 中的 req 对象;IncomingMessageExt 就是 passport 中 request.js 模块中的 req 对象,也就是使用 request.js 模块中的 logIn、logOut 和 isAuthenticated 等方法来覆盖 Express req 的相对应的方法;备注,之前误以为只能在每次请求调用 authenticate.js#authenticate 方法的时候才会做相应的覆盖操作,原来在 require 流程中就已经涉及了;
- 再次,通过 this.framework() 方法将上述的初始化后的 connect 对象赋值给 Authenticator._framework
1
2
3
4Authenticator.prototype.framework = function(fw) {
this._framework = fw;
return this;
};
初始化 Session Strategy 并赋值给 Authenticator._strategies,入口方法如下,
1
this.use(new SessionStrategy(this.deserializeUser.bind(this)));
值得一提的是,使用了 Authenticator.deserializeUser 方法作为构造参数来初始化 SessionStrategy 对象,也就是说,SessionStrategy 对象的属性 _deserializeUser 引用的是 Authenticator.deserializeUser 方法;然后通过 authenticator.use() 方法将 SessionStrategy 赋值给了 authenticator._strategies 对象,
1
2
3
4
5
6
7
8
9
10Authenticator.prototype.use = function(name, strategy) {
if (!strategy) {
strategy = name;
name = strategy.name;
}
if (!name) { throw new Error('Authentication strategies must have a name'); }
this._strategies[name] = strategy;
return this;
};session.js 模块中主要创建了 SessionStrategy 对象以及 SessionStrategy 的 authenticate() 方法用来进行用户身份验证;
初始化 Session Manager 并赋值给 Authenticator._sm 属性;入口方法,
1
this._sm = new SessionManager({ key: this._key }, this.serializeUser.bind(this));
要注意的是,在初始化 SessionManager 的时候,使用了 Authenticator.serializeUser 方法作为构造参数;
备注,SessionManager 提供了两个管理 Session 的方法,logIn() 和 logOut() 方法;要注意的是,要区分它与 request.js 模块中 logIn() 和 logOut() 这两个同名方法之间的关系,关系是,request.js 模块中 logIn() 和 logOut() 方法最终会通过判断是否启动了 session 来决定是否调用 Session Manager 中的 logIn() 和 logOut() 方法;来看一下 request.js 模块中 logIn 的方法片段,
1
2
3
4
5
6
7
8
9
10
11
12req.logIn = function(user, options, done) {
...
if (session) {
...
var self = this;
this._passport.instance._sm.logIn(this, user, function(err) {
if (err) { self[property] = null; return done(err); }
done();
});
}
...
};this._passport.instance._sm → 就是上面所初始化所得的 Session Manager 实例;
注册 initialize 流程
该流程是由如下代码所触发,对应流程图中的 Step 2;
1 | app.use(passport.initialize()); |
注意,passport 对象就是通过 require 流程实例化所得到的 Authenticator 对象;来看 passport.initialize() 方法,
1 | Authenticator.prototype.initialize = function(options) { |
可见,它调用的是 this._framework 对象的 initialize 方法,由上述分析可知,this._framework → connect.js 模块所 export 的对象,因此,可知,this._framework.initialize(this, options) 调用的就是 initialize.js 模块的 initialize 方法,如下,
1 | module.exports = function initialize(passport) { |
注意,这里调用的 initialize 的最外层初始化的方法,function initialize(passport),目的就是为里层的 initialize(req, res, next) 生成闭包,passport;但是我在这里看到了一个小小的 defect,在 passport.initialize() 中通过,
1 | return this._framework.initialize(this, options); |
调用的时候传递了两个参数用来调用 initialize.js 中的 initialize(passport) 方法,但是只有第一个参数 this 既 Authenticator 对象会赋值给 passport,而这里所传递的 options 没起到任何的作用,不清楚作者这么写的目的是为什么?难道是为了适配将来更多的像 initialize.js 这样的中间件模块?其核心功能就是为里层的 initialize(req, res, next) 方法生成相关的闭包 passport,并将里层的 initialize(req, res, next) 方法的句柄返回并注入到 Express 中,
1 | app.use(passport.initialize()); |
起到的作用就是,以后每次请求的时候,都会调用里层的 initialize(req, res, next) 方法;
注册 Session Strategy 认证流程
此部分对应流程图中的 step 3,相关代码如下,
1 | app.use(passport.session()); |
先来分析 passport.session() 的执行流程,
1 | Authenticator.prototype.session = function(options) { |
1 | Authenticator.prototype.authenticate = function(strategy, options, callback) { |
可以看到,最终实际上调用的就是 this._framework.authenticate() 方法,由前面的分析可知,this._framework 对应的就是 connect.js 模块所 exports 的对象,其中就有 authenticate 方法属性,由此,这里实际上调用的是 authenticate.js 模块的外层 authenticate(passport, name, options, callback) 方法,
1 | module.exports = function authenticate(passport, name, options, callback) { |
其目的就是为里层的将会被注册到 Express 的 authenticate(req, res, next) 生成相关的闭包,passport, name, options, callback,然后将里层的 authenticate(req, res, next) 方法引用返回并通过如下代码注入到 Express 中,
1 | app.use(passport.session()); |
所达到的目的就是,以后每次调用请求,都会执行该里层的 authenticate(req, res, next) 方法来来实现对请求 req 的验证动作;
备注,里层的 authenticate(req, res, next) 方法中被省略掉的代码非常的重要,它是执行用户身份认证的模板代码,标准流程,这部分内容笔者将会在下一篇博文中重点进行阐述;
注册其它 Strategy 验证流程
这里以 Local Strategy 为例来演示相关的注册流程,相关代码如下,
1 | const LocalStrategy = require('passport-local').Strategy; |
代码第 1 行,从 passport-local 模块中获得 exports 出来的 Strategy 对象,然后赋值给 LocalStrategy;看看 passport-local 模块中定义了什么,(备注,当使用 npm install passport-local 命令安装 passport-local 模块以后,会在本地的 node_modules 目录中下载并生成 passport-local/ 目录,相关源码正在此处;)
1
2
3
4
5
6
7
8
9
10
11
12
13
14
15
16
17
18
19
20
21
22
23
24
25
26
27
28
29
30
31
32
33
34function Strategy(options, verify) {
if (typeof options == 'function') {
verify = options;
options = {};
}
if (!verify) { throw new TypeError('LocalStrategy requires a verify callback'); }
this._usernameField = options.usernameField || 'username';
this._passwordField = options.passwordField || 'password';
passport.Strategy.call(this);
this.name = 'local';
this._verify = verify;
this._passReqToCallback = options.passReqToCallback;
}
/**
* Authenticate request based on the contents of a form submission.
*
* @param {Object} req
* @api protected
*/
Strategy.prototype.authenticate = function(req, options) {
options = options || {};
var username = lookup(req.body, this._usernameField) || lookup(req.query, this._usernameField);
var password = lookup(req.body, this._passwordField) || lookup(req.query, this._passwordField);
...
}
/**
* Expose `Strategy`.
*/
module.exports = Strategy;首先,定义了一个 Strategy 对象,该对象就是 Local Strategy,主要用来构造通过用户名和密码验证的 Strategy,此部分要注意将该 Strategy 命名为 ‘local’,该名字将会被作为关键字注入 passport._strategies 供 authenticate.js 模块中的 authenticate() 模板方法进行调用;
再次,定义了实例方法 authenticate(),该方法将会被 authenticate.js 模块中的 authenticate() 模板方法进行回调,进而实现对用户身份的认证以及相关上下文的创建,具体相关的验证流程笔者将会在另外一篇博文中进行阐述,这里需要记住的是,passport-local 模块主要负责定义 Local Strategy 的验证策略;还要注意的是,上述的代码 11 行是 javascript 的面向对象中的“继承”的写法;
代码第 3 到 12 行,实例化 LocalStrategy 对象并注入 passport;注意里面用户自定义的方法,
1
2
3
4
5
6
7
8(username, password, done) => {
User.findByUsername(username, (error, user) => {
if (error) return done(error);
if (!user) return done(null, false);
if (user.password !== password) return done(null, false);
return done(null, user);
});
}上述的 lambda 方法将会作为 options 参数用来构建 passport-local 模块中的 Strategy 对象,也就是这里的 LocalStrategy,从其构造函数中可以看到,用户自定义的 lambda 回调方法赋值给了 LocalStrategy 实例的私有属性 _verify,_verify 将会在 LocalStrategy 执行 authenticate 的时候被回调;总结而言,passport 对象使用 use 方法,
1
passport.use(LocalStrategy instance)
将 LocalStrategy instance 以关键字 ‘local’ (注: 该关键字 local 是 LocalStrategy 自己的一个实例属性) 注入 passport._strategies 供 authenticate.js 模块中的 authenticate() 模板方法进行调用;
代码第 14 行,passport.authenticate(‘local’, {…})
1
passport.authenticate('local', { successReturnToOrRedirect: '/', failureRedirect: '/login' })
该注册过程与注册 Session 认证流程类似,得到一个闭包上下文 name = ‘local’ 的属于 authenticate.js 模块的 authenticate(req, res, next) 方法句柄;不过要注意的是,这里可以通过数组的方式使用多个 Strategies 来进行验证,比如,
1
2
3
4
5app.post('/token',
passport.authenticate(['basic', 'oauth2-client-password'], { session: false }),
oauth2.token(),
oauth2.errorHandler()
);这样的话,表示当请求 /token 访问的时候,会使用 Basic Strategy 和 OAuth2 Client Password Strategy 对用户的身份进行验证,要注意的是,这里会根据 Strategy 注册的顺序依次进行验证,所以,会首先通过 basic 验证,若没有通过,则再通过 OAuth2 Client Password Strategy 对用户身份进行验证;