前言
笔者打算写一系列的文章,记录自己在学习并使用 Scrapy 的点滴;作者打算使用 python 3.6 作为 Scrapy 的基础运行环境;
本文为作者的原创作品,转载需注明出处;
Scrapy 安装
我本地安装有两个版本的 python, 2.7 和 3.6;而正如前言所描述的那样,笔者打算使用 Python 3.6 的环境来搭建 Scrapy;
1 | $ pip install Scrapy |
默认安装的支持 Python 2.7 版本的 Scrapy;
1 | $ pip3 install Scrapy |
安装的是支持 python 3.x 版本的 Scrapy;不过安装过程中,遇到了些问题,HTTPSConnectionPool(host=’pypi.python.org’, port=443): Read timed out.解决办法是,在安装的过程中,延长超时的时间,
1 | $ pip3 install -U --timeout 1000 Scrapy |
Scrapy Tutorial
创建 tutorial 项目
使用
1 | $ scrapy startproject tutorial |
可见默认使用的 python 2.7,但是如果需要创建一个支持 python 3.x 版本的 tutoiral 项目呢?如下所示,使用 python3 -m
1 | $ python3 -m scrapy startproject tutorial |
导入 PyCharm
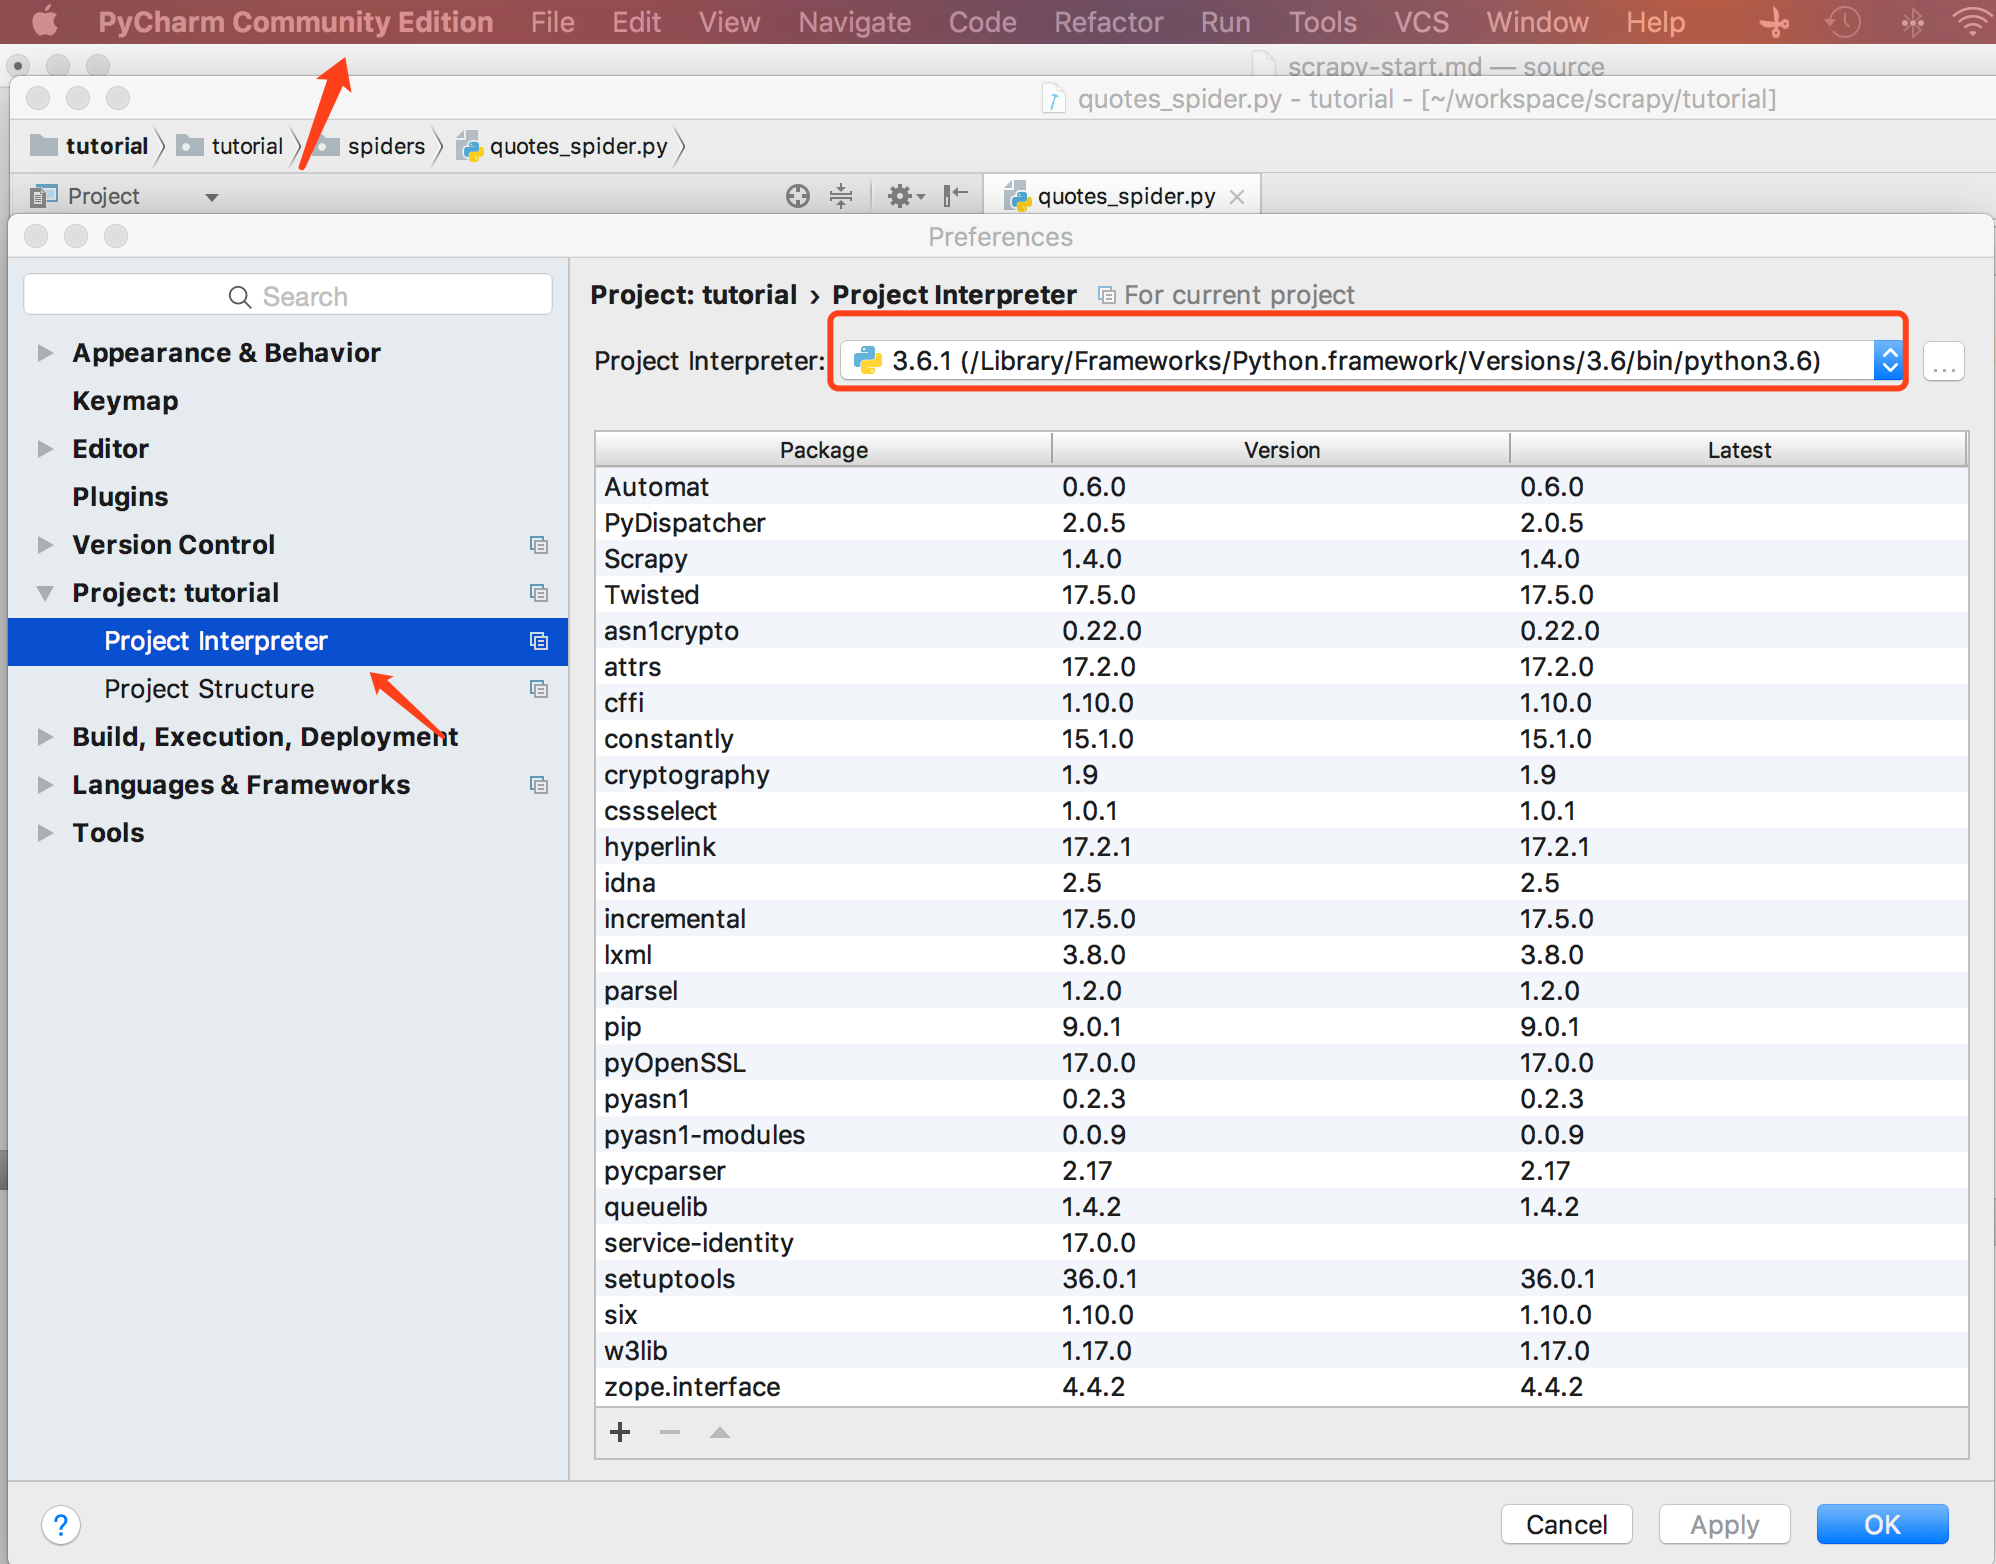
直接 open 项目工程 /Users/mac/workspace/scrapy/tutorial;这里需要注意的是默认的 PyCharm 使用的解释器 Interpretor 是我本地的 Python 2.7;这里需要将解释器改为 Python 3.6;下面记录下修改的步骤,
- 点击左上角 PyCharm Community Edition,进入 Preferences
- 点击 Project:tutorial,然后选择 Project Interpreter,然后设置解释器的版本,如下
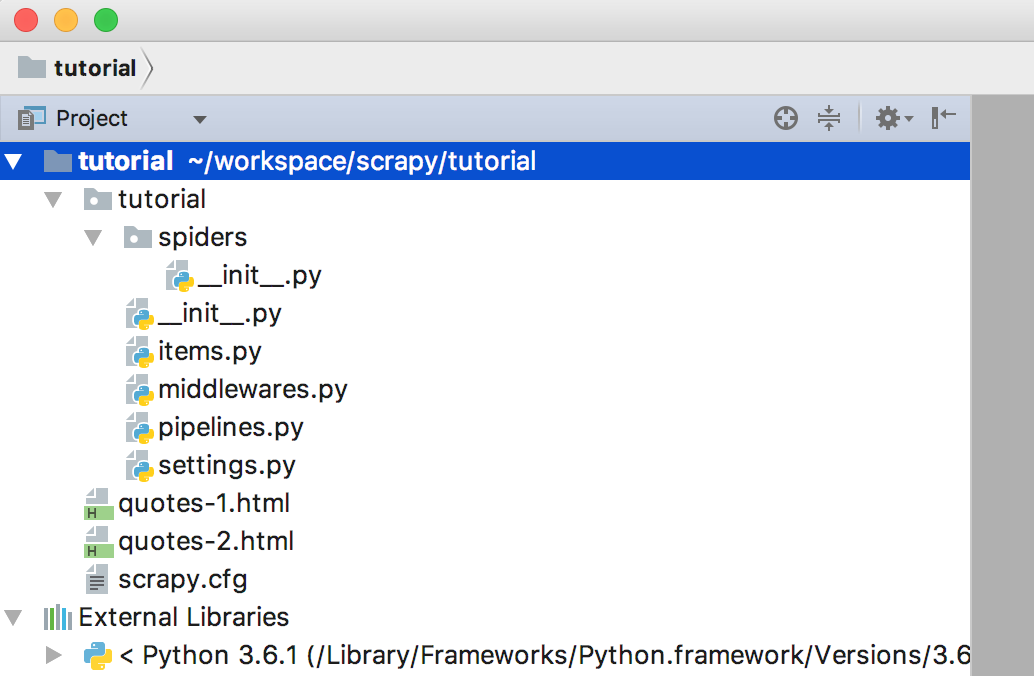
工程结构
通过命令构建出来的项目骨架如图所示
第一个 Spider
我们来新建一个 Spider 类,名叫 quotes_spider.py,并将其放置到 tutorial/spiders 目录中
1 | import scrapy |
可以看到,我们新建的 QuotesSpider 类是继承自 scrapy.Spider 类的;下面看看其属性和方法的意义,
- name
是 Spider 的标识符,用于唯一标识该 Spider;它必须在整个项目中是全局唯一的; - start_requests()
必须定义并返回一组可以被 Spider 爬取的 Requests,Request 对象由一个 URL 和一个回调函数构成; - parse()
就是 Request 对象中的回调方法,用来解析每一个 Request 之后的 Response;所以,parse() 方法就是用来解析返回的内容,通过解析得到的 URL 同样可以创建对应的 Requests 进而继续爬取;
再来看看具体的实现,
- start_request(self) 方法分别针对 http://quotes.toscrape.com/page/1/ 和 http://quotes.toscrape.com/page/2/ 创建了两个需要被爬取的 Requests 对象;并通过 yield 进行迭代返回;备注,yield 是迭代生成器,是一个 Generator;
- parse(self, response) 方法既是对 Request 的反馈的内容 Response 进行解析,这里的解析的逻辑很简单,就是分别创建两个本地文件,然后将 response.body 的内容放入这两个文件当中。
如何执行
执行的过程需要使用到命令行,注意,这里需要使用到scrapy命令来执行;
1 | $ cd /Users/mac/workspace/scrapy/tutorial |
大致会输出如下内容
1 | ... |
可以看到,通过爬取,我们在本地生成了两个 html 文件 quotes-1.html 和 quotes-2.html
如何提取
通过命令行的方式提取
Scrapy 提供了命令行的方式可以对需要被爬取的内容进行高效的调试,通过使用Scrapy shell进入命令行,然后在命令行中可以快速的对要爬取的内容进行提取;
如何进入 Scrapy shell 环境
我们试着通过 Scrapy shell 来提取下 “http://quotes.toscrape.com/page/1/" 中的数据,通过执行如下命令,进入 shell
1 | $ scrapy shell "http://quotes.toscrape.com/page/1/" |
输出
1 | [ ... Scrapy log here ... ] |
这样,我们就进入了 Scrapy shell 的环境,上面显示了连接请求和返回的相关信息,response 返回 status code 200 表示成功返回;
通过 CSS 标准进行提取
这里主要是遵循 CSS 标准 https://www.w3.org/TR/selectors/ 来对网页的元素进行提取,
通过使用 css() 选择我们要提取的元素;下面演示一下如何提取元素 <title/>
1
2>>> response.css('title')
[<Selector xpath=u'descendant-or-self::title' data=u'<title>Quotes to Scrape</title>'>]可以看到,它通过返回一个类似 SelectorList 的对象成功的获取到了 http://quotes.toscrape.com/page/1/ 页面中的 <title/> 的信息,该信息是封装在
Selector对象中的 data 属性中的;提取
Selector元素的文本内容,一般有两种方式用来提取,通过使用 extract() 或者 extract_first() 方法来提取元素的内容;下面演示如何提取 #1 返回的元素 <title/> 中的文本内容 text;
1
2>>> response.css('title::text').extract_first()
'Quotes to Scrape'extract_first() 表示提取返回队列中的第一个
Selector对象;同样也可以使用如下的方式,1
2>>> response.css('title::text')[0].extract()
'Quotes to Scrape'不过 extract_first() 方法可以在当页面没有找到的情况下,避免出现
IndexError的错误;通过 re() 方法来使用正则表达式的方式来进行提取元素的文本内容
1
2
3
4
5
6>>> response.css('title::text').re(r'Quotes.*')
['Quotes to Scrape']
>>> response.css('title::text').re(r'Q\w+')
['Quotes']
>>> response.css('title::text').re(r'(\w+) to (\w+)')
['Quotes', 'Scrape']备注,最后一个正则表示式返回了两个匹配的 Group;
使用 XPath
除了使用 CSS 标准来提取元素意外,我们还可以使用 XPath 标准来提取元素,比如,
1 | >>> response.xpath('//title') |
XPath 比 CSS 的爬取方式更为强大,因为它不仅仅是根据 HTML 的结构元素去进行检索(Navigating),并且它可以顺带的对文本(text)进行检索;所以它可以支持 CSS 标准不能做到的场景,比如,检索一个 包含文本内容”Next Page”的 link 元素;这就使得通过 XPath 去构建爬虫更为简单;
提取 quotes 和 authors
下面我们将来演示如何提取 http://quotes.toscrape.com 首页中的内容,先来看看首页的结构
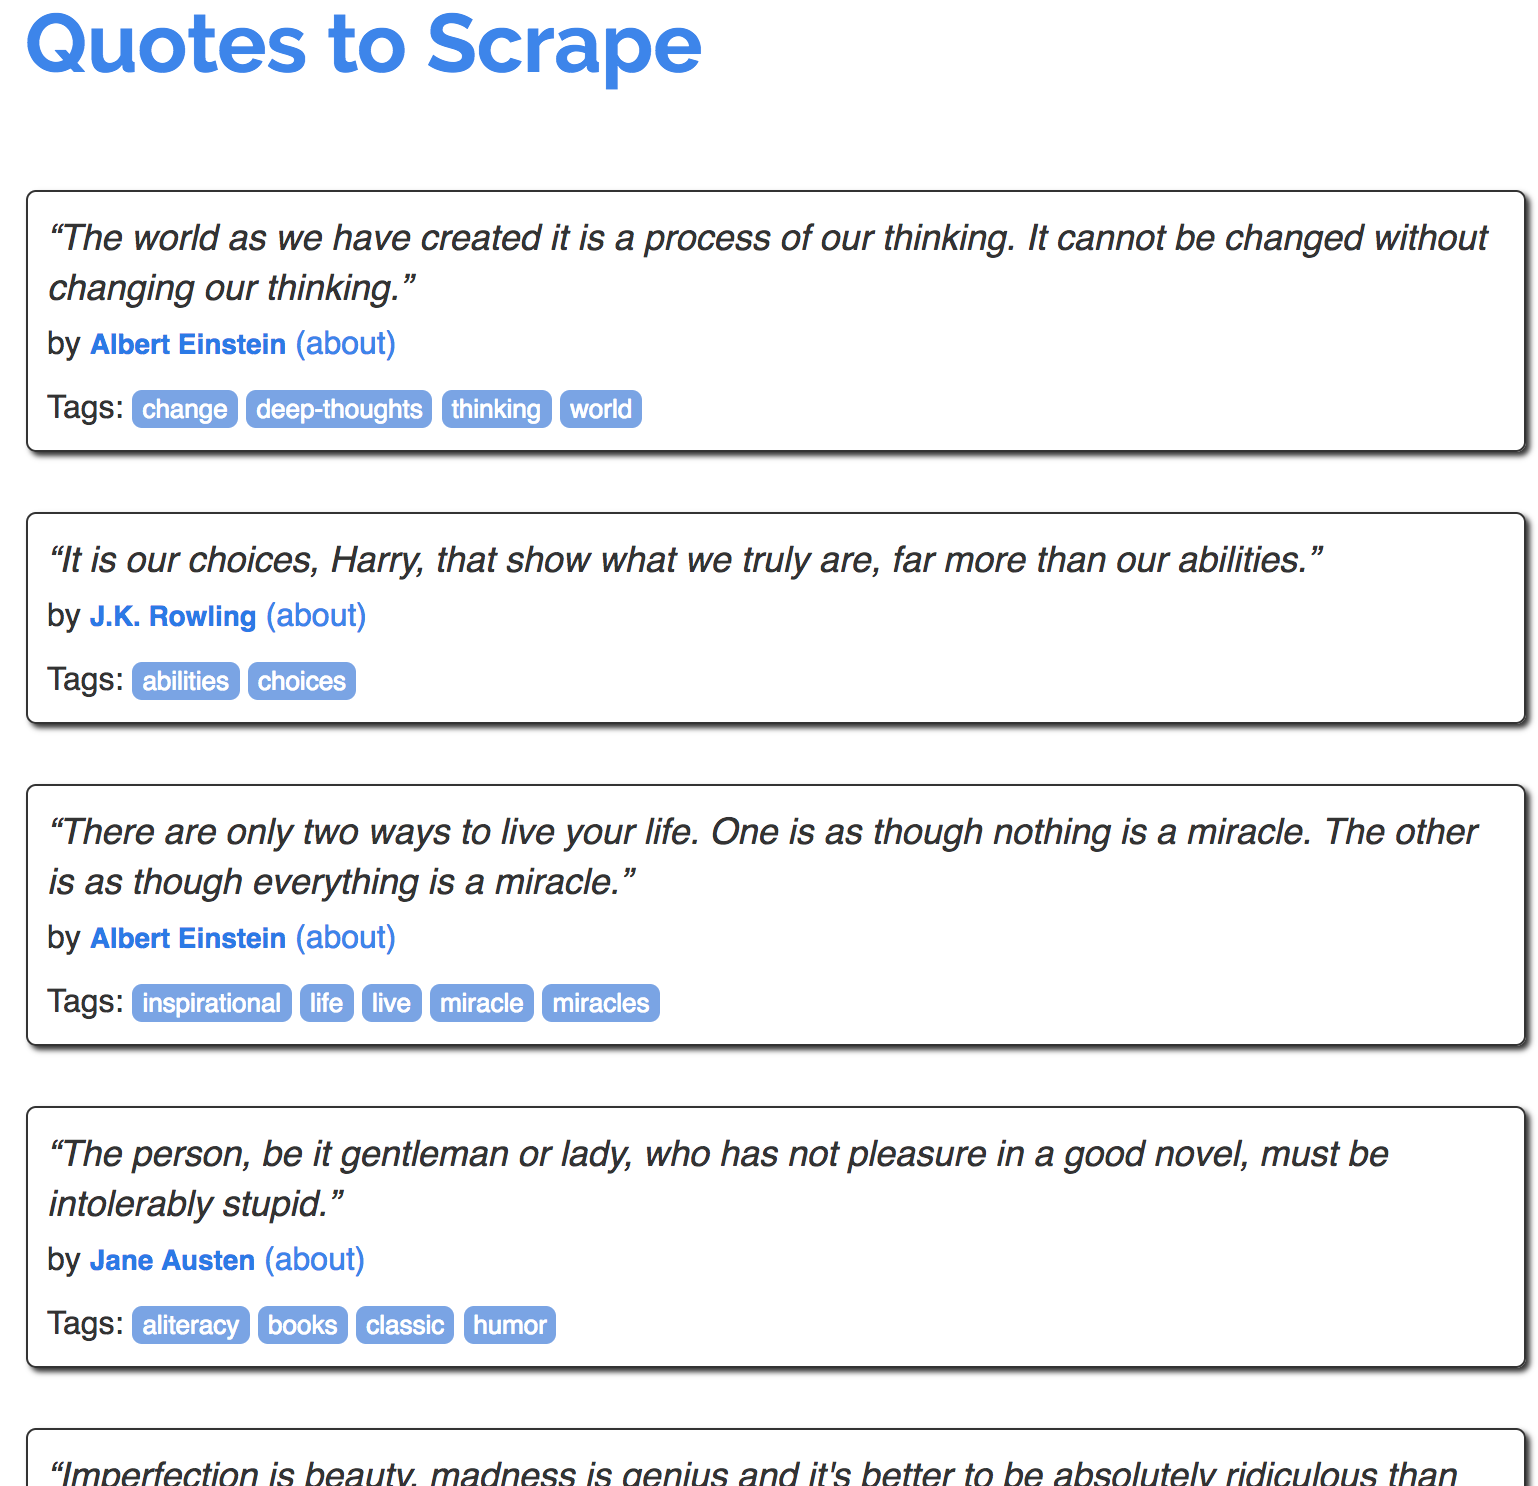
可以看到,里面每个段落包含了一个名人的一段语录,那么我们如何来提取所有的相关信息呢?
我们从提取第一个名人的信息入手,看看如何提取第一个名人的名言信息;可以看到,第一个名人的语句是爱因斯坦的,那么我们试着来提取名言、作者以及相关的tags;
1 | <div class="quote"> |
下面我们就来试着一步一步的去提取相关的信息,
首先,进入 Scrapy Shell,
1 | $ scrapy shell 'http://quotes.toscrape.com' |
然后,获取 <div class="quote" /> 元素列表
1 | >>> response.css("div.quote") |
这里会返回一系列的相关的 Selectors,不过因为这里我们仅仅是对第一个名言进行解析,所以我们只取第一个元素,并将其保存在 quote 变量中
1 | >>> quote = response.css("div.quote")[0] |
然后,我们来分别提取title、author和tags
提取
title1
2
3>>> title = quote.css("span.text::text").extract_first()
>>> title
'“The world as we have created it is a process of our thinking. It cannot be changed without changing our thinking.”'提取
author1
2
3>>> author = quote.css("small.author::text").extract_first()
>>> author
'Albert Einstein'提取
tags,这里需要注意的是,tags 是一系列的文本,1
2
3>>> tags = quote.css("div.tags a.tag::text").extract()
>>> tags
['change', 'deep-thoughts', 'thinking', 'world']
Ok,上述完成了针对其中一个名言信息的提取,那么,我们如何提取完所有名人的名言信息呢?
1 | for quote in response.css("div.quote"): |
写个循环,将所有的信息的信息放入 Python dictionary;
通过 Python 程序来进行提取
本小计继续沿用提取 quotes 和 authors 小节的例子,来看看如何通过 python 程序来做相同的爬取动作;
提取数据
修改该之前的 quotes_spider.py 内容,如下,
1 | import scrapy |
执行上述的名为 quotes 的爬虫,
1 | $ scrapy crawl quotes |
执行结果如下,
1 | 2016-09-19 18:57:19 [scrapy.core.scraper] DEBUG: Scraped from <200 http://quotes.toscrape.com/page/1/> |
可以看到,我们通过 python 创建的爬虫 quotes 一条一条的返回了爬取的信息;
保存数据
最简单保存方式被爬取的数据是通过使用 Feed exports,通过使用如下的命令,
使用 JSON 格式
1 | $ scrapy crawl quotes -o quotes.json |
上述命令会生成一个文件quotes.json,该文件中包含了所有被爬取的数据;不过由于历史的原因,Scrapy 是往一个文件中追加被爬取的信息,而不是覆盖更新,所以如果你执行上述命令两次,将会得到一个损坏了的 json 文件;
使用 JSON Lines 格式
1 | $ scrapy crawl quotes -o quotes.jl |
这样,保存的文件就是 JSON Lines 的格式了,注意,这里的唯一变化是文件的后缀名改为了.jl;
补充,JSON Lines 是另一种 JSON 格式的定义,基本设计是每行是一个有效的 JSON Value;比如它的格式比 CSV 格式更友好,
1 | ["Name", "Session", "Score", "Completed"] |
同时也可以支持内嵌数据,
1 | {"name": "Gilbert", "wins": [["straight", "7♣"], ["one pair", "10♥"]]} |
JSON Lines 格式非常适合处理含有大量数据的文件,通过迭代,每行处理一个数据对象;不过,要注意的是,使用 JSON lines 的方式,Scrapy 同样的是以追加的方式添加内容,只是因为 JSON Lines 逐行的方式添加被爬取的数据,所以以追加的方式并不会想使用 JSON 格式那样导致文件格式错误;
如果是一个小型的项目,使用 JSON Lines 的方式就足够了;但是,如果你面临的是一个更复杂的项目,而且有更复杂的数据需要爬取,那么你就可以使用 Item Pipeline;一个 demo Pipelines 已经帮你创建好了,tutorial/pipelines.py;
提取下一页(提取链接信息)
如何提取章节详细的描述了如何爬取页面的信息,那么,如何爬取该网站的所有信息呢?那么就必须爬取相关的链接信息;那么我们依然以 http://quotes.toscrape.com 为例,来看看我们该如何爬取链接信息,
我们可以看到,下一页的链接 HTML 元素,
1 | <ul class="pager"> |
我们可以通过 shell 来抓取它,
1 | >>> response.css('li.next a').extract_first() |
这样,我们得到了这个anchor元素,但是我们想要得到的是其href属性;Scrapy 支持 CSS 扩展的方式,因此我们可以直接爬取其属性值,
1 | >>> response.css('li.next a::attr(href)').extract_first() |
好的,我们现在已经知道该如何获取下一页链接的相对地址了,那么我们如何修改我们的 python 程序使得我们可以自动的爬取所有页面的数据呢?
使用 scrapy.Request
1 | import scrapy |
这里简单的描述下程序的执行逻辑,通过 for 循环处理完当前页面的爬取操作,然后执行获取下一页的相关操作,首先获得下一页的相对路径并保存到变量 next_page 中,然后通过 response.urljon(next_page) 方法得到绝对路径;最后,通过该绝对路径再生成一个 scrapy.Request 对象返回,并加入 爬虫队列中,等待下一次的爬取;由此,你就可以动态的去爬取所有相关页面的信息了;
基于此,你就可以建立起非常复杂的爬虫了,同样,可以根据不同链接的类型,构建不同的 Parser,那么就可以对不同类型的返回页面进行分别处理;
使用 response.follow
不同于使用 scrapy Request,需要通过相对路径构造出绝对路径,response.follow 可以直接使用相对路径,因此就不需要调用 urljoin 方法了;注意,response.follow 直接返回一个 Request 实例,可以直接通过 yield 进行返回;所以,上述代码可以简化为
1 | import scrapy |
另外,response.follow 在处理 <a> 元素的时候,会直接使用它们的 href 属性;所以上述代码还可以简化为,
1 | next_page = response.css('li.next a').extract_first() |
因此匹配的时候不需要显示的声明 <a> 的属性值了;
定义更多的 Parser
1 | import scrapy |
该例子创建了两个解析方法 parse() 和 parse_author(),一个是用来控制整个爬取流程,一个是用来解析 author 信息的;首先,我们来分析一下执行的流程,
进入 parse(),从当前的页面中爬取得到所有相关的 author href 属性值既是一个链接,然后针对该链接,通过 response.follow 创建一个新的 Request 继续进行爬取,通过回调 parse_author() 方法对爬取的内容进行进一步的解析,这里就是对爬取到的 Author 的信息进行提取;
当 #1 有关当前页面所有的 Author 信息都已经爬取成功以后,便开始对下一页进行爬取;
从这个例子中,我们需要注意的是,当爬取当前页面的时候,我们依然可以通过创建子的 Requests 对子链接进行爬取直到所有有关当前页面的信息都已经被爬取完毕以后,方可进入下一个页面继续进行爬取;
另外,需要注意的是,在爬取整个网站信息的时候,必然会有多个相同 Author 的名言,那么势必要爬取到许多的重复的 Author 的信息;这无疑是增加了爬取的压力同时也需要处理大量的冗余数据,基于此,Scrapy 默认实现了对重复的已经爬取过的链接在下次爬取的时候自动过滤掉了;不过,你也可以通过 DUPEFILTER_CLASS 来进行设置是否启用该默认行为;
使用 Spider 参数
你可以通过 commond line 的方式为你的 Spider 提供参数,
1 | $ scrapy crawl quotes -o quotes-humor.json -a tag=humor |
该参数将会被传入 Spider 的 __init__ 方法中,并默认成为当前 Spider quotes 的属性;在 quotes Spider 的 python 应用程序中,可以通过使用 self.tag 来获取该参数信息;
1 | import scrapy |
通过 getattr(self, 'tag', None) 便可以获取从 common line 中传入的 tag 参数,并构造出需要爬取的 URL 链接 http://quotes.toscrape.com/tag/humor
Reference
Scrapy 爬虫框架:http://python.jobbole.com/86405/
Installation Guide: https://doc.scrapy.org/en/latest/intro/install.html
explain how virtualenv used: https://stackoverflow.com/questions/41151141/how-to-get-scrapy-to-use-python-3-when-both-python-versions-are-installed
tutorial guide: https://doc.scrapy.org/en/latest/intro/tutorial.html
Scrapy Clusters: http://scrapy-cluster.readthedocs.io/en/latest/
Scrapy Deployment: https://scrapyd.readthedocs.io/en/latest/deploy.html
Scrapy 0.24 文档:http://scrapy-chs.readthedocs.io/zh_CN/0.24/index.html