References
Spring Framework Source Code: https://github.com/spring-projects/spring-framework
Spring All Project Source Code: https://github.com/spring-projects/
前言
此系列的源码分析是基于当前 Spring 的最新 Release 版本 4.7;
备注,本文是作者的原创作品,转载请注明出处。
源码分析大纲
首先,从 Spring 官网上可以看到如下的一张 Spring Framework 的整体架构图,

可以看到主要包含三个子系统,和一系列中间件;最核心的子系统分别是Spring Core Container 子系统,其余两个子系统是Data Access/Integration 子系统和Web 子系统;除了这些子系统以外,还包含子系统之间的一些核心中间件,包括AOP、Aspects、Instrumetation以及Messaging;
可以看到,Spring Core Container是构建出整个 Spring Framework 的核心,是所以其它子系统和中间件的基石;所以顺利成章,作者的源码分析大纲思路是,首先分析Spring Core Container的核心源码,然后依次分析上层的中间件层,最后到余下的两个子系统;于是呢,有了下面的一系列源码分析文章,
Spring Core Container源码分析系列,
Spring Core Container 源码分析一:官方文档阅读笔记
Spring Core Container 源码分析二:环境准备
Spring Core Container 源码分析三:Spring Beans 初始化流程分析
Spring Core Container 源码分析四:BeanPostProcessor 和 BeanFactoryPostProcessor
Spring Core Container 源码分析五:@Autowired
Spring Core Container 源码分析六:@Service
Spring Core Container 源码分析七:注册 Bean Definitions中间件系列
待续
Spring Framework 源码环境搭建
下载源码
1 | git clone https://github.com/spring-projects/spring-framework.git |
按照下面的操作切换到当前最新 Release 版本 4.3.7
1 | cd spring-framework |
显示所有的 release tag ( 可见当前最新 RELEASE 版的是 4.3.7 )
1 | git tag |
1 | ... |
切换至 tag v4.3.7.RELEASE
1 | git checkout -b v4.3.7.RELEASE_LOCAL v4.3.7.RELEASE |
也可以直接使用命令git checkout v4.3.7.RELEASE,因为 tag 分支上的代码都是只读的,不能修改;所以,如果想对 tag 上的代码进行修改,那么就必须为 tag 创建一个分支 branch。
查看本地分支1
2
3$ git branch
master
* v4.3.7.RELEASE_LOCAL
本地环境搭建
安装 Eclipse Gradle Plugin STS
Spring 4.3.7 Release 的源码是构建在 Gradle 构建环境之上的;所以首先需要安装 Eclipse Gradle Plugin STS;
详细安装过程参考上面的链接,大致过程是 In Eclipse Open Help >> Install New Software,然后输入 gradle 的在线安装地址 http://dist.springsource.com/release/TOOLS/gradle 进行安装即可。
构建并导入项目
直接在项目根路径下执行,
1 | ./import-into-eclipse.sh |
生成 Eclipse Gradle 相关的 project metadata
注意,必须事先安装 Eclipse Gradle Plugin STS,如果已经安装,点击回车,开始安装,1
2
3
4
5
6
7
8
9
10
11
12
13
14
15
16
17
18
19
20
21
22
23
24
25
26...
:spring-webmvc-portlet:eclipseClasspath
:spring-webmvc-portlet:eclipseJdtPrepare
:spring-webmvc-portlet:eclipseJdt
:spring-webmvc-portlet:eclipseProject
:spring-webmvc-portlet:eclipseSettings
:spring-webmvc-portlet:eclipseWstComponent
:spring-webmvc-portlet:eclipse
:spring-webmvc-tiles2:eclipseClasspath
:spring-webmvc-tiles2:eclipseJdtPrepare
:spring-webmvc-tiles2:eclipseJdt
:spring-webmvc-tiles2:eclipseProject
:spring-webmvc-tiles2:eclipseSettings
:spring-webmvc-tiles2:eclipseWstComponent
:spring-webmvc-tiles2:eclipse
:spring-websocket:eclipseClasspath
:spring-websocket:eclipseJdtPrepare
:spring-websocket:eclipseJdt
:spring-websocket:eclipseProject
:spring-websocket:eclipseSettings
:spring-websocket:eclipseWstComponent
:spring-websocket:eclipse
BUILD SUCCESSFUL
Total time: 58.296 secs成功安装以后提示上述内容,
导入 Eclipse
执行完 #1 以后,会提示第二步执行的提示,按照提示进行导入1
2
3
4
5
6
7
8
9
10
11
12
13
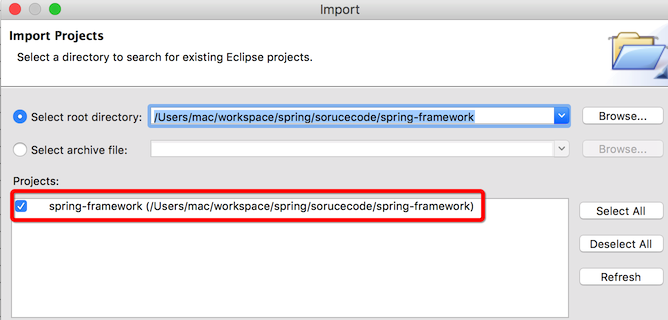
STEP 2: Import subprojects into Eclipse/STS

Within Eclipse/STS, do the following:

+ File > Import... > Existing Projects into Workspace
+ When prompted \for the 'root directory', provide /Users/mac/workspace/spring/framework/sourcecode/spring-framework.
  (注意,上面的路径是你自己工程的路径)
+ Press enter. You will see the modules show up under "Projects".
+ All projects should be selected/checked. Click Finish.
+ When the project import is complete, you should have no errors.

When the above is complete, return here and press the enter key.
根据提示,将工程导入 Eclipse

点击 Finish,完成导入,备注,这一步会加载所有相关的 maven 库,执行时间会稍长,也可以通过命令
./gradlew build来完成 maven 库的导入。备注:这步完成导入以后,默认应该是不会有任何错误的,但是,最终我还是得到了两个错误,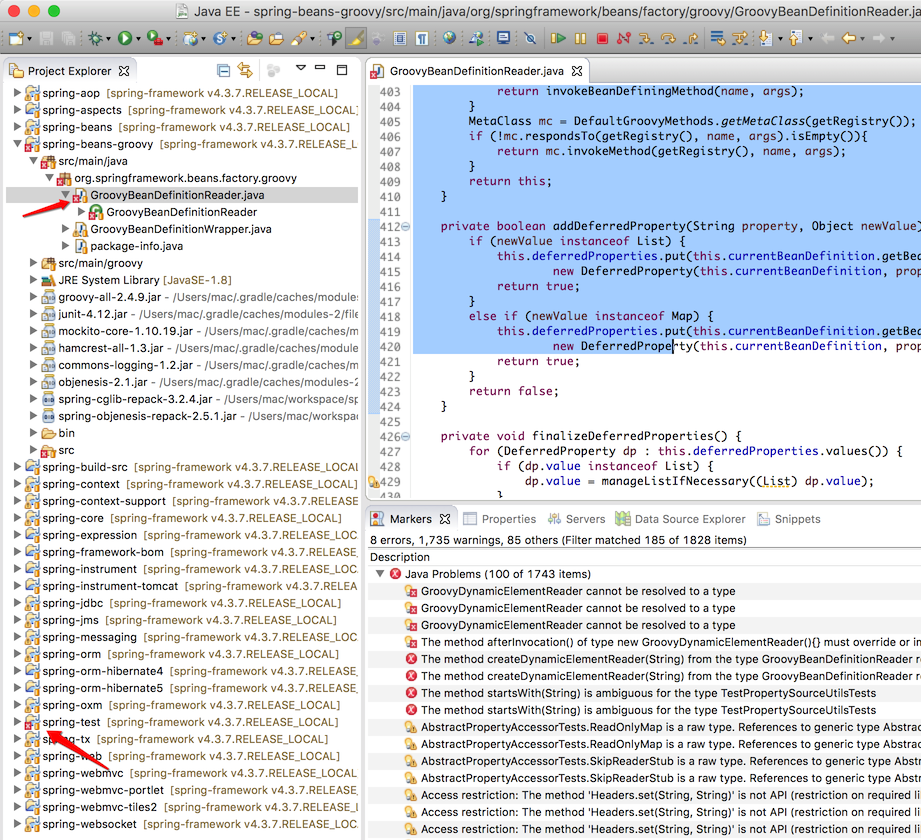
不能解析 GroovyDynamicElementReader 和 spring-test 的错误;不打算再花精力去看了,有知道的朋友,请给我留言;
生成 root project
回到 #2 的 Command 窗口,点击回车,会提示第三步需要执行的步骤,如下,1
2
3
4
5
6
7
8
9
10
11
12STEP 3: Generate root project Eclipse metadata
Unfortunately, Eclipse does not support importing project hierarchies,
so we had to skip root project metadata generation during step 1. In
this step we simply generate root project metadata so that you can
import it in the next step.
The command run will be:
./gradlew --no-daemon :eclipse
Press the enter key when ready.接着,点击回车,生成 root project metadata.
将 root project 导入 Eclipse
执行完 #3 以后,会提示第四步操作的步骤,提示模拟 #2 的步骤进行导入;1
2
3
4
5
6STEP 4: Import root project into Eclipse/STS
Follow the project import steps listed in step 2 above to import the
root "spring" project.
Press enter when complete, and move on to the final step.按照提示,导入 root project,
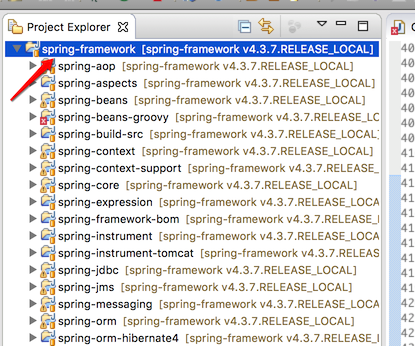
可见,通过 #3 生成了 root project
spring-framework,点击 Finish 按钮完成导入;导入成功以后,通过 Project Explorer 可以看到 root project hierarchy 的结构
其它命令相关
在项目的根目录中执行,
1 | ./gradlew build |
有些项目需要 install 到你本地的 maven 库中,供其它项目引用。1
./gradlew install