前言
介绍 grunt 常用的模块
为什么我放弃 Gulp 和 Grunt 而使用 npm Scripts
Jit Grunt
References
https://github.com/shootaroo/jit-grunt
作用
A JIT(Just In Time) plugin loader for Grunt.
Load time of Grunt does not slow down even if there are many plugins.
官网就是官网,说得永远都是模模糊糊的;其实很简单,就是自动加载模块,而不用再传统的使用语句grunt.loadNpmTasks 去加载模块了。
初始化
1 | $ npm install jit-grunt --save-dev |
使用/原理
删除 Gruntfile.js 中定义的 grunt.loadNpmTasks,替换为 require('jit-grunt')(grunt) 即可。1
2
3
4
5
6
7
8
9module.exports = function (grunt) {
require('jit-grunt')(grunt);
grunt.initConfig({
...
});
grunt.registerTask('default', [...]);
}
那么它是如何根据 registerTask 知道该如何加载模块的呢?看看官网上的解释
Will automatically search for the plugin from the task name. Search in the following order:
- node_modules/grunt-contrib-task-name
- node_modules/grunt-task-name
- node_modules/task-name
原来是按照这样一种顺序从上至下的到 node_modules 中取挨个匹配去找,找到以后就加载了。那么问题来了,如果按照这种默认的方式找不到对应的 plugin 呢? 答案是 Static mappings
Static mappings
Second parameter is static mappings. (Second parameter,指定是加载 jit-grunt 的时候可以指定的第二项参数)
It is used when there is a plugin that can not be resolved in the automatic mapping.
格式如下,taskname: grunt-plugin-name
例子1
2
3
4
5require('jit-grunt')(grunt, {
sprite: 'grunt-spritesmith',
foo: '@abc/grunt-foo', // for private modules.
bar: 'custom/bar.js' // for custom tasks.
});
这样,就将自定义路径中的 custom/bar.js 作为名为 bar 的模块加载进入 Grunt 中。
Grunt Jshint
References
https://github.com/gruntjs/grunt-contrib-jshint
http://jshint.com/docs/
http://jshint.com/about/
https://lzw.me/a/jshint-eclipse-and-sublime.html
http://www.cnblogs.com/haogj/p/4781677.html
作用
是一款javascript代码的静态检查器,看看官网的描述
JSHint scans a program written in JavaScript and reports about commonly made mistakes and potential bugs. The potential problem could be a syntax error, a bug due to an implicit type conversion, a leaking variable, or something else entirely.
安装
1 | $ npm install grunt-contrib-jshint --save-dev |
加载任务
加载有两种方式,
手动加载
1
grunt.loadNpmTasks('grunt-contrib-jshint');
执行任务
1 | $ grunt jshint |
一个例子,来解释 jshint 的各项配置
例子
从 yeoman 生成的骨架中的 Gruntfile.js 中拷贝出来的,1
2
3
4
5
6
7
8
9
10
11
12
13
14
15jshint: {
options: {
jshintrc: '.jshintrc',
reporter: require('jshint-stylish')
},
all: {
src: [ 'Gruntfile.js', '<%= yeoman.app %>/scripts/{,*/}*.js']
},
test: {
options: {
jshintrc: 'test/.jshintrc'
},
src: ['test/spec/{,*/}*.js']
}
},
options
jshintrc
Type:String 或者 true
Default:null
如果设置为true或者.jshintrc,JSHint 将会从当前路径中寻找文件.jshintrc,并获取其参数值;如同上面例子中描述的一样,例子,$ cat .jshintrc1
2
3
4
5
6
7
8
9
10
11
12
13
14
15
16{
"bitwise": true,
"browser": true,
"curly": true,
"eqeqeq": true,
"esnext": true,
"latedef": true,
"noarg": true,
"node": true,
"strict": true,
"undef": true,
"unused": true,
"globals": {
"angular": false
}
}
如果不使用 jshintrc 参数,则可以直接在 options 中定义1
2
3
4
5
6
7
8
9
10
11
12
13
14grunt.initConfig({
jshint: {
options: {
curly: true,
eqeqeq: true,
eqnull: true,
browser: true,
globals: {
jQuery: true
},
},
...
}
})
reporter
默认的,使用的是 built-in 的 reporter,jslinit 或者 checkstyle,比较推荐的是使用一个第三方的 reporter, jshint-stylish
安装,1
$ npm install --save-dev jshint-stylish
配置1
2
3options: {
reporter: require('jshint-stylish')
}
然后,jshint将会使用jshint-style风格打印;默认情况下,报告是直接打印到控制台中,可以通过reporterOutput重定向输出,效果图如下,可以看到,分别执行了两个任务all和test
reporterOutput
Type: String
Default: null
Specify a filepath to output the results of a reporter. If reporterOutput is specified then all output will be written to the given filepath instead of printed to stdout.
两个任务
该例子中定义了两个任务,all和test,注意,src指定了 jshint 将要做静态检查的文件零。all其实就是对source进行检查,test其实就是对test source进行检查,为什么不把他们放到一起来检查?我觉得这里,yeoman这样做似乎是有点多余。
官方文档中,给了一个更为简单的写法,不使用src1
2
3
4
5
6// Project configuration.
grunt.initConfig({
jshint: {
all: ['Gruntfile.js', 'lib/**/*.js', 'test/**/*.js']
}
});
忽略指定的错误
If you would like to ignore a specific warning:
[L24:C9] W015: Expected '}' to have an indentation at 11 instead at 9.
You can toggle it by prepending - to the warning id as an option:1
2
3
4
5
6
7
8
9
10grunt.initConfig({
jshint: {
ignore_warning: {
options: {
'-W015': true,
},
src: ['**/*.js'],
},
},
});
Grunt Uglify
References
https://github.com/gruntjs/grunt-contrib-uglify
初始化
1 | $ npm install grunt-contrib-uglify --save-dev |
1 | grunt.loadNpmTasks('grunt-contrib-uglify'); |
作用
将 javascript 文件进行压缩,这里的压缩是指对文本内容进行压缩,比如删除注释、空格等等..
用例
Grunt Concurrent
references
https://github.com/sindresorhus/grunt-concurrent
安装
1 | $ npm install --save-dev grunt-concurrent |
将grunt-concurrent作为grunt的模块安装,并作为devDependencies添加到package.json中。
Concurrent target
1 | require('load-grunt-tasks')(grunt); // npm install --save-dev load-grunt-tasks |
ok,说一说这里的行为,执行命令1
$ grunt
target1所对应的两个子任务,coffee和sass会并发的执行,当target1执行完毕以后,才轮到target2执行,同样,target2中定义的两个任务jshint和mocha也会并发的执行。target1和target2谁先谁后,由任务注册时的先后顺序决定。
说了这么多,归纳起来其实就是target1和target2不能并发,target1和target2中定义的子任务可以并发执行。
Sequential tasks in concurrent target
1 | grunt.initConfig({ |
这里的行为又是什么呢?
- 首先
['jshint', 'coffee']和'sass'之间是并行执行的 - 其次
['jshint', 'coffee']中jshint和coffee是串行执行的,且jshint在coffee之前执行。
options
limit
Type: number
Default: Twice the number of CPU cores with a minimum of 2
Limit how many tasks that are run concurrently.
指定同时可以支持多少个任务同时并发,默认值是 CPU 内核数的两倍。
用例
这时通过 yeoman 1.8.5 生成 angular 项目骨架后,Gruntfile.js 中的内容1
2
3
4
5
6// Run some tasks in parallel to speed up the build process
concurrent: {
server: ['compass:server'],
test: ['compass'],
dist: ['compass:dist', 'imagemin', 'svgmin']
},
根据 Concurrent target 中所描述的内容可知,这里实际上只是对 Target dist定义了三个可并发的任务,compass:dist,imagein以及svgmin。
Grunt Connect
References
https://github.com/gruntjs/grunt-contrib-connect
http://www.cnblogs.com/haogj/p/4785286.html
作用
启动一个静态服务器,当前的脚本代码可以直接运行在该服务器上,进行快速开发。(之前想的是,在前端的本地部署一套 Nginx,然后在 Nginx 环境中开发或者是提交代码以后,通过 jenkins 自动部署到 Nginx 中进行联调开发,其实都不太理想,前端大部分对 Nginx 不熟悉,在他们本地部署这么套环境增加了开发难度,通过 jenkins 自动发布到联调环境上开发,增加了开发周期…,看来最佳的方式,就是使用 Grunt Connect)
初始化
1 | $ npm install grunt-contrib-connect --save-dev |
1 | grunt.loadNpmTasks('grunt-contrib-connect'); |
Http Server
临时服务器
创建 Gruntfile.js1
2
3
4
5
6
7
8
9
10
11
12
13
14
15
16
17
18
19
20
21;
module.exports = function (grunt) {
// Project configuration.
grunt.initConfig({
connect: {
server: {
options: {
port: 8000,
hostname: '*',
base: ['src/']
}
}
}
});
grunt.loadNpmTasks('grunt-contrib-connect');
}
开启一个端口 8000 的静态服务器,且静态资源路径放置在 src/ 中;将一个 index.html 放置在 src/ 目录中,进行测试1
2
3
4
5
6
7
8
9
10
<html lang="en" ng-app="grunttest">
<head>
<meta charset="utf-8">
<title>grunt-connect</title>
</head>
<body>
<h1>Hello World, Grunt Connect!</h1>
</body>
</html>
执行grunt connect,1
2
3
4
5$ grunt connect
Running "connect:server" (connect) task
Started connect web server on http://localhost:8000
Done, without errors.
注意,这样创建的 Http Server,在 Grunt 任务结束后也就自动关闭了。
持久的服务器
需要使用keepalive,有两种方式可以生效
Add-hoc 的方式
grunt connect:targetname:keepalive1
2
3
4$ grunt connect:server:keepalive
Running "connect:server:keepalive" (connect) task
Waiting forever...
Started connect web server on http://localhost:8000修改 Gruntfile.js
1
2
3
4
5
6
7
8
9
10
11
12
13
14
15
16
17
18
19
20
21
22;
module.exports = function (grunt) {
// Project configuration.
grunt.initConfig({
connect: {
server: {
options: {
port: 8000,
hostname: '*',
keepalive: true,
base: ['src/']
}
}
}
});
grunt.loadNpmTasks('grunt-contrib-connect');
}加入配置 keepalive: true
1
2
3
4$ grunt connect
Running "connect:server" (connect) task
Waiting forever...
Started connect web server on http://localhost:8000
特别特别注意,一旦 keep alive connect 任务启动以后,将会阻塞后续任务,所以,它应该放到最后来执行。
http or https or http2
默认是使用 http,如果需要使用 https,则需要明确的指定,同时需要指定证书1
2
3
4
5
6
7
8
9
10
11
12
13
14
15
16
17
18
19
20
21 grunt.initConfig({
connect: {
server: {
options: {
protocol: https
port: 8000,
key: grunt.file.read('server.key').toString(),
cert: grunt.file.read('server.crt').toString(),
ca: grunt.file.read('ca.crt').toString(),
hostname: '*',
keepalive: true,
base: ['src/']
}
}
}
});
grunt.loadNpmTasks('grunt-contrib-connect');
}
进阶
base
Type: String or Array or Object
Default: '.'
| Type | Result | Example |
|---|---|---|
| String | The base (or root) directory from which files will be served. Defaults to the project Gruntfile’s directory. | 'public' |
| Array | Array of String (or Object) bases to serve multiple directories. The last base given will be the [directory][] to become browse-able. | ['public','www-root'] |
| Object | Map containing path and options keys. options are passed on to the serve-static module. | { path: 'public', options: { maxAge: 1000*60*5 } } |
open
Type: Boolean or String or Object
Default: falseOpen the served page in your default browser.
This can be one of the following:
- Specifying
trueopens the default server URL (generated from the protocol, hostname and port settings)- Specifying a URL opens that URL
- Specify an object with the following keys to configure open directly:
1 | { |
当 open 的值设置为 true,grunt 将会自动根据 protocol、hostname 以及 port 自动生成访问路径,用来打开浏览器。
可以通过自定义的 open 参数的 方式设置打开的行为,1
2
3
4
5
6
7
8
9
10
11
12
13
14
15
16
17
18
19
20
21
22
23
24
25
26
27;
module.exports = function (grunt) {
// Project configuration.
grunt.initConfig({
connect: {
server: {
options: {
port: 8000,
hostname: '*',
keepalive: true,
base: ['src/'],
open: {
target: 'http://localhost:8000', // target url to open, 目标路径
appName: 'chrome', // name of the app that opens, ie: open, start, xdg-open,自动启动的应用名称, 比如你的浏览器:chrome
callback: function() {} // called when the app has opened,这里指浏览器打开以后
}
}
}
}
});
grunt.loadNpmTasks('grunt-contrib-connect');
}
执行grunt connect将会使用chrome打开访问地址 http://localhost:8000
keepalive
Type:
Boolean
Default:falseKeep the server alive indefinitely. Note that if this option is enabled, any tasks specified after this task will never run. By default, once grunt’s tasks have completed, the web server stops. This option changes that behavior.
This option can also be enabled ad-hoc by running the task like
grunt connect:targetname:keepalive
使用用例,参考持久的服务器;要特别特别注意的是,一旦执行到 keepalive connect 任务后,它将会阻塞后续的任务,所以它应该放到最后来执行。
debug
Type:
Boolean
Default:falseSet the debug option to true to enable logging instead of using the
--debugflag.
我倒是比较倾向于使用 –debug 这种 Ad-hoc 的方式。
onCreateServer
Type:
FunctionorArray
Default:nullA function to be called after the server object is created, to allow integrating libraries that need access to connect’s server object. A Socket.IO example:
1 | grunt.initConfig({ |
当服务器创建好以后,提供回调接口;这里通过 Socket.io 获取连接,然后进行相关的处理。
middleware
Type:
FunctionorArray
Default:Arrayof connect middlewares that useoptions.basefor static files and directory browsing
中间件,可以通过中间件对grunt connect构建出来的静态服务器进行扩展,两种情况,
如果参数是以
Array形式出现,
完全取代默认的服务器处理行为,直接使用中间件来进行处理,需要我们完全定义服务器的处理行为1
2
3
4
5
6
7
8
9
10
11
12
13
14
15
16
17
18
19
20connect: {
server: {
options: {
port: 8000,
hostname: '*',
keepalive: true,
base: ['src/'],
open: {
target: 'http://localhost:8000', // target url to open, 目标路径
appName: 'chrome', // name of the app that opens, ie: open, start, xdg-open,自动启动的应用名称, 比如你的浏览器:chrome
callback: function() {} // called when the app has opened
},
middleware: [
function myMiddleware(req, res, next) {
res.end('Hello, world!');
}
]
}
}
}grunt connect,从打开的网页中可以看到,返回的是1
Hello, world!
替换了
Hello World, Grunt Connect!index.html 的默认输出。如果参数是以
Function形式出现
inject a custom middleware into the array of default middlewares,将自定义的中间件行为插入到默认的行为中,并不完全覆盖默认行为;可以理解为做了一个简单的拦截,在原有的默认行为中添加你自己自定义的行为1
2
3
4
5
6
7
8
9
10
11
12
13
14
15
16
17
18grunt.initConfig({
connect: {
server: {
options: {
middleware: function(connect, options, middlewares) {
// inject a custom middleware into the array of default middlewares
middlewares.unshift(function(req, res, next) {
if (req.url !== '/hello/world') return next();
res.end('Hello, world from port #' + options.port + '!');
});
return middlewares;
},
},
},
},
});拦截访问链接,如果是
/hello/world,则使用自定义行为。
livereload
Type:
BooleanorNumber
Default:falseSet to
trueor aport numberto inject a live reload script tag into your page using connect-livereload.This does not perform live reloading. It is intended to be used in tandem with
grunt-contrib-watchor another task that will trigger a live reload server upon files changing.
具体官方文档想表达的是什么意思,参考live Reload
Grunt Watch
References
https://github.com/gruntjs/grunt-contrib-watch
http://www.cnblogs.com/haogj/p/4785288.html
the watch examples,
https://github.com/gruntjs/grunt-contrib-watch/blob/master/docs/watch-examples.md#enabling-live-reload-in-your-html
如何实现 live-reloaded
https://my.oschina.net/liuyong25/blog/140110
http://blog.csdn.net/xiongzhengxiang/article/details/12843615
https://github.com/gruntjs/grunt-contrib-watch/blob/master/docs/watch-examples.md#enabling-live-reload-in-your-html
初始化
1 | $ npm install grunt-contrib-watch --save-dev |
在 Gruntfile.js 中加载watch模块1
grunt.loadNpmTasks('grunt-contrib-watch');
运行1
$ grunt watch
Settings
files
Type: String|Array
This defines what file patterns this task will watch. It can be a string or an array of files and/or minimatch patterns.
tasks
Type: String|Array
This defines which tasks to run when a watched file event occurs.
Options
spawn
Type: Boolean
Default: trueWhether to spawn task runs in a child process. Setting this option to
falsespeeds up the reaction time of the watch (usually 500ms faster for most) and allows subsequent task runs to share the same context. Not spawning task runs can make the watch more prone to failing so please use as needed.
是否将Watch任务设置为子进程来执行;官网大概意思是,如果不使用子进程的方式,后续的任务可以与 Watch 任务使用同一套环境变量,并且可以快速的响应失败。(到底是用子进程好还是不好,没有解释;当整理到后面的时候,看到这个用例 Compiling Files As Needed 以后,如果需要动态变化 config 需要将 spawn 设置为 false )
Example:1
2
3
4
5
6
7
8
9watch: {
scripts: {
files: ['**/*.js'],
tasks: ['jshint'],
options: {
spawn: false,
},
},
},
该例子非常直观,就是一旦相关的 javascript 发生了变动,将会触发 jshint 任务。
interrupt
Type: Boolean
Default: falseAs files are modified this watch task will spawn tasks in child processes. The default behavior will only spawn a new child process per target when the previous process has finished. Set the
interruptoption to true toterminatethe previous process and spawn a new one upon later changes.
默认行为是 interrupt false,意思是,当 watch 任务触发以后,会创建一个子进程来执行,但是前提是先等待前面的进程结束以后,才创建子进程来执行;当设置为 true 以后,它会 terminate 之前的进程,然后再创建一个子进程来执行。
Example:1
2
3
4
5
6
7
8
9watch: {
scripts: {
files: '**/*.js',
tasks: ['jshint'],
options: {
interrupt: true,
},
},
},
debounceDelay
Type: Integer
Default: 500How long to wait before emitting events in succession for the same filepath and status. For example if your
Gruntfile.jsfile waschanged, achangedevent will only fire again after the given milliseconds.
官网永远是文绉绉的,其实就是为了避免重复触发changed事件,场景,当你在不断的保存更新某个文件的时候,不希望这个 watch 的事件触发得如此的频繁,那么设置一个间隔时间 debounceDelay(单位是 ms )
Example:1
2
3
4
5
6
7
8
9watch: {
scripts: {
files: '**/*.js',
tasks: ['jshint'],
options: {
debounceDelay: 250,
},
},
},
interval
Type: Integer
Default: 100The
intervalis passed tofs.watchFile. Sinceintervalis only used byfs.watchFileand this watcher also usesfs.watch; it is recommended to ignore this option. Default is 100ms.
就是每隔多长的时间进行一次 Watch,推荐不设置,使用默认的即可;默认是 100ms 一次。
event
Type: String|Array
Default: ‘all’Specify the type of watch events that triggers the specified task. This option can be one or many of:
'all','changed','added'and'deleted'.
对其监控的内容,触发指定的事件,包括 ‘all’, ‘changed’, ‘added’ and ‘deleted’.
Example:
当 js 文件发生变化( added,deleted )
1
2
3
4
5
6
7
8
9watch: {
scripts: {
files: '**/*.js',
tasks: ['generateFileManifest'],
options: {
event: ['added', 'deleted'],
},
},
},使用自定义 function 任务
1
2
3
4
5
6
7
8
9
10grunt.initConfig({
watch: {
scripts: {
files: ['lib/*.js'],
},
},
});
grunt.event.on('watch', function(action, filepath, target) {
grunt.log.writeln(target + ': ' + filepath + ' has ' + action);
});通过捕获
watch事件本身,并提供自定义的function行为,当 watch 事件产生以后,执行function;这种情况适合高度定制化,当没有任何其它第三方 plugins 能够满足需要的时候,便可以使用自定义function的方式。
reload
Type: Boolean
Default: falseBy default, if
Gruntfile.jsis being watched, then changes to it will trigger the watch task torestart, and reload theGruntfile.jschanges. Whenreloadis set to true, changes toanyof the watched files will trigger the watch task to restart. This is especially useful if your Gruntfile.js is dependent on other files.
1 | watch: { |
如果 Gruntfile.js 被监控,那么默认情况下 (reload: false),只会当 Gruntfile.js 的内容发生了变化以后,Watch 任务才会重新启动加载新的变化;但是,有些时候,Gruntfile.js需要依赖其它的 js 文件,这个时候,可以将 reload 设置为 true,这样,凡是被监视的文件发生了变化,都会触发 Watch 任务重新启动。
dateFormat
Type: Function
This is only a task level option and cannot be configured per target. By default when the watch has finished running tasks it will display the message Completed in 1.301s at Thu Jul 18 2013 14:58:21 GMT-0700 (PDT) - Waiting.... You can override this message by supplying your own function:
1 | watch: { |
atBegin
Type: Boolean
Default: falseThis option will trigger the run of each specified task at
startupof the watcher.
有点像 JUnit 中的 @Before
livereload
Type: Boolean|Number|Object
Default: falseSet to
trueor setlivereload: 1337to a port number to enable live reloading. Default and recommended port is35729.If enabled a live reload server will be started with the watch task per target. Then after the indicated tasks have run, the live reload server will be triggered with the modified files.
See also how to enable livereload on your HTML.
Example:1
2
3
4
5
6
7
8
9watch: {
css: {
files: '**/*.sass',
tasks: ['sass'],
options: {
livereload: true,
},
},
},
Live Reload是 Watch 提供的一个后台服务,提供这样一个服务供前端页面和后端页面进行交互,当后端代码发生变化,将变化直接推送给前端页面。参考Live Reload
例子
Compiling Files As Needed
1 | grunt.initConfig({ |
有个常有的 Scenario,就是只编译有变化的文件,提升效率;默认情况下,只要监控的文件中部分发生变化,会进行全局编译;那么可以通过上述的方式,通过捕获 watch 事件本身,动态的修改 grunt jshint 的 config 属性;注意,如果你需要动态的修改 config,必须将 spawn 属性设置为 false 保证 watch 任务和主任务是运行在同一个 context 上下文之中的。
为特定的文件定义特定的 watch 任务
1 | grunt.initConfig({ |
Live Reload
connect 和 watch 模块里面都扯到这个 live reload,而且说得非常的零散,为了更好的理解,我单独起了一章专门说这个东西。
References
作用
live reload 起到的作用,通俗点说,就是当前端代码发生变动后,省去浏览器F5刷新去加载前端代码的过程;更直白点,就是一旦后端有任何的改动,浏览器自动加载改动;那他是如何实现的呢?前端页面和服务器保持一个连接,Grunt Watch 模块监视后端的变动,一旦发生变动,通过该连接将后端的变动加载到前端;
实现方式一,硬编码
后端启动两个服务,一个服务是 connect,作为静态服务器;另外一个服务是 watch reload,作为监听服务器;前端页面通过硬编码的方式,显示加载 livereload.js,该脚本保持前端和后端的连接,使得前端页面能够监听服务器,获取到更新文件,然后刷新当前页面。
实现步骤如下
启动 Watch Livereload 服务
添加 watch livereload 配置
1
2
3
4
5
6
7
8watch : {
livereload:{
options:{
livereload:true
},
files:['src/*.html']
}
}通过监听 src/*.html 中的文件变更启动 livereload 服务
启动 Watch Livereload 服务
1
2
3$ grunt watch
Running "watch" task
Waiting...可见,
watch是作为一个单独的服务启动,默认端口是35729;
在前端页面中加载 livereload.js
src/index.html1
2
3
4
5
6
7
8
9
10
11
<html lang="en" ng-app="grunttest">
<head>
<meta charset="utf-8">
<title>grunt-connect</title>
<script src="http://localhost:35729/livereload.js"></script>
</head>
<body>
<h1>Hello World, Grunt Connect!</h1>
</body>
</html>注意端口是
35279,必须和 watch 启动的监听服务是同一个端口。启动 Grunt Connect 服务
1
2
3
4$ grunt connect
Running "connect:server" (connect) task
Waiting forever...
Started connect web server on http://localhost:8000服务启动以后自动打开 index.html http://localhost:8000 可以看到欢迎文字 Hello World, Grunt Connect!
修改 index.html
将内容改为 Hello World, Grunt LiveReload!
不用刷新页面,页面内容已经自动变为 Hello World, Grunt LiveReload!
补充,Watch 控制台会自动提示,有内容发生变动1
2
3
4Running "watch" task
Waiting...
>> File "src/index.html" changed.
Completed in 0.001s at Sun Mar 05 2017 22:14:09 GMT+0800 (CST) - Waiting...
弊端
这种方式的最大弊端是,需要显示的在页面中加载 livereload.js,而 livereload.js 只是在开发环境中会用到,在生产环境中不能出现,否则还会出现页面错误。所有,在页面上 hardcode 的方式是不可取的。
Gruntfile.js1
2
3
4
5
6
7
8
9
10
11
12
13
14
15
16
17
18
19
20
21
22
23
24
25
26
27
28
29
30
31
32
33
34
35
36
37
38;
module.exports = function (grunt) {
// Project configuration.
grunt.initConfig({
connect: {
server: {
options: {
port: 8000,
hostname: '*',
keepalive: true,
base: ['src/'],
open: {
target: 'http://localhost:8000', // target url to open, 目标路径
appName: 'chrome', // name of the app that opens, ie: open, start, xdg-open,自动启动的应用名称, 比如你的浏览器:chrome
callback: function() {} // called when the app has opened
}
}
}
},
watch : {
livereload:{
options:{ livereload:true },
files:['src/*.html']
}
}
});
grunt.loadNpmTasks('grunt-contrib-connect');
grunt.loadNpmTasks('grunt-contrib-watch');
//grunt.registerTask('default', ['watch', 'connect:server']);
}
实现方式二,浏览器插件
通过使用浏览器的扩展插件来实现,好处是,不用再前端页面中显示加载 livereload.js;对,这个方式已经解决了方式一不兼容生产环境的问题;但,也许,你并不希望你的浏览器安装不必要的插件。
how do I install and use the browser extensions
实现方式三,Connect Middleware
好的,主角登场了,有没有一种方式,既不用显示的在前端页面中加载 livereload.js,也不用安装其它的插件,就可以达到live reload所要求的效果?答案是肯定的,那就是使用 Connect 中间件,它的作用就是,自动的将 livereload.js 代码注入到你的前端代码中;(让我脑洞大开~~~ 这不就相当于 java 代码的热部署吗?是不是可以使用这种方式来实现 javascript 代码的热部署?自动的选择性的进行模块加载.. 让我觉得 javascript 越来越有意思了 )。
实现步骤
添加 Connect Middleware 配置
1
2
3
4
5
6
7
8
9
10
11
12
13
14
15
16
17
18
19
20
21
22
23grunt.initConfig({
//connect
connect: {
......
livereload: {
options: {
middleware: function (connect, options) {
return [
require('connect-livereload')({
port:35729,
ignore: ['.js', '.svg']
}),
// Serve static files.
connect.static(options.base),
// Make empty directories browsable.
connect.directory(options.base)
];
}
}
},
......
}
})这里设置的时候,注意端口要和 Watch Livereload 的端口一致;Watch Livereload 的默认端口是 35729;当然,这里也可以不用指定端口,默认就是 35729;后面可以指定 ignore 属性,表示哪些文件不会自动的加载 livereload.js。
index.html
1
2
3
4
5
6
7
8
9
10
<html lang="en" ng-app="grunttest">
<head>
<meta charset="utf-8">
<title>grunt-connect</title>
</head>
<body>
<h1>Hello World, Grunt Live Reload!</h1>
</body>
</html>这里就不用显示加载 livereload.js, 会通过 #1 通过 Connect Middleware 自动加载到前端。
启动 Connect
1
$ grunt connect
启动 Watch
1
$ grunt watch
修改 index.html
你会发现,前端页面不用刷新,会自动加载更新的内容
Gruntfile.js1
2
3
4
5
6
7
8
9
10
11
12
13
14
15
16
17
18
19
20
21
22
23
24
25
26
27
28
29
30
31
32
33
34
35
36
37
38
39
40
41
42
43
44
45
46
47
48
49
50
51
52
53
54;
module.exports = function (grunt) {
// Project configuration.
grunt.initConfig({
connect: {
server: {
options: {
port: 8000,
hostname: '*',
keepalive: true,
base: ['src/'],
open: {
target: 'http://localhost:8000', // target url to open, 目标路径
appName: 'chrome', // name of the app that opens, ie: open, start, xdg-open,自动启动的应用名称, 比如你的浏览器:chrome
callback: function() {} // called when the app has opened
},
livereload: {
options: {
middleware: function (connect, options) {
return [
require('connect-livereload')({
port:35729,
ignore: ['.js', '.svg']
}),
// Serve static files.
connect.static(options.base),
// Make empty directories browsable.
connect.directory(options.base)
];
}
}
}
}
}
},
watch : {
livereload:{
options:{
livereload:true
},
files:['src/*.html']
}
}
});
grunt.loadNpmTasks('grunt-contrib-connect');
grunt.loadNpmTasks('grunt-contrib-watch');
//grunt.registerTask('default', ['watch', 'connect:server']);
}
我的总结
不使用这个东东,为什么呢?如果你正在开发后端代码,那么会不断的触发保存动作,那么后端将会不断的将更新推送到前端页面进行更新,频繁的更新导致页面不断的加载进而影响电脑的性能。其实,点一下F5也没什么不好的。
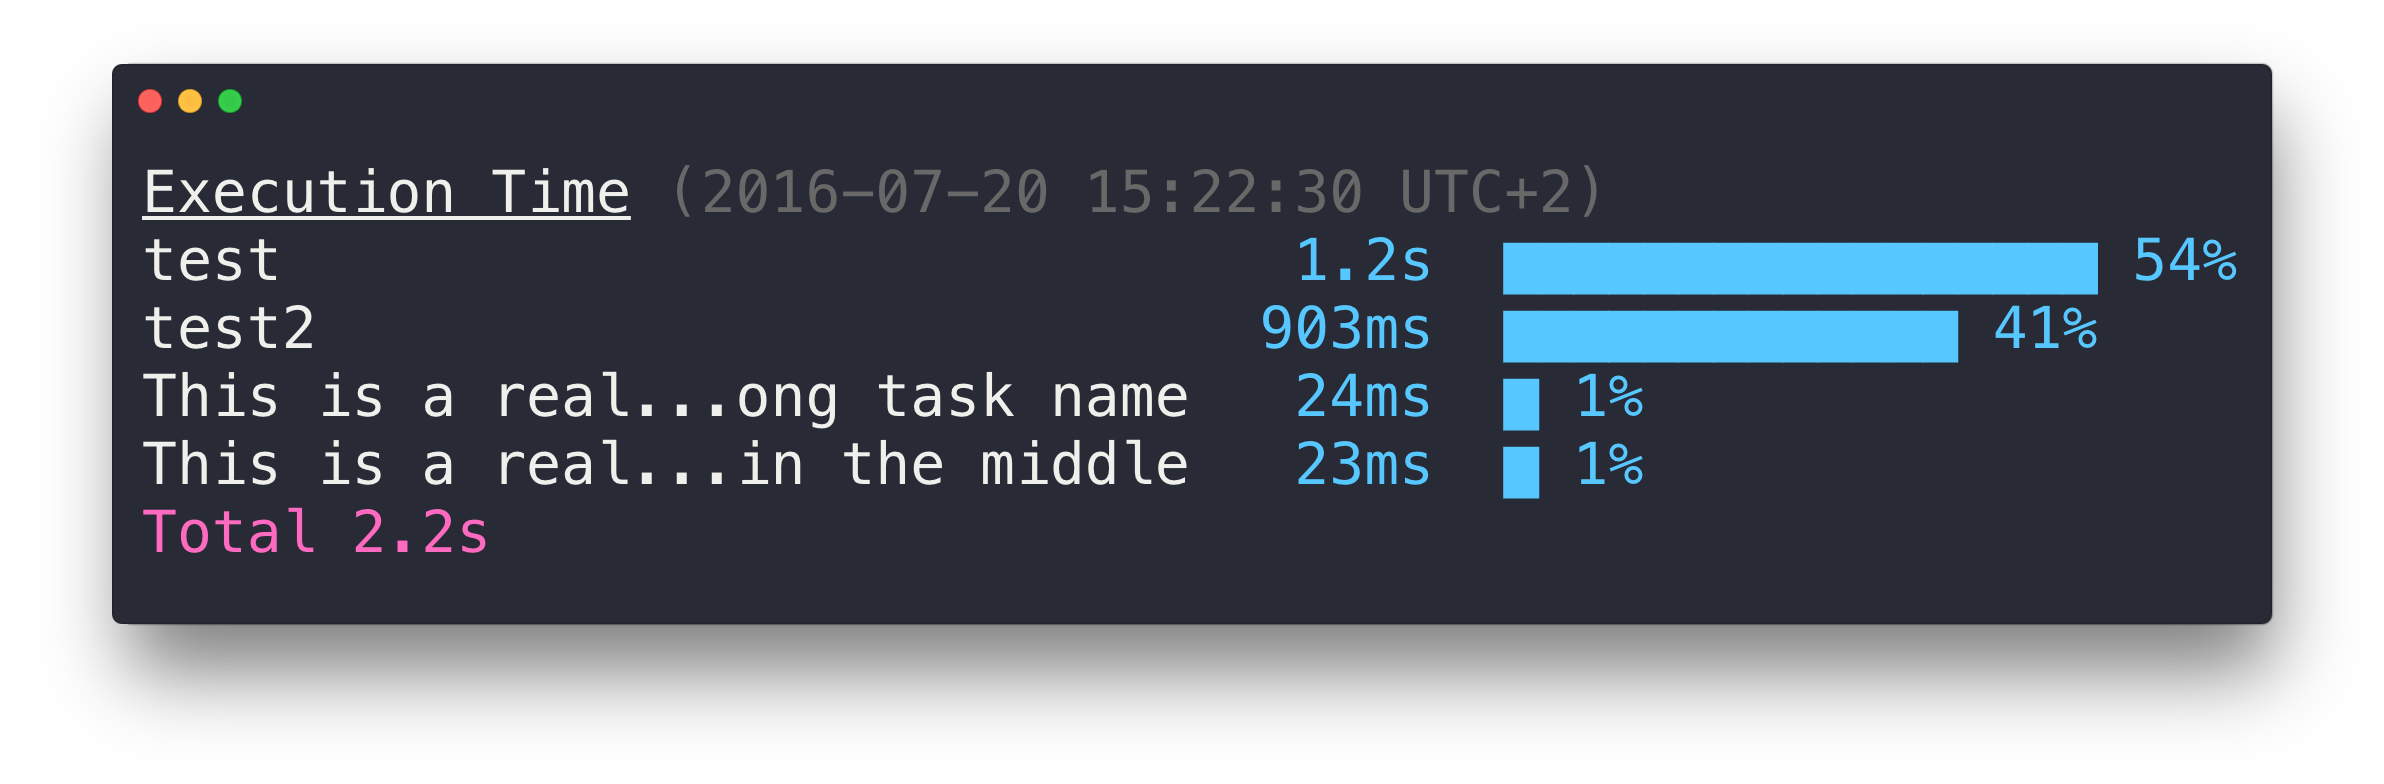
Grunt Time-grunt
Reference
http://localhost:4000/2017/03/02/javascript-env-grunt-modules/#Grunt-Time-grunt
yeoman 创建的 angularjs 项目中的 Gruntfile.js
作用
Display the elapsed execution time of grunt tasks
初始化
1 | $ npm install --save-dev time-grunt |
1 | // Gruntfile.js |
Grunt Imagemin
References
https://www.npmjs.com/package/grunt-contrib-imagemin
作用
给图片做压缩;
初始化
1 | $ npm install grunt-contrib-imagemin --save-dev |
1 | $ grunt.loadNpmTasks('grunt-contrib-imagemin'); |
Options 参数
要理解参数的作用,首先,要知道,Imagemin是通过四种不同的 optimizer 分别对四种格式的图片进行压缩
- gifsicle — Compress GIF images
- jpegtran — Compress JPEG images
- optipng — Compress PNG images
- svgo — Compress SVG images
optimizationLevel (for png only)
Type: Number
Default: 3Select optimization level between 0 and 7.
The optimization level 0 enables a set of optimization operations that require minimal effort. There will be no changes to image attributes like bit depth or color type, and no recompression of existing IDAT datastreams. The optimization level 1 enables a single IDAT compression trial. The trial chosen is what OptiPNG thinks it’s probably the most effective. The optimization levels 2 and higher enable multiple IDAT compression trials; the higher the level, the more trials.
Level and trials:
1 trial
8 trials
16 trials
24 trials
48 trials
120 trials
240 trials
progressive (for jpg only)
Type: Boolean
Default: trueLossless conversion to progressive.
interlaced (for gif only)
Type: Boolean
Default: trueInterlace gif for progressive rendering.
svgoPlugins (for svg only)
Type: array
Default: []Customize which SVGO plugins to use. More here.
use
Type: Array
Default: nullAdditional plugins to use with imagemin.
使用更多的第三方 puglins
例子
项目结构1
2
3
4
5
6
7├── Gruntfile.js
├── dist
├── package.json
└── src
├── test_1.png
└── test_2.jpg
└── test_3.gif
目标,分别通过静态和动态的方式,对 src 目录中的图片进行压缩;
Gruntfile.js1
2
3
4
5
6
7
8
9
10
11
12
13
14
15
16
17
18
19
20
21
22
23
24
25
26
27
28
29
30
31
32
33
34
35
36
37
38;
module.exports = function (grunt) {
var mozjpeg = require('imagemin-mozjpeg');
grunt.initConfig({
imagemin: { // Task
static: { // Target
options: { // Target options
optimizationLevel: 3,
svgoPlugins: [{ removeViewBox: false }],
use: [mozjpeg()]
},
files: { // Dictionary of files
'dist/img.png': 'src/img.png', // 'destination': 'source'
'dist/img.jpg': 'src/img.jpg',
'dist/img.gif': 'src/img.gif'
}
},
dynamic: { // Another target
options: {
interlaced : true
},
files: [{
expand: true, // Enable dynamic expansion
cwd: 'src/', // Src matches are relative to this path
src: ['**/*.{png,jpg,gif}'], // Actual patterns to match
dest: 'dist/' // Destination path prefix
}]
}
}
});
grunt.loadNpmTasks('grunt-contrib-imagemin');
grunt.registerTask('default', ['imagemin']);
}
静态处理
通过 files 分别制定输入和输出;使用 use 使用三方 plugin mozjpeg 来处理 JPEG。
动态处理
设置属性 expand = true 启动动态处理;动态处理全部使用默认值进行压缩
处理结果
由于使用到了 imagemin-mozjpeg 模块,所以需要对其进行加载,1
$ npm install --save imagemin-mozjpeg
执行命令(执行动态构建)1
$ grunt imagein:dynamic
执行结果
动态的将 src/ 中的图片进行压缩,并且输出到 /dist 目录中;有个细节需要注意,那就是 gif 格式的文件,压缩前后的大小没有发生变化,应该是没有对其进行压缩;无论是否指定了 interlaced 属性值为 true。
Grunt Svgmin
References
https://github.com/sindresorhus/grunt-svgmin
作用
Minify SVG using SVGO
Grunt Htmlmin
References
https://github.com/gruntjs/grunt-contrib-htmlmin
作用
Minify Html
Grunt Wiredep
References
https://github.com/stephenplusplus/grunt-wiredep
https://github.com/taptapship/wiredep
https://segmentfault.com/q/1010000000494228
http://stephenplusplus.github.io/grunt-wiredep/
Wiredep
作用
我们来看看wiredep本身的描述
Wire Bower dependencies to your source code.
将 Bower 包根据包依赖的关系加载到你的源码中。
Wiredep Quick Example
1 | $ mkdir bower | cd "$_" |
初始化 npm1
$ npm init
初始化 bower1
$ bower init
安装 jquery 包1
$ bower install jquery --save
创建 index.html1
$ vim index.html
1 | <html> |
使用 wiredep 自动将 bower 包注入 index.html1
2$ node
> require('wiredep')({ src: 'index.html' });
控制台输出1
2
3
4
5
6
7{ packages:
{ jquery:
{ main: [Object],
type: [Object],
name: 'jquery',
dependencies: {} } },
js: [ '/Users/mac/workspace/javascript/bower/bower/js/lib/jquery/dist/jquery.js' ] }
检查结果1
$ cat index.html
1 | <html> |
可见,jquery.js 被加载到了 HTML 中;javascript 加载到指定的注释块 <!-- bower:js --> 中;而 css 将会加载到 <!-- bower:css--> 中。
疑问,
- 这样做,会把所有的 bower components 都注入,如果我只想部分注入呢?
这个理解本身有问题,How it Works 中详细介绍了,Wiredep 只是根据其 dependencies 去加载依赖包,而不是从 bower_components 中加载所有。 - 另外,我要把所有的 bower components 压缩成一个文件,然后注入到 index.html 中,该如何实现呢?
http://stackoverflow.com/questions/16761272/how-to-configure-grunt-to-replace-bower-dependencies-by-its-minified-versions
How it Works
Installing a Bower package with –save will add the package as a dependency in your project’s bower.json file. This library reads that file, then reads the bower.json files for each of those dependencies. Based on these connections, it determines the order your scripts must be included before injecting them between placeholders in your source code.
- Wiredep 根据 bower.json 中所配置的 dependency 来进行加载;
- 解析依赖关系,并根据依赖关系进行加载
那么,如何控制加载顺序呢?比如依赖 jQuery 的包 _A_ 必须在 jQuery 加载后加载;这个时候,Wiredep 会通过 _A_ 中的 bower.json 的 dependency 属性的关联关系中判断出应该首先加载其依赖包 jQuery,这样保证了,jQuery 一定是在 _A_ 之前加载的。
Grunt Wiredep
作用
Inject Bower packages into your source code with Grunt.
Reference to Wiredep
初始化
1 | $ npm install --save-dev grunt-wiredep |
1 | grunt.loadNpmTasks('grunt-wiredep'); |
Grunt Wiredep Quick Example
http://stephenplusplus.github.io/grunt-wiredep/
包默认安装路径
当前版本的Bower默认会将包的安装路径设置到 js/lib中,可以通过 .bowerrc 配置文件来更改其行为,具体操作参考 Bower Directory
Grunt Filerev
References
https://github.com/yeoman/grunt-filerev
https://www.npmjs.com/package/grunt-filerev
作用
Static asset revisioning through file content hash
这是官网的解释,我来试着翻译一下,通过文档内容的哈希值来revisioning静态资源。我已经尽力去取翻译了,但是还是很抽象,怎么来理解呢?举个例子,当你有一个 javascript helloworld.js 处于开发之中,你发布了两个版本了,但是脚本名称都是叫做 helloworld.js,结果客户端有缓存,发现名称相同,于是就没有更新旧有的缓存,也就导致了,新版本发布的 helloworld.js 在客户端失效;有木有过这个痛苦,以前在开发前端代码的时候,常常需要清理浏览器的缓存,来加载新版本的 helloworld.js 才能使得新版在浏览器生效,这真是一种痛苦不堪的经历呀。好了,现在我们有了filerev了,它的作用其实很简单,根据 helloworld.js 的文档内容,生成唯一的hash code,然后将 helloworld.js 重命名为 helloworld.hashcode.js (比如 helloworld.12DF3MS.js ),然后你的 helloworld.js 有新版的发布,内容也发生了变化,那么通过filerev就会再新生成一个hashcode并将 helloworld.js 重命名为 helloworld.FDA2EDF.js;两个版本的 helloworld.js 对应了不同的后缀名,这样就会迫使前端浏览器加载新版本的 helloworld.js (这下算是彻底搞清楚了~~~~ :) )
初始化
1 | $ npm install --save-dev grunt-filerev |
Filerev Quick Example
项目目录结构1
2
3
4
5
6
7img
├── test1.png
├── test2.jpg
└── test3.gif
dist
Gruntfile.js
pakcage.json
Gruntfile.js1
2
3
4
5
6
7
8
9
10
11
12
13
14
15
16
17
18
19
20
21
22
23
24
25;
module.exports = function (grunt) {
grunt.initConfig({
filerev: {
options: {
algorithm: 'md5',
length: 8
},
images: {
src: 'img/**/*.{jpg,jpeg,gif,png,webp}',
dest: 'dist'
}
}
});
grunt.loadNpmTasks('grunt-filerev');
}
options.algorithm
表明采用md5算法来根据图片的内容计算出版本号既revved version num.
options.length
表示版本号的长度
images.src
表明需要被转换的源文件。
images.dest
这个属性不是必填的,但是如果不填,filerev会直接用revved version直接替换到src的源文件;这个是大多数情况下不期望的行为。
执行并验证其结果
执行1
$ grunt filerev
结果1
2
3
4
5
6
7
8
9
10img
├── test1.png
├── test2.jpg
└── test3.gif
dist
├── test1.84f8ce96.png
├── test2.3ca48b99.jpg
└── test3.21b26bdd.gif
Gruntfile.js
pakcage.json
可以看到,dist中输出了源文件的revved version版本。
Grunt Usemin
是yeoman孵化的一个组件,
References
https://github.com/yeoman/grunt-usemin
作用
Replaces references from non-optimized scripts, stylesheets and other assets to their optimized version within a set of HTML files (or any templates/views).
用处非常直白,就是把non-optimized代码文件替换为optimized版本的代码文件;这里的optimized通常就是指压缩、合并以后的文件。
简单的例子
目录结构1
2
3
4
5
6
7
8
9
10app
├── assets
│ └── js
│ ├── bar.js
│ └── foo.js
└── index.html
dist
├── ...
Gruntfile.js
package.json
index.html1
2
3
4
5
6
7
8
9
10
11
12
13
14
<html lang="en" ng-app="grunttest">
<head>
<meta charset="utf-8">
<title>grunt-connect</title>
</head>
<body>
<!-- build:js assets/js/optimized.js -->
<script src="assets/js/foo.js"></script>
<script src="assets/js/bar.js"></script>
<!-- endbuild -->
<h1>Hello World, Grunt Live Reload!</h1>
</body>
</html>
期望达到的目的
- _合并_
foo.js和bar.js,并 _压缩_ 成一个文件optimized.js,并输出到 dist/app/assets/js/optimized.js - 当发布
index.html后,用optimized.js来替换index.html中的foo.js和bar.js
Gruntfile.js1
2
3
4
5
6
7
8
9
10
11
12
13
14
15
16
17
18
19
20
21
22
23
24
25
26
27
28
29
30
31
32
33
34
35
36
37
38
39
40
41
42
43
44
45
46
47
48
49
50
51
52
53
54
55
56
57module.exports = function(grunt) {
// Project configuration.
grunt.initConfig({
pkg: grunt.file.readJSON('package.json'),
copy: {
html: {
expand: true,
src: ['app/index.html'], // 会把 app 文件夹 + 文件 复制过去
dest: 'dist'
}
},
useminPrepare: {
html: 'app/index.html',
options: {
dest: 'dist/app' // 指定替换文件所在的根路径(既 optimized.js 所在的根路径)
}
},
filerev: {
options: {
algorithm: 'md5', // 使用 md5 生成 revved version
length: 8
},
js: {
src: 'dist/app/assets/js/*.js', // revved the optimized.js
dest: 'dist/app/assets/js/'
}
},
usemin: {
html: 'dist/app/index.html', // 注意,这里是替换 dist 下的 index.html
options: {
assetsDirs: ['dist/app'] // 指定 revved version 文件所在的根路径
}
}
});
grunt.loadNpmTasks('grunt-copy');
grunt.loadNpmTasks('grunt-usemin');
grunt.loadNpmTasks('grunt-contrib-concat');
grunt.loadNpmTasks('grunt-contrib-uglify');
grunt.loadNpmTasks('grunt-filerev');
grunt.registerTask('build', [
'copy',
'useminPrepare',
'concat',
'uglify',
'filerev',
'usemin'
]);
};
将 index.html 通过
copy拷贝到 dist 目录中
目的是,不在源文件上做Usemin相关的替换动作。useminPrepare将会生成concat,uglify以及cssmin等的配置代码,形成一个压缩流,称作flow
这里很容易被混淆,useminPrepare其实并不做其它的事情,它只是生成concat、uglify和cssmin对应的配置脚本,所以,我们仍然需要注册concat、uglify、cssmin任务。usemin,这里好玩了,它先后干了两件事情用 optmized.js 替换 foo.js 和 bar.js
1
2
3
4<!-- build:js assets/js/optimized.js -->
<script src="assets/js/foo.js"></script>
<script src="assets/js/bar.js"></script>
<!-- endbuild -->替换后,生成
1
<script src="assets/js/optimized.js"></script>
注意,这里的替换过程较为复杂,首先是通过
useminPrepare根据注释(build:js assets/js/optimized.js) 的约定,将foo.js和bar.js压缩并打包为optimized.js,放置到dist/app/asserts/js/optimized.js;然后通过usemin任务,从useminPrepare任务所规定的dest目录中(既 assets/app)去找到optimized.js(既找到dist/app/asserts/js/optimized.js),然后用它来替换foo.js和bar.js,重要的事情再说一遍,是从从useminPrepare任务所规定的dest的目录中(既 assets/app)去找到optimized.js。用
optimized.js的 revved version 去替换自己
这里去替换的时候,查找的根路径是由usemin的配置assetsDirs决定的,既 dist/app。这里踩过的坑,就是,混淆了 revved version 和 optimized 替换时的根路径,以为都是usemin的assetDirs决定的,非也,optimized 替换的时候,使用的是useminPrepare中dest所定义的根路径,而 revved version 使用的是usemin中所配置的assetsDirs路径。
执行
安装模块1
2
3
4
5
6$ npm install grunt --save-dev
$ npm install grunt-copy --save-dev
$ npm install grunt-filerev --save-dev
$ npm install grunt-usemin --save-dev
$ npm install grunt-contrib-concat --save-dev
$ npm install grunt-contrib-uglify --save-dev
执行任务1
2
3
4
5
6
7
8
9
10
11
12
13
14
15
16
17
18
19$ grunt build
Running "copy:html" (copy) task
File "dist/app/index.html" created.
Running "useminPrepare:html" (useminPrepare) task
Configuration changed \for concat, uglify, cssmin
Running "concat:generated" (concat) task
Running "uglify:generated" (uglify) task
File "dist/assets/js/optimized.js" created.
Running "filerev:js" (filerev) task
Revved 2 files
Running "usemin:html" (usemin) task
Replaced 1 reference to assets
Done
验证结果
build 后 dist 目录结构1
2
3
4
5
6
7
8$ tree -- dist
dist
└── app
├── assets
│ └── js
│ ├── optimized.c7df0271.js
│ └── optimized.js
└── index.html
dist/assets/js/optimized.js1
function foo(){alert("Hello, I'm Foo")}function bar(){alert("Hello, I'm Bar")}
index.html1
2
3
4
5
6
7
8
9
10<html lang="en" ng-app="grunttest">
<head>
<meta charset="utf-8">
<title>grunt-connect</title>
</head>
<body>
<script src="assets/js/optimized.c7df0271.js"></script>
<h1>Hello World, Grunt Live Reload!</h1>
</body>
</html>.macdeMacBook-Pro:usemin
Ok,首先,我们的foo.js和bar.js都成功的被optimized了;然后,filerev通过算法md5将 optimized.js 生成其文件签名(并附属在文件名上这就是 revved version);最后,通过usemin用 revved version optimized.c7df0271.js 替换掉 dist/app/index.html 中所引用的 optimized.js。这样最大的好处是,如果某个 js 文件有改动,并有新版发布( revved version )会强制更新用户的浏览器。
备注,通过$ cat dist/app/index.html中可以看到生成的 index.html最后有块被隐藏的签名,为什么这么设计,I don’t know
Grunt UseminPrepare
useminPreparetask updates the grunt configuration to apply a configuredtransformation flowto tagged files (i.e. blocks). By default the transformation flow is composed ofconcatanduglifyfor JS files, but it can be configured.
实话,读了几遍官网的描述,都是云里雾里,不知道真的它要干嘛;后来找了几个比较好的例子实践以后,方才知道,它的作用就只是在 Gruntfile.js 中生成concat、uglify等配置脚本;省去你去配置的步骤而已。对了,官网中强调了transformation flow,但我只看到了transformation,既是生成concat、uglify等任务的脚本,但是flow呢?我的实践中发现,这个flow实际上是需要自己在 grunt.registerTask 中自己去配置的(谁先谁后)…. 搞懂了,是配置文件依赖所依赖的流见 Transformation flow
块 Blocks
块是什么?其实就是 html 代码中的一个代码段,但,这个代码段是通过UseminPrepare的注释标注的。1
2
3<!-- build:<type>(alternate search path) <path> -->
... HTML Markup, list of script / link tags.
<!-- endbuild -->
type: can be _js_, css or a custom type with a block replacement function defined
如果指定的是 _js_,那么对应的是 concat 和 uglify
如果指定的是 css,那么对应的是 concat 和 cssmin
- If another type, the block will be ignored. Useful for “development only” blocks that won’t appear in your build
alternate search path: (optional) By default the input files are relative to the treated file. Alternate search path allows one to change that。
意思是,原本 input files 是从当前的文件目录中去 search;但是,Alternate search path 允许你修改这一行为,允许从其它的路径中去 search。path: the file path of the optimized file, the target output
指定优化过后的文件(optimized file)的输出路径
_例子_1
2
3
4
5
6<!-- build:js js/app.js -->
<script src="js/app.js"></script>
<script src="js/controllers/thing-controller.js"></script>
<script src="js/models/thing-model.js"></script>
<script src="js/views/thing-view.js"></script>
<!-- endbuild -->
<!-- build --> ... <!-- endbuild >
表示 useminPrepare 所能够识别的代码块,既是 Blocks
这里也就表示,需要处理的四个文件 app.js,thing-controller.js …build:js
表示要进行处理的是 javascript 文件。js/app.js
表示经过concat和uglify后的输出文件是js/app.js
Transformation flow
The transformation flow is made of sequential steps: each of the steps transform the file, and useminPrepare will modify the configuration in order for the described steps to be correctly performed.
By default the flow is:
concat -> uglify. Additionally to the flow, at the end, some postprocessors can be launched to further alter the configuration.
Ok, 这下我大致明白为什么需要 Transformation flow 了,它并不是去帮你定义 concat、uglify、cssmin 等任务的执行顺序,而是需要根据这个 flow 来控制其配置文件的内容该如何生成,比如设置了 concat -> uglify 这样一个 flow,那么 uglify 就需要依赖 concat 的输出来生成其对应的脚本;所以,我的理解是,Transformation flow 其实只是配置文件生成所依赖的流而已。
example
html
1
2
3
4
5
6<!-- build:js js/app.js -->
<script src="js/app.js"></script>
<script src="js/controllers/thing-controller.js"></script>
<script src="js/models/thing-model.js"></script>
<script src="js/views/thing-view.js"></script>
<!-- endbuild -->useminPrepare
1
2
3
4
5
6useminPrepare: {
html: 'app/index.html', // useminPrepare 需要读取文件中的注释来决定输出行为
options: {
dest: 'dist'
}
},生成的 concat 和 uglify 配置文件
1
2
3
4
5
6
7
8
9
10
11
12
13
14
15
16
17
18
19
20
21
22
23
24
25
26
27{
concat: {
generated: {
files: [
{
dest: '.tmp/concat/js/app.js',
src: [
'app/js/app.js',
'app/js/controllers/thing-controller.js',
'app/js/models/thing-model.js',
'app/js/views/thing-view.js'
]
}
]
}
},
uglify: {
generated: {
files: [
{
dest: 'dist/js/app.js',
src: [ '.tmp/concat/js/app.js' ]
}
]
}
}
}可见,uglify 需要依赖 concat 的输出来进行压缩。
Directories
sample 1
从 root 路径中寻找 index.html,默认是从项目的根路径中进行寻找,可以修改 root属性进行重新定义。1
2
3useminPrepare: {
html: 'index.html'
}
sample 2
可以对不同的文件定义不同的 Tranformation flow1
2
3
4
5
6
7
8useminPrepare: {
foo: {
src: ['index.html', 'another.html']
},
bar: {
src: 'index.html'
}
}
Options
dest
Type: string
Default: nilBase directory where the transformed files should be output.
staging
Type: string
Default: .tmpBase directory where the temporary files should be output (e.g. concatenated files).
root
Type: string, array
Default: nullThe root directory from which your files will be resolved.
默认是从项目的根路径开始,既是包含 Gruntfile.js 的路径;可以通过该属性进行重定位。
flow
Type:
object
Default:{ steps: { js: ['concat', 'uglify'], css: ['concat', 'cssmin'] }, post: {} }This allow you to configure the workflow, either on a per-target basis, or for all the targets. You can change the
stepsor the post-processors (post) separately.
自定义 flow 最大的好处,是可以自定义相关行为,
For examples,
to change the js steps and post for the
target html:1
2
3
4
5
6
7
8
9
10
11
12
13
14useminPrepare: {
html: 'index.html',
html2: 'hello.html'
options: {
flow: {
html: {
steps: {
js: ['uglify']
},
post: {}
}
}
}
}针对 target
html不进行合并了,只进行压缩.. 注意,这里只修改该 html target 的行为,言外之意 html2 target 仍然使用的是默认行为,既是 concat 和 uglifyto change the js steps and post for
all targets:1
2
3
4
5
6
7
8
9
10
11
12useminPrepare: {
html: 'index.html',
html2: 'hello.html'
options: {
flow: {
steps: {
js: ['uglify']
},
post: {}
}
}
}改变所有 target 的行为。
Grunt Usemin
The
usemintask has 2 actions:
- First it replaces all the blocks with a single “summary” line, pointing to a file creating by the transformation flow.
第一件事情,它将用tranformation flow转换生成后的文件替换 Blocks 中的内容。- Then it looks for references to assets (i.e. images, scripts, …), and tries to replace them with their revved version if it can find one on disk
然后,它将会从 assets 路径中寻找匹配的文件,将他们替换为与其匹配的 revved version 版本的文件
Finding assets
By default
useminwill look for a map object created by grunt-filerev, located ingrunt.filerev.summary. If it does not find it it will revert to disk lookup which is longer.Note that by using the
options.revmap(see below), you can furnish a map object.
该章节描述,如何去寻找 assets;是吧,看得云里雾里;官网没有说明,这是针对哪个步骤,这是针对 Grunt Usemin 所描述的第二个步骤,意思是,去寻找 revved version 来替换掉当前版本的步骤;这里介绍的就是,它会如何去寻找;那么既然使用的是 grunt-filerev,那么自然需要根据 grunt-filerev 的规定来进行寻找,grunt-filerev 定义了一个 map 映射的关系。
On directories
When
usemintries to replace referenced assets with their revved version it has to look at a collection of directories (asset search paths): for each of the directories of this collection it will look at the below tree, and try to find the revved version. This asset search directories collection is by default set to the location of the file that is scrutinized(这里指 html 打包发布的路径,一般指 dist/html) but can be modified (see Options below).
当usemin试图去用 revved version 替换的时候,它会从一组 _路径_ 中取寻找可用的 revved version 的文件,会遍历每一个 _路径_(包含子路径)去寻找对应的 revved version;默认是从 dist/html 路径中去寻找 revved version,当然这个路径可以通过 options.assetsDirs 更改。
Example,
File dist/html/index.html has the following content:1
2<link rel="stylesheet" href="styles/main.css">
<img src="../images/test.png">
默认情况下,usemin将会从dist/html中去寻找 revved version,
styles/main.css
将会从默认的路径dist/html/styles/包中去寻找main.css的 revved version ,比如 dist/html/styles/main.1234.css../images/test.png
将会从默认的路径dist/html中上一级目录的styles/images/包,既dist/styles/images/,中去寻找test.png的 revved version。
Options
assetsDirs
Type:
array
Default: Single item array set to the value of the directory where the currently looked at file is.List of directories where we should start to look for revved version of the assets referenced in the currently looked at file.
自定义 revved version 的寻找路径,可以是一个数组。
Example1
2
3
4
5
6usemin: {
html: 'build/index.html',
options: {
assetsDirs: ['foo/bar', 'bar']
}
}
举个例子,如果你的 index.html 中引用了 /images/foo.png,usemin将会依次从assetsDirs中去寻找对应的 revved version,比如
- foo/bar/images/foo.12345678.png
- bar/images/foo.12345678.png
先从 foo/bar/images/ 中去寻找,然后从 bar/images/ 路径中去寻找。
patterns
Type:
object
Default:{}Allows for user defined pattern to replace reference to files. For example, let’s suppose that you want to replace all references to
'image.png'in your Javascript files by the revved version ofimage.pngfound below the directoryimages.By specifying something along the lines of:
1 | usemin: { |
可以通过patterns自定义转换的规则,上面的这个例子很好的说明了这点,只用 revved version 去替换所有 javascript 文件中的名字为 image.png 的文件。值得注意的是,usemin 默认情况下,是会用 revved version 去替换所有与之匹配的被引用的图片,脚本文件等,这里,通过pattern的方式就很好的限定了它的行为。不过,在使用它的时候,需要注意以下两点,
- key in pattern should match the target (e.g js key for the target js)
这里的意思是,patterns 中定义的 key (_js_) 必须与 Target (_js_) 的名字相同- Each pattern is an array of arrays. These arrays are composed of 4 items (last 2 are optional):
- First one if the regexp to use. The first group is the one that is supposed to represent the file reference to replace
- Second one is a logging string
- A function which behaves like a filter-in. Receives the matched group and must return the file path of the asset. Great functionality when you have a compiled file by a template engine.
- A function which behaves like a filter-out. It receives the revved path of the asset and must return it as an url from it will be reached from web server.
revmap
Type: string
Default: ''
Indicate the location of a map file, as produced by
grunt-filerevfor example. This map file is a simple JSON file, holding an object which attributes are the original file and associated value is the transformed file.
For example:1
2
3{
"foo.png": "foo.1234.png"
}
This map will be used instead of looking for file on the disk.
这样的话,就只会用 revved version foo.1234.png 去替换 foo.png 了,如果有其它的另外的 revved version 就不会去替换了。
认真看过 grunt-filerev 过后,方才知道,上述的理解是错误的,这个其实就是当filerev在转换的时候,由grunt.filerev.summary保存的一个值,该值是一个map,而这个map保存了当前相互转换的关系,主要是用于调试。