前言
此篇博文是笔者所总结的 Docker 系列之一;
本文为作者的原创作品,转载需注明出处;
安装
Ubuntu 上安装 Docker
从 Ubuntu 官方安装步骤上翻译;
前置条件
安装有两个重要的前提
- Docker 只能在 64 位 linux 操作系统上安装
- Docker 需要在 3.10 或者更高版本的内核版本上进行安装。如果内核版本低于 3.10,会丧失 Docker Container 的一些特性,并且会引入一些 bug,比如文件丢失等; 通过
uname -r检查你的内核版本1
2mac@ubuntu:~$ uname -r
4.8.0-22-generic
更新你的 apt sources
更新 apt 包,保证 APT 能够使用 https
1
2$ sudo apt-get update
$ sudo apt-get install apt-transport-https ca-certificates添加 PGP Key
1
2
3$ sudo apt-key adv \
--keyserver hkp://ha.pool.sks-keyservers.net:80 \
--recv-keys 58118E89F3A912897C070ADBF76221572C52609D参考如下的表格,查找于你的 Ubuntu 版本对应的 Repository,用来决定 APT 将会从哪个 Reposiroty 中查找 Docker 安装包;建议使用一个长期维护的 LTS 版本的 Reposiroty
| Ubuntu Version | Repository |
|---|---|
| Precise 12.04 (LTS) | deb https://apt.dockerproject.org/repo ubuntu-precise main |
| Trusty 14.04 (LTS) | deb https://apt.dockerproject.org/repo ubuntu-trusty main |
| Wily 15.10 | deb https://apt.dockerproject.org/repo ubuntu-wily main |
| Xenial 16.04 (LTS) | deb https://apt.dockerproject.org/repo ubuntu-xenial main |
将对应的源 repo 添加到 APT 中
1
$ echo "deb https://apt.dockerproject.org/repo ubuntu-xenial" | sudo tee /etc/apt/sources.list.d/docker.list
我的版本是 16.10,所以这里选择了一个最接近的
更新 APT index
1
sudo apt-get udpate
检查 APT 是否是从正确的 repository 中进行拉取的
1
2
3
4
5
6
7
8
9
10
11
12
13$ apt-cache policy docker-engine
docker-engine:
Installed: 1.12.2-0~trusty
Candidate: 1.12.2-0~trusty
Version table:
*** 1.12.2-0~trusty 0
500 https://apt.dockerproject.org/repo/ ubuntu-trusty/main amd64 Packages
100 /var/lib/dpkg/status
1.12.1-0~trusty 0
500 https://apt.dockerproject.org/repo/ ubuntu-trusty/main amd64 Packages
1.12.0-0~trusty 0
500 https://apt.dockerproject.org/repo/ ubuntu-trusty/main amd64 Packages*** 标志表示当前 repository 中所包含的 Docker 版本信息,这里显示的是1.12.0,且每一个路径中应当包含路径 https://apt.dockerproject.org/repo/,则表示 APT Repository 设置无误。
安装 linux-image-extra-* 内核
安装 linux-image-extra-* 内核,允许你使用 aufs 存储引擎,(只针对 Ubuntu Xenial 16.04 (LTS), Wily 15.10, Trusty 14.04 (LTS) 版本 )
1 | $ sudo apt-get install linux-image-extra-$(uname -r) linux-image-extra-virtual |
安装最新版 Docker
更新 APT Package index
1 | $ sudo apt-get update |
安装 Docker
1 | $ sudo apt-get install docker-engine |
启动 Docker Daemon 守护进程
1 | $ sudo service docker start |
通过运行 hello-world image 来检查是否安装成功
1 | mac@ubuntu:~$ docker run hello-world |
用非 root 用户来管理 Docker
因为 docker 守护进程是绑定在 Unix socket 上而不是 TCP 端口上,默认情况下,Unix socket 是由 root 用户所拥有,其它的用户只能通过 sudo 进行访问;也正因如此,docker 的守护进程是运行在 root 用户上的。
如果,你不希望使用 sudo 来执行 docker 的命令,那么你需要创建一个名叫 docker 的 Unix 用户组然后将用户加入。当 docker 的守护进程启动以后,它将会把 Unix socket 绑定在 docker 用户组上。
注意,docker group 相当于 root 用户,要知道有什么安全隐患,查看Dock Attack Surface
1 | $ sudo groupadd docker |
验证
1 | $ docker run hello-world |
如果执行失败,你会看到如下的错误Cannot connect to the Docker daemon. Is 'docker daemon' running on this host?
Check whether the DOCKER_HOST environment variable is set for your shell.
1 | $ env | grep DOCKER_HOST |
If it is set, the above command will return a result. If so, unset it.
1 | $ unset DOCKER_HOST |
You may need to edit your environment in files such as ~/.bashrc or ~/.profile to prevent the DOCKER_HOST variable from being set erroneously.
卸载
卸载 Docker 包
1
$ sudo apt-get purge docker-engine
卸载 Docker 包依赖
1
$ sudo apt-get autoremove --purge docker-engine
删除 Containers, Images 或者自定义的配置文件等
1
$ rm -rf /var/lib/docker
docker 日志输出
1 | Ubuntu (old using upstart ) - /var/log/upstart/docker.log |
Docker 容器状态机
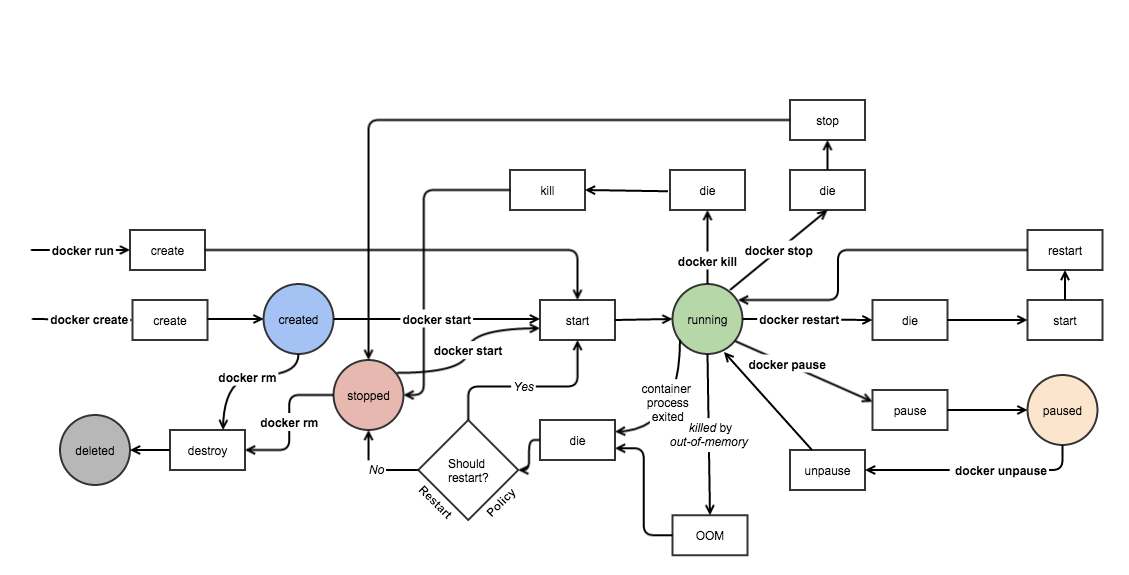
Docker 容器状态
created:表示已经被创建的容器,但还没有启动(既是没有进入 running 状态)
docker ps -a可以列出所有已经被创建的容器,Status 显示当前状态信息1
2
3
4
5
6mac@ubuntu:~$ docker ps -as
CONTAINER ID IMAGE COMMAND CREATED STATUS PORTS NAMES SIZE
fae5af17f0ba hello-world "/hello" 45 minutes ago Exited (0) 45 minutes ago romantic_noether 0 B (virtual 1.848 kB)
91d964aec9f7 hello-world "/hello" About an hour ago Exited (0) About an hour ago reverent_brattain 0 B (virtual 1.848 kB)
41d27e5b204f hello-world "/hello" About an hour ago Exited (0) About an hour ago distracted_tesla 0 B (virtual 1.848 kB)
2210b152b308 training/webapp "python app.py" 21 hours ago Created web31 0 B (virtual 348.8 MB)running:表示运行中的容器
docker ps可以列出所有正在 running 状态的 Docker 容器。1
2mac@ubuntu:~$ docker ps
CONTAINER ID IMAGE COMMAND CREATED STATUS PORTS NAMES可以看到,当前没有任何正在运行的容器。
- paused:容器的进程被暂停了。
- restarting:容器的进程正在重启过程中。
- exited:上图中的 stopped 状态,表示容器之前运行过但是现在处于停止状态(要区别于
created 状态,它是指一个新创出的尚未运行过的容器)。可以通过 start 命令使其重新进入 running 状态 - destroyed:容器被删除了,再也不存在了
查看当前容器的状态
可以使用docker inspect ContainerID查看当前容器的状态
1 | mac@ubuntu:~$ docker inspect fae5af17f0ba |
Docker 的命令大全
Docker 命令分类
镜像操作
1 | build Build an image from a Dockerfile |
容器及其中应用的生命周期操作
1 | create Create a new container (创建一个容器) |
容器文件系统操作
1 | # 基本文件操作 |
Docker registry 操作
1 | login Log in to a Docker registry. |
Volume 操作
1 | volume Manage Docker volumes |
网络操作
1 | network Manage Docker networks |
Swarm 操作
1 | swarm Manage Docker Swarm |
系统操作
1 | version Show the Docker version information |
常用的命令
生命周期相关
创建一个容器
创建一个名为 web31 的容器1
2mac@devstack:/home/mac# docker create --name web31 training/webapp python app.py
7465f4cb7c49555af32929bd1bc4213f5e72643c0116450e495b71c7ec128502容器状态为
created1
2root@devstack:/home/mac# docker inspect --format='{{.State.Status}}' web31
created启动容器
1
2root@devstack:/home/mac# docker start web31 #启动容器
web31容器的状态为
runnning1
2root@devstack:/home/mac# docker inspect --format='{{.State.Status}}' web31
running暂停容器
1
2root@devstack:/home/mac# docker pause web31 #暂停容器
web31容器状态为
paused1
2root@devstack:/home/mac# docker inspect --format='{{.State.Status}}' web31
paused继续容器
1
2root@devstack:/home/mac# docker unpause web31 #继续容器
web31容器状态为
runnning1
2root@devstack:/home/mac# docker inspect --format='{{.State.Status}}' web31
running停止容器
1
2root@devstack:/home/mac# docker stop newweb31 #停止容器
newweb31容器状态为
exited1
2root@devstack:/home/mac# docker inspect --format='{{.State.Status}}' newweb31
exited删除容器
1
2root@devstack:/home/mac# docker rm newweb31 #删除容器
newweb31容器状态为,错误,没有检查到该容器
1
2root@devstack:/home/mac# docker inspect --format='{{.State.Status}}' newweb31
Error: No such image, container or task: newweb31
重命名
1 | root@devstack:/home/mac# docker rename web31 newweb31 #重命名 |
查看容器中top进程
1 | root@devstack:/home/mac# docker top newweb31 #在容器中运行 top 命令 |
获取容器的日志
1 | root@devstack:/home/mac# docker logs newweb31 #获取容器的日志 |
深入理解 docker stop 和 docker kill
在docker stop 命令执行的时候,会先向容器中PID为1的进程发送系统信号 SIGTERM,然后等待容器中的应用程序终止执行,如果等待时间达到设定的超时时间(默认为 10秒,用户可以指定特定超时时长),会继续发送SIGKILL的系统信号强行kill掉进程。在容器中的应用程序,可以选择忽略和不处理SIGTERM信号,不过一旦达到超时时间,程序就会被系统强行kill掉,因为SIGKILL信号是直接发往系统内核的,应用程序没有机会去处理它
1 | docker stop web5 -t 20 # 等待 20 秒,然后发送 kill 命令 |
查看容器 web5 的日志
1 | 2016-09-16T16:01:18.206540853+08:00 container kill b3256ef1400a7f6a6f242e377a77af5e25d3b12237c4ee7c2e9b31a5f6437868 (image=training/webapp, name=web5, signal=15) |
能看到:
- 首先 docker 向容器发出 SIGTERM 信号(
signal=15) - 等待20秒 (01:18 到 01:38)
- 再发送 SIGKILL 系统信号 (
signal = 9) - 然后容器被杀掉了 (
die)
在 host 与 container 之间相互拷贝文件或者目录
从 host 拷贝文件到 container 的 /webapp 目录中
1
2
3
4mac@ubuntu:~$ docker ps
CONTAINER ID IMAGE COMMAND CREATED STATUS PORTS NAMES
2210b152b308 training/webapp "python app.py" 22 hours ago Up 4 minutes 5000/tcp web31
mac@ubuntu:/home/mac# docker cp /home/mac/testfile web31:/webapp从 container 中拷贝文件到 host 中
1
2
3mac@ubuntu:~$ docker cp web31:/opt/webapp/tests.py /home/mac
mac@ubuntu:~$ ls /home/mac
tests.py
docker export 和 import
docker export
将一个容器整个文件系统打包成一个压缩文件,给容器备份、或者导出文件以便深度分析;1
2
3
4
5
6
7
8
9
10
11
12mac@ubuntu:~$ docker export web31 -o /home/mac/docker_web31_backup.tar
mac@ubuntu:~$ ls -shAl /home/mac
total 324M
4.0K -rw------- 1 mac mac 1.8K Dec 20 12:34 .bash_history
4.0K -rw-r--r-- 1 mac mac 220 Dec 18 16:29 .bash_logout
4.0K -rw-r--r-- 1 mac mac 3.7K Dec 18 16:29 .bashrc
4.0K drwx------ 2 mac mac 4.0K Dec 18 16:32 .cache
324M -rw------- 1 mac mac 324M Dec 20 15:11 .docker_web31_backup
4.0K -rw-r--r-- 1 mac mac 655 Dec 18 16:29 .profile
0 -rw-r--r-- 1 mac mac 0 Dec 18 16:33 .sudo_as_admin_successful
4.0K -rw-r--r-- 1 mac mac 285 May 16 2015 tests.py
4.0K -rw------- 1 root root 1.6K Dec 19 11:18 .viminfo可以直接使用 tar 命令解压压缩文件
1
mac@ubuntu:~$ tar -xvf docker_web31_backup.tar
docker import
从一个压缩包中创建一个镜像1
2mac@ubuntu:/$ docker import /home/mac/docker_web31_backup.tar new_web31 -m "import a new image from the backup file"
sha256:81a66be74de5d63e3dd96d0e5e492cef14140ea9581a85662cfff19ceeb7c5c0可见,通过容器导出的备份文件,在本地新建了一个名为
new_web31的 docker 镜像。1
2
3mac@ubuntu:/$ docker history new_web31
IMAGE CREATED CREATED BY SIZE COMMENT
81a66be74de5 11 seconds ago 323.7 MB import a new image from the compressed file1
2
3
4
5mac@ubuntu:/$ docker images
REPOSITORY TAG IMAGE ID CREATED SIZE
new_web31 latest 81a66be74de5 32 seconds ago 323.7 MB
hello-world latest c54a2cc56cbb 5 months ago 1.848 kB
training/webapp latest 6fae60ef3446 19 months ago 348.8 MB
docker run
docker run 命令会创建一个容器并启动它,它也是包含很多的参数,按照用途将它们分类如下,
cgroups 和 namespace 相关
1 | --blkio-weight value Block IO (relative weight), between 10 and 1000 |
linux process capabilities 相关参数
1 | --cap-add value Add Linux capabilities (default []) |
容器运行模式和环境相关
1 | -d, --detach Run container in background and print container ID |
DNS 相关
1 | --dns value Set custom DNS servers (default []) |
健康检查相关
1 | --health-cmd string Command to run to check health |
IP 和端口
1 | --ip string Container IPv4 address (e.g. 172.30.100.104) |
Volume 相关
1 | -v, --volume value Bind mount a volume (default []) |
Network 有关
1 | --network string Connect a container to a network (default "default") |
日志有关
1 | --log-driver string Logging driver for the container |
交互性有关
1 | -a, --attach value Attach to STDIN, STDOUT or STDERR (default []) |
OOM 有关
1 | --oom-kill-disable Disable OOM Killer |
其它
1 | --detach-keys string Override the key sequence for detaching a container |